If you’ve worked with piano in the past and have struggled to get it to cut-through in your mixes, this tutorial is for you. I guarantee that you’ll be EQing piano in minutes after reading.
I’ll be teaching you how to EQ piano the easy way (globally) and the advanced way (by isolating each microphone and EQing them individually).
I’ll also be providing some piano EQ presets for the Logic Pro X Channel EQ to get you started.
However, you’ll realize that there’s only 1 EQ manoeuvre that’s responsible for 99% of the result we’re aiming for. In other words, you might not even need the presets if you’re in a rush!
Did that grab your attention? Well, let’s get started then…
- EQing Piano VSTs vs The Real Thing
- What Should I Do BEFORE EQing Piano?
- 6 Steps To EQ Piano in Logic Pro X [beginner]
- 12 Steps To EQ Piano in Logic Pro X [advanced]
- EQ Settings for Piano: Downloadable Presets
- Summary: How To EQ Piano in Logic Pro X
EQing Piano VSTs vs The Real Thing
If you’re recording music in your home studio, chances are you’re not using an actual upright piano and definitely not a grand piano.
You’re probably using a software instrument like Arturia V Collection 8, Keyscapes, etc…
Either way, you SHOULD have control over the type of microphone(s), the placement and even the type of room you’re recording in.
That’s important because there’s only so much we can do with EQ in post-production.
We can already start shaping the sound BEFORE we start adding plugins.
For example, take a look at the Piano V from Arturia V Collection…
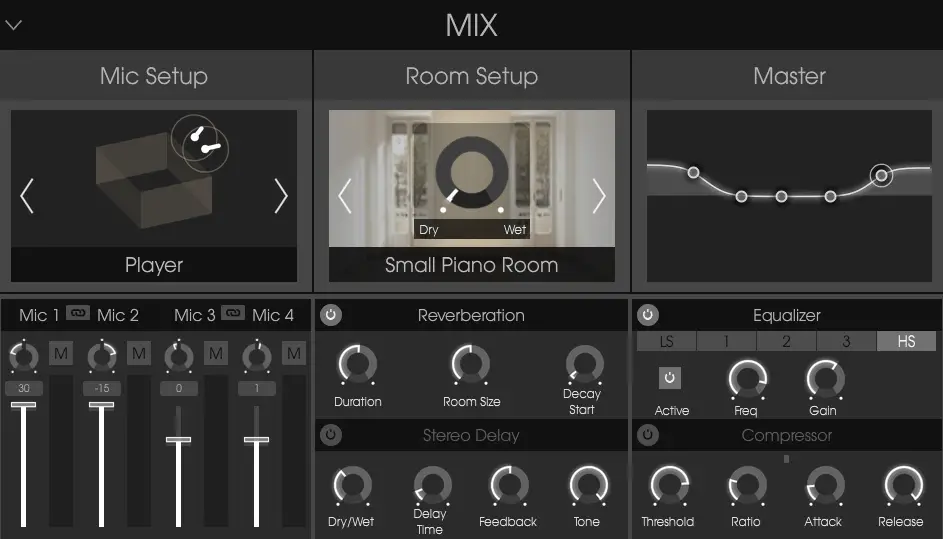
You can change the type of room, microphone configuration and it even has a built-in EQ!
That’s one of the many advantages of working with high-quality software instruments.
Of course, it’ll be impossible to change your mind AFTER you’ve recorded a physical piano with microphones. That’s why taking the time to get a good sound is even more important.
That being said, you can check out THIS article to find out how to do just that.
If you ask me though… Save yourself the trouble and just use a software instrument.
What Should I Do BEFORE EQing Piano?
Depending on what you’re working with, you might have more than one piano track.
For example, you might have a left and a right channel (or maybe even 4 channels).
Of course, that might not be the case if you’re using a software instrument like Arturia V Collection since it all gets routed to the same stereo output.
However, some software instruments like EastWest Composer Cloud allow you to route each virtual microphone to a different output.
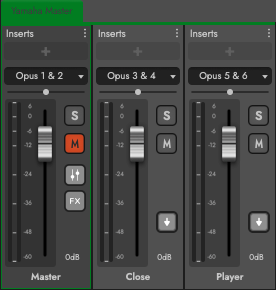
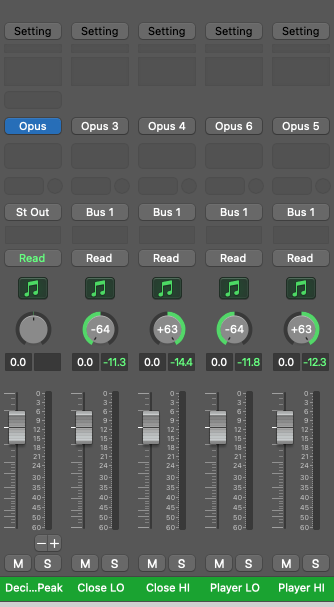
I highly recommend doing this to have maximum control when it comes to EQ.
Each position will need to be EQed differently.
For example, the “close” and “player” microphone positions need to be treated differently. The left microphone (bass-side) will also behave differently than the right microphone (treble-side).
If you don’t have that option though, don’t worry!
We’ll be routing our individual channels to a sub-mix either way.
You can skip the advanced EQ steps if you want because we’re starting with the basics first…
6 Steps To EQ Piano in Logic Pro X [beginner]
We’re starting with the simplest method which is just to route every microphone to the same bus.
It might already be done for you, but we’re just going to EQ the piano mix globally. We’ll learn how to EQ different microphone positions in the next section!
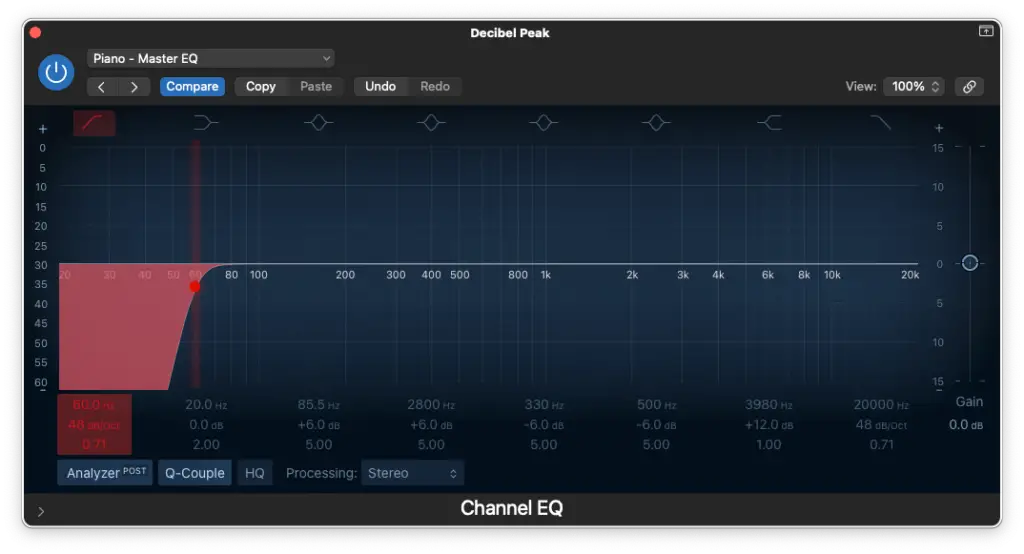
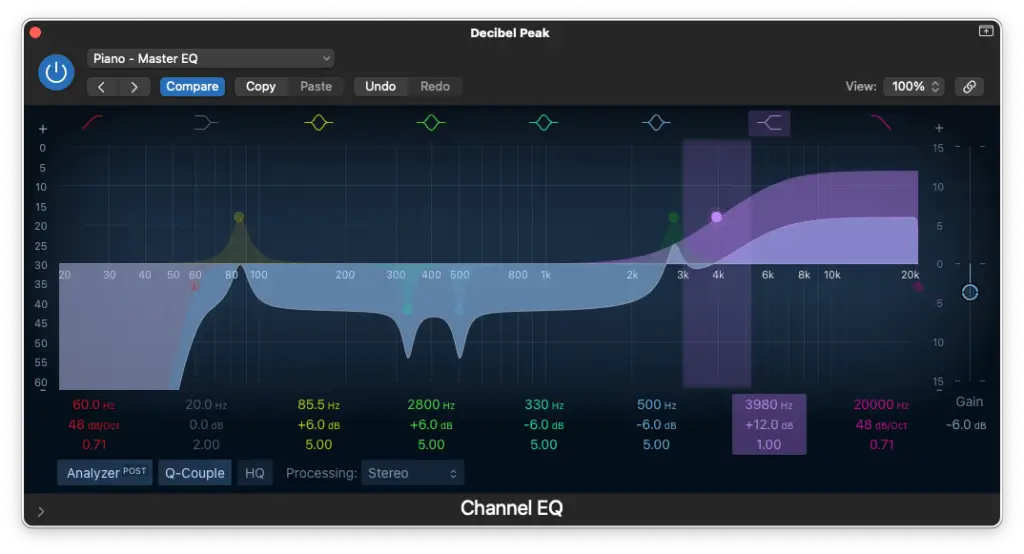
Step 1 – High-Pass Filter around 60 Hz – 80 Hz
This first EQ manoeuvre will depend on the type of mix you’re working with. Piano doesn’t really produce much sub-bass frequencies and they’d most likely clutter up the mix anyway.
If it’s a solo piano performance, you could skip this step or cut around 20 Hz – 40 Hz.
Step 2 – Low-Pass Filter at 20,000 Hz
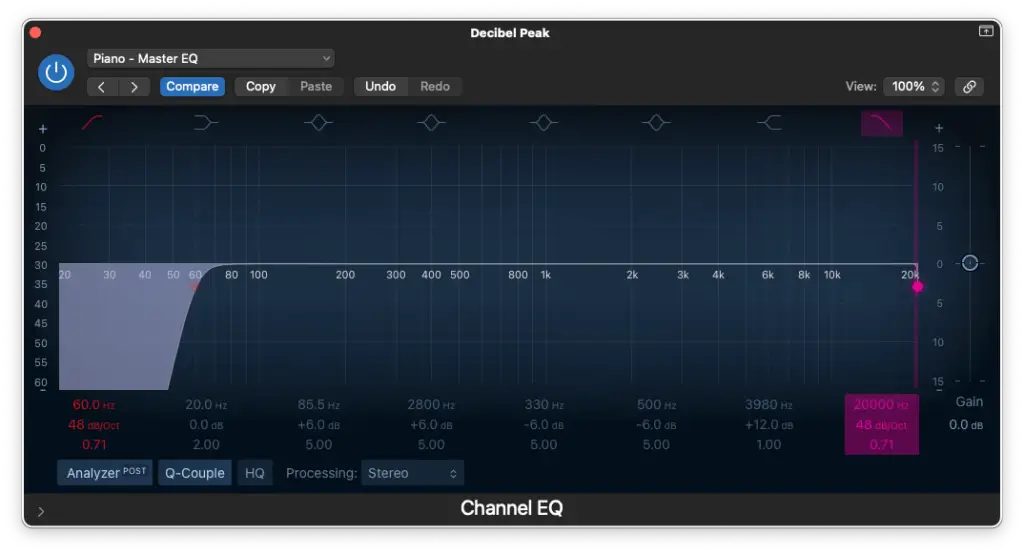
The next one is merely for good practice because you won’t hear a difference. I don’t recommend cutting any lower than this because piano has lots going on in the high frequencies.
It’ll just remove any potential artifacts/aliasing above 20,000 Hz.
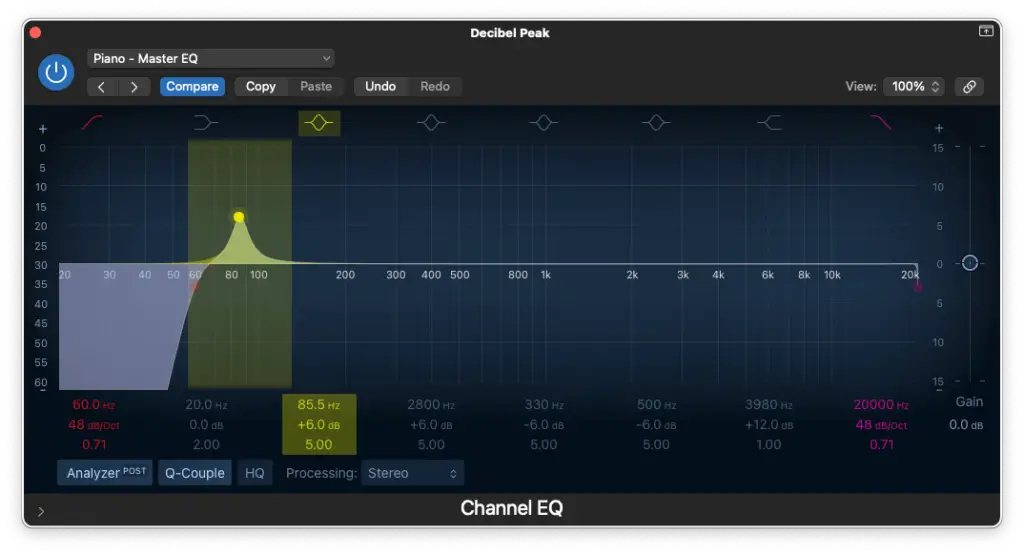
Step 3 – Boosting/Cutting around 80 Hz – 120 Hz
Depending on how close the microphones are to the piano, you might need more “boominess” if the microphones were not positioned close enough to the strings.
You’ll need to use your ears for this one and it also depends on what your mix needs.
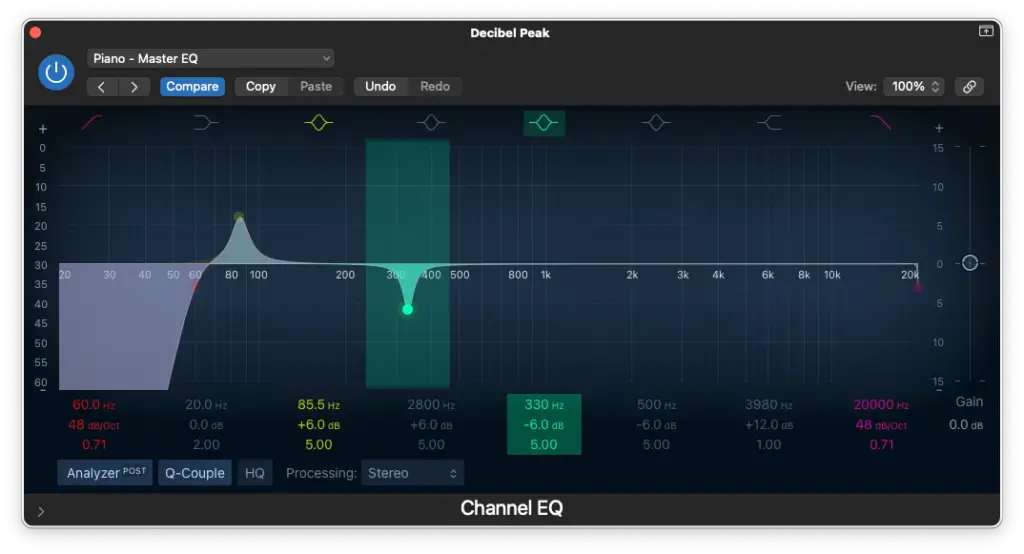
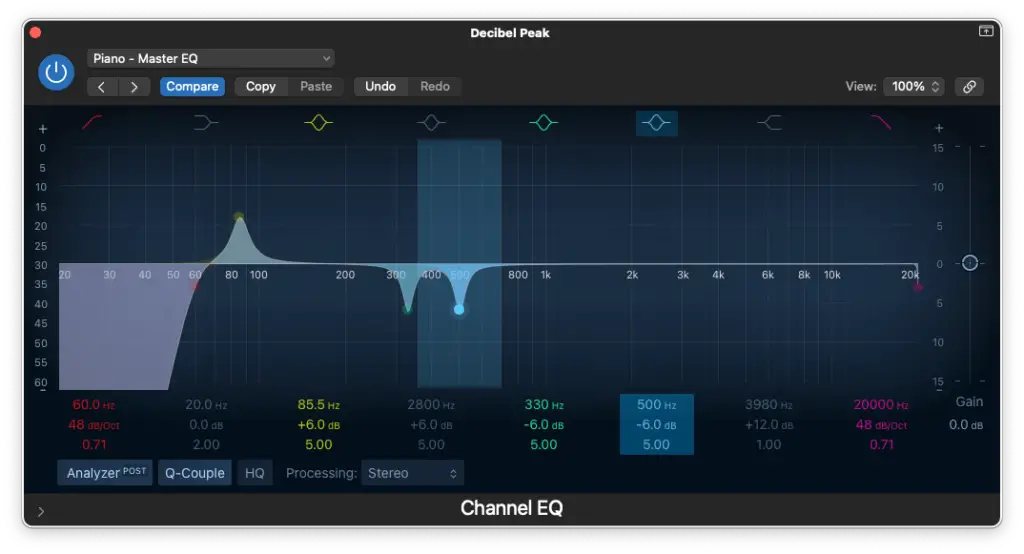
Step 4 – Cutting between 200 Hz – 500 Hz
Generally speaking, the piano takes up too much space in the mids. You may actually one to make a few cuts in this area depending on what instruments you’ve got in your mix.
I recommend keeping the Q narrow to make precise adjustments.
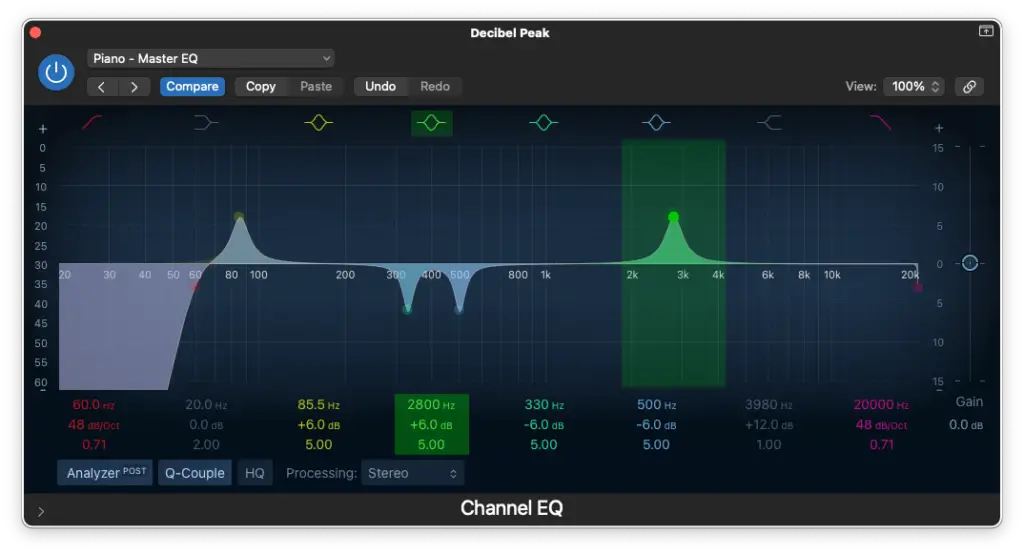
Step 5 – Boosting around 1,000 Hz – 2,000 Hz
This step is pretty important because one of the keys to getting your piano to stand out in the mix is boosting somewhere in this area. That’s where the sound of the hammer is!
You choose which sound you like best. For example, 1,000 Hz gives you one sound and an octave above (2,000 Hz) would give you a different sound.
Step 6 – High-Shelf Boost around 4,000 Hz
Now, this step is actually the most important and not something I usually do. I’m talking about boosting more than +6 dB (+12 dB in this case).
It might sound excessive, but trust me… These are the frequencies that make the piano shine!
You can actually drop the master gain on your EQ plugin -6 dB to compensate.
12 Steps To EQ Piano in Logic Pro X [advanced]
Okay, now we’re going to add some more precision to our mix. Technically, this part should be done BEFORE the global EQ we did in the previous section which you can now apply to the piano sub-mix.
In this case, we’ll be working with the “close” microphone position.
Once you have your left/right microphones separated, we’re ready to begin…
Close Microphone Position (Left/Low)
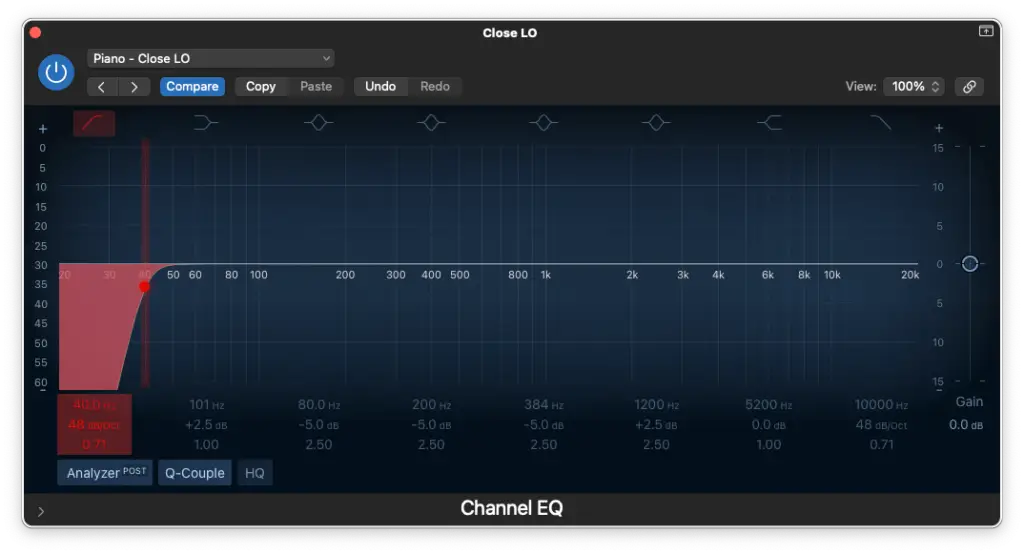
Step 1 – High-Pass Filter around 40 Hz – 60 Hz
In this case, we can probably get a little more sub-bass if you need it since we’re close enough.
If not, then you can just cut at 60 Hz.
Step 2 – Low-Pass Filter at 10,000 Hz
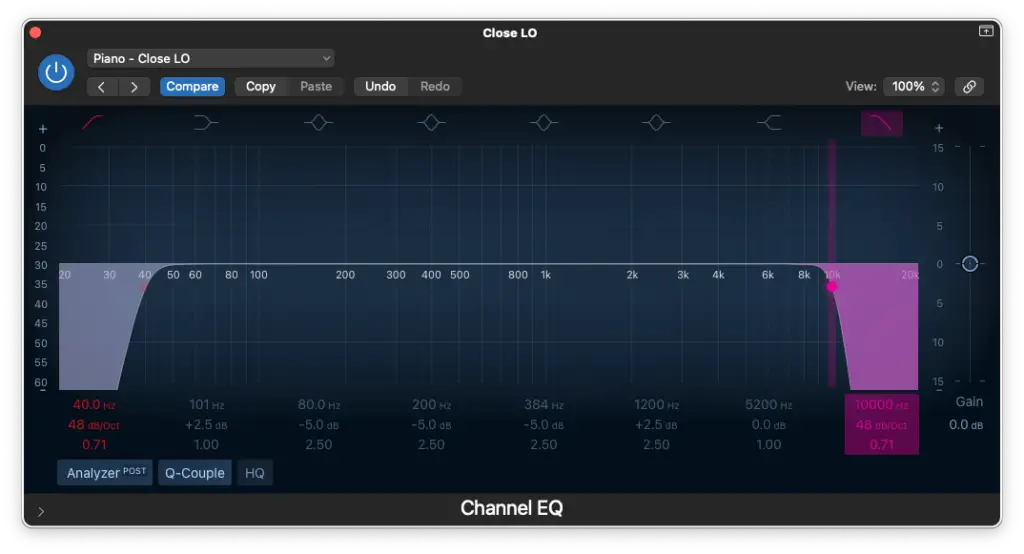
Now, this one is kind of optional, but I really like it.
Remember, you should only be using the left-hand part for reference and you’ll notice that you don’t lose much by cutting here. It just makes the sound a bit darker.
It’ll be a really nice foundation once we layer the right-hand microphone.
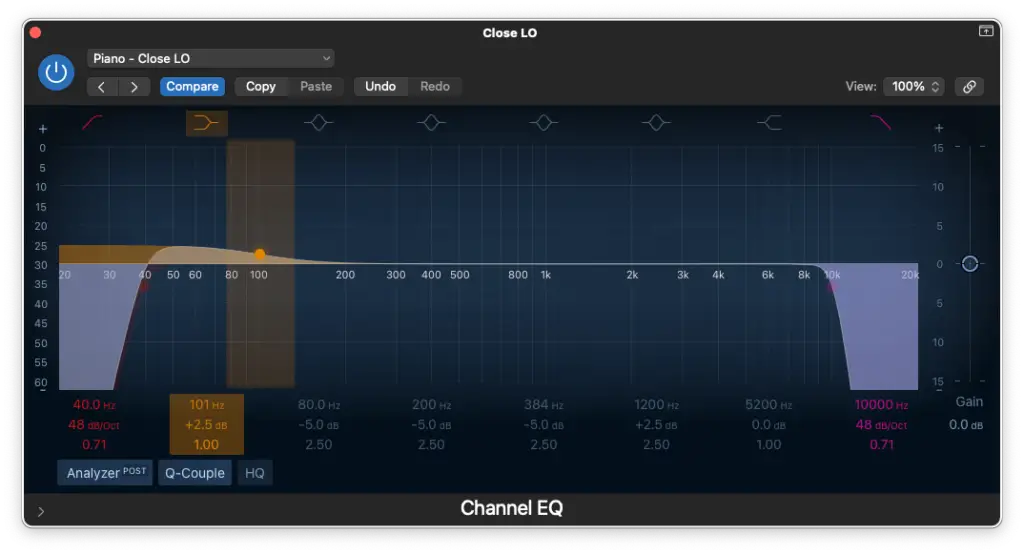
Step 3 – Low-Shelf Boost around 100 Hz
Nothing excessive, but it’ll really add some thickness in the low-end if you do this.
Remember, we’ll also have the EQ on our piano sub-mix to filter out any resonant frequencies in the low-end so just make it sound BIG for now!
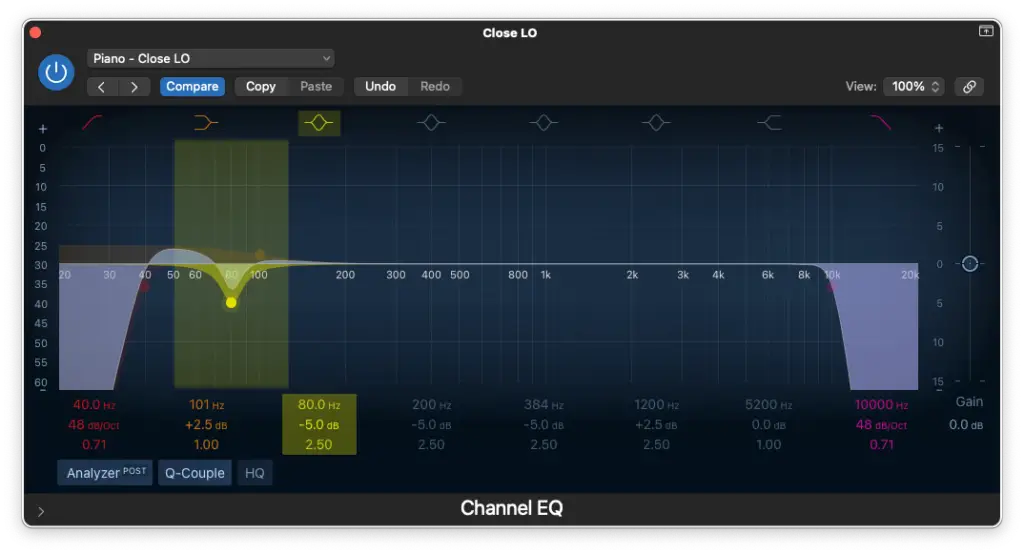
Step 4 – Cutting around 80 Hz – 100 Hz
Be very precise with this move. It might sound counter-intuitive to cut the frequencies responsible for “boominess”, but it’ll really define the low-end after that low-shelf boost.
Of course, every piano is different. This one just needed some taming around 80 Hz.
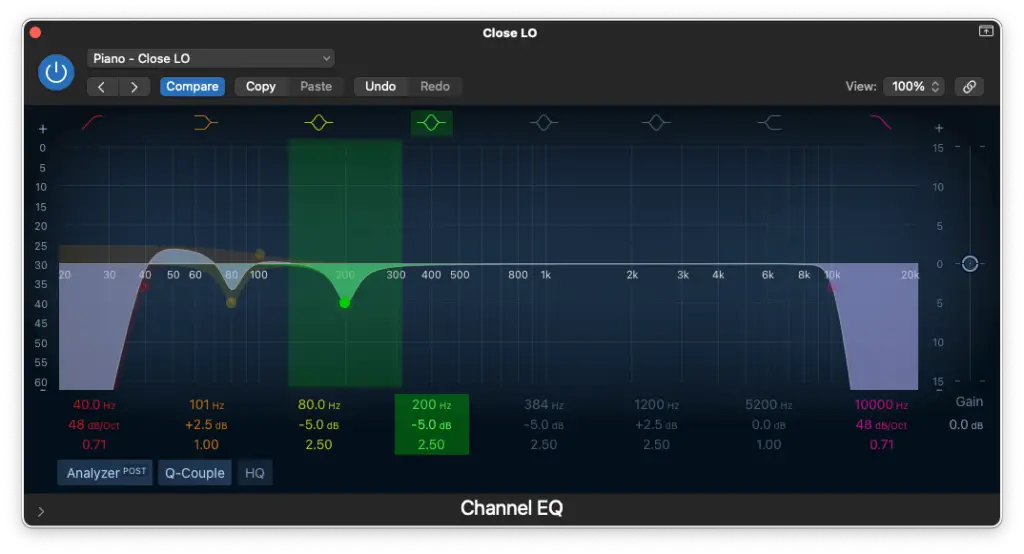
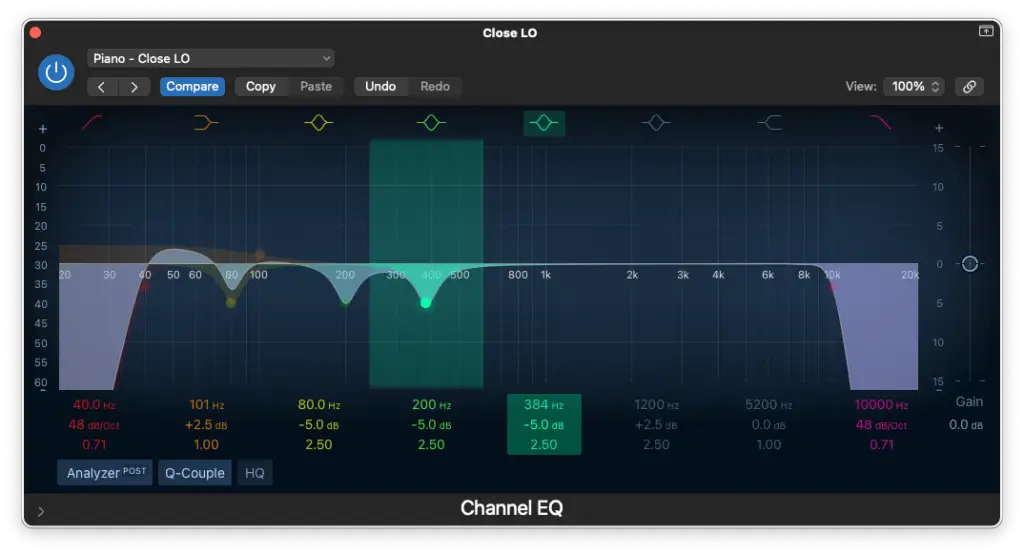
Step 5 – Cutting between 200 Hz – 500 Hz
You’ll notice that you can never do enough cutting in this range when it comes to piano.
Just use your ears and try to find the most troublesome frequencies.
Also, make sure not to target different frequencies with each EQ you add to the mix.
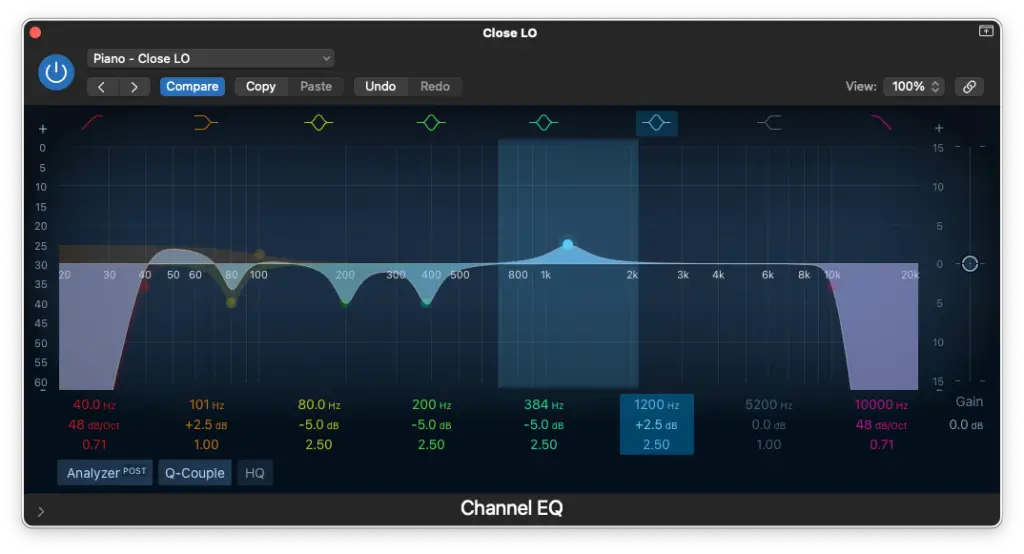
Step 6 – Boosting around 1,000 Hz
In the case of the left-hand, you can add a bit of “crunch” to your sound if you boost here.
Make sure to lean closer to the 1,000 Hz area because we’ll be leaning more towards 2,000 Hz for the right-hand microphone.
Close Microphone Position (Right/High)
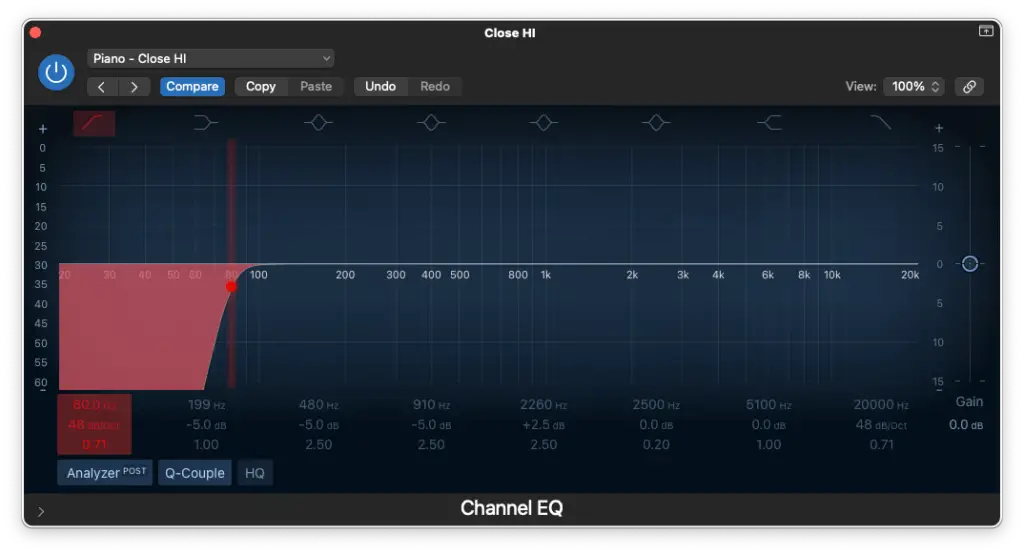
Step 7 – High-Pass Filter at 80Hz – 100 Hz
We’ve already got plenty of low-end, so we want to create some space in the right-hand.
It’s the same concept as what we did to the low-pass filter in the left-hand.
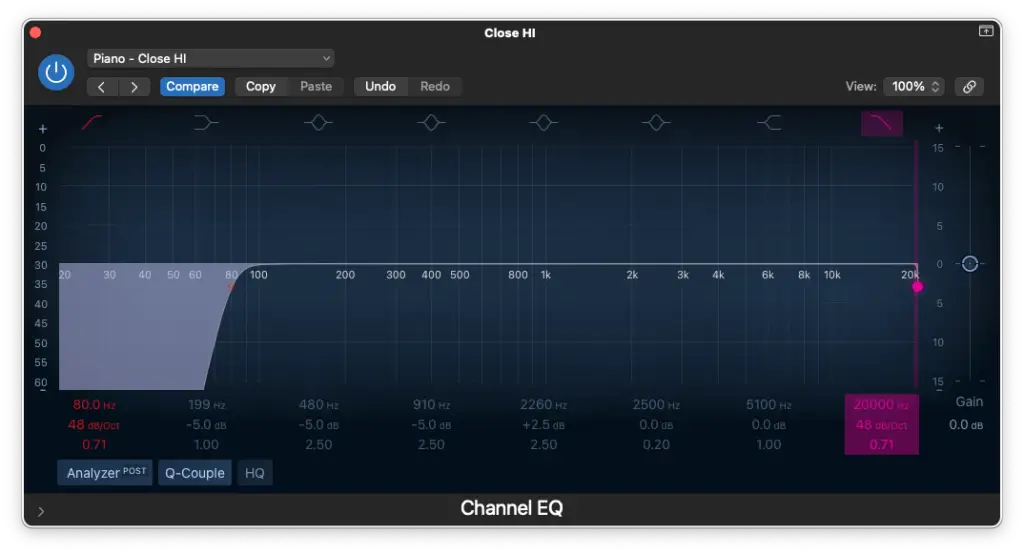
Step 8 – Low-Pass Filter at 20,000 Hz
Nothing much to say here, just keeping things clean and tidy!
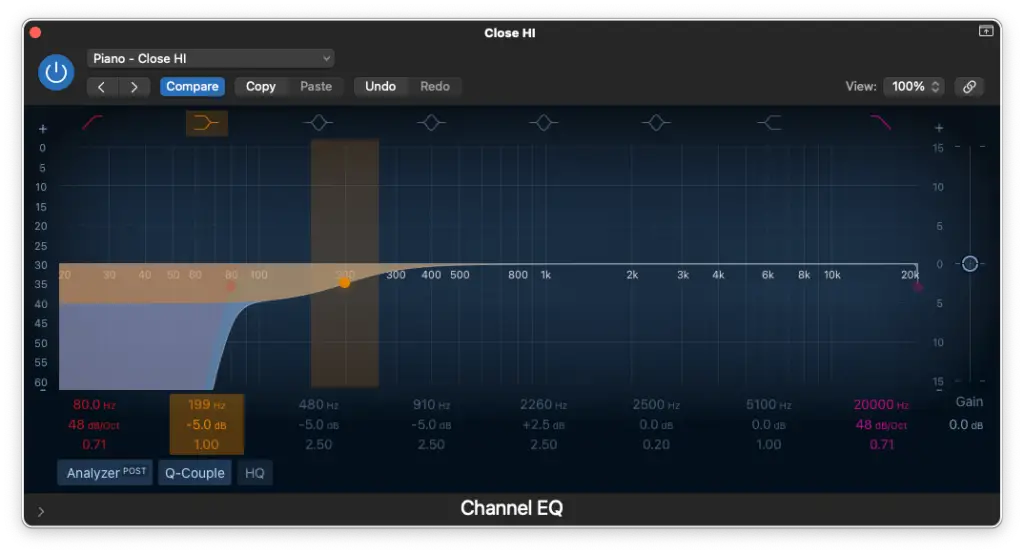
Step 9 – Low-Shelf Cut around 100 Hz – 200 Hz
We boosted the low-shelf in the left-hand, so it makes sense to cut it in the right-hand.
You’ll hear how much it opens up the sound once you combine both channels together. This process is all about balancing and defining the right/left microphones.
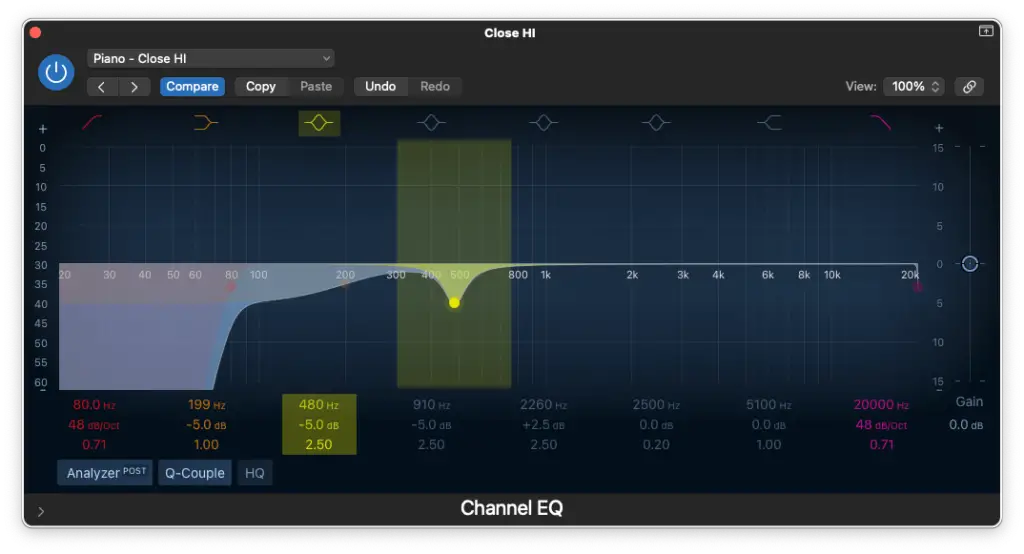
Step 10 – Cutting between 500 Hz – 1000 Hz
We focused on the low-mids in the left-hand, so we’ll focus on the high-mids in the right.
You can make as many cuts as you deem necessary here. Just use your ears and make sure not to repeat yourself (boosting/cutting the same frequencies twice).
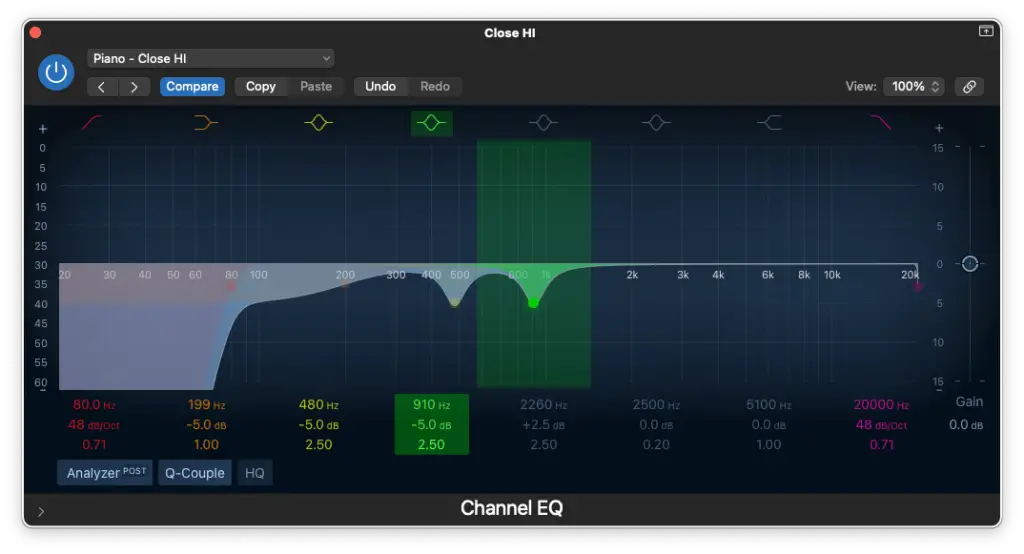
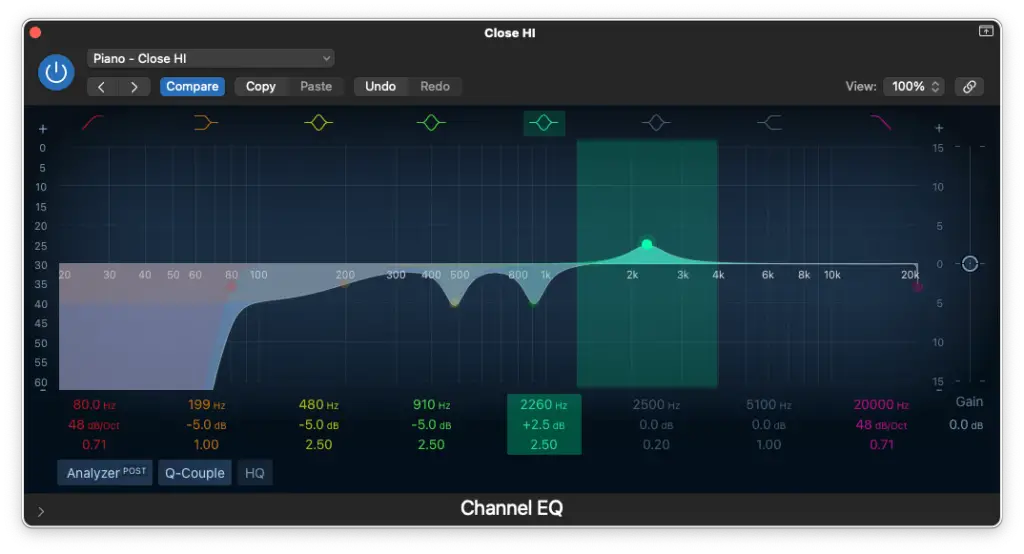
Step 11 – Boosting around 2,000 Hz
If you really listen closely, you’ll find a special frequency that’ll add lots of sparkle to your sound.
It should compliment the frequency you boosted around 1,000 Hz in the left-hand.
EQ Settings for Piano: Downloadable Presets
To make things easier for you, I’m providing the presets we created in today’s tutorial.
You can use them as references until you make your own (which I highly encourage you to do). Each mix will require different EQ moves, so make sure to tweak them and to USE YOUR EARS.
Here’s the download link…
Summary: How To EQ Piano in Logic Pro X
I know, that was a lot of information on how to EQ piano. Wasn’t it?
Lots of tutorials cover the beginner steps, but I haven’t found many tutorials on actually EQing the individual microphone positions used to record piano. That’s why I created my own!
Just to be clear though…
- The steps in the “advanced” section should be done first (if you’re going that route)
- You should always route your piano channels (whether it’s 1, 4 or more) to a sub-mix
- The steps in the “beginner” section should be done last on this sub-mix
- To create the sub-mix, just route your outputs to an auxiliary bus
I hope that makes sense and if it doesn’t please leave me a comment!
Also, make sure not to rely on the downloadable presets too much. They’re a great starting point, but I highly encourage you to use your ears and to develop your own presets.
Each type of mix will require different things and each piano performance is different.
So, did you learn something new today?
Let us know in the comments and once again, feel free to ask any questions if you need clarification on any of the steps we covered today.
Thanks for reading, I hope you enjoyed learning how to EQ piano in Logic Pro X!
Related Articles
- How To Mix and Master Music in Logic Pro X (w/ Presets)
- How To Mix BINAURAL AUDIO in Logic Pro X (w/ Presets)
- How To EQ Bass Guitar in Logic Pro X (w/ Presets)
- How To EQ Electric Guitar in Logic Pro X (w/ Presets)
- How to EQ Vocals in Logic Pro X (w/ Presets)
Sources
