I’m going to show you how to master the art of mixing and mastering music in Logic Pro X in just TWO HOURS OR LESS!
If you’re skeptical about the feasibility of this claim, it’s probably because you haven’t had a chance to explore the wealth of knowledge available in my comprehensive online mixing and mastering course, discreetly named “MIX and MASTER IT Yourself!”
In today’s article, I’ll offer a condensed version of the course, providing you with a blueprint for efficiently transforming your music. We’ll cover all the essential steps of mixing and mastering, including EQ, compression, reverb, sub-mixing, limiting, and metering.
But here’s the best part: I’m not stopping there. To kick-start your journey, I’ll also be sharing some of my personal Logic Pro X presets, which you can download and use right away.
Whether you’re a hobbyist creating music for fun or an aspiring professional embarking on your music career, mastering the art of mixing and mastering is a game-changer. It saves you precious TIME, MONEY, and ENERGY, allowing you to produce professional-sounding music independently.
My commitment is to provide you with this invaluable knowledge right now! So, let’s dive into the world of Logic Pro X and unlock the secrets of mixing and mastering incredible music.
Table of Contents
What Equipment Do You Need To Start Mixing Music?
When it comes to crafting the perfect mix and mastering your music in Logic Pro X, having the right equipment is essential. To get started, it’s important to set up your home recording studio with the right gear. For a more comprehensive list of essential equipment and a guide on building your home studio, check out our detailed post on building a home recording studio.
Now, let’s break down the equipment you need into two crucial categories: “Speaker Monitors” and “Studio Headphones.”
Speaker Monitors:
- KRK Rokit RP5 G4 – Renowned for their balanced sound and affordability, these are a popular choice among music producers.
- Presonus Eris E3.5-3.5″ – Compact, accurate, and great for small spaces, they’re a solid pick for home studios.
- Yamaha HS5 – Known for their accuracy, these studio monitors are favored by professionals.
Studio Headphones:
- Audio-Technica ATH-M50x – Loved for their excellent sound isolation and clarity, they’re a go-to choice.
- Sennheiser HD 650 – Praised for their open-back design and natural sound reproduction, perfect for critical listening.
- Beyerdynamic DT 990 Pro – Known for their comfort during long sessions and impressive audio quality.
Adding these quality speaker monitors and studio headphones to your setup will give you the precision and clarity needed for effective mixing and mastering in Logic Pro X. Don’t forget to check out our full guide on [building a home recording studio](insert internal link) for a complete list of equipment recommendations.
What Plugins Do You Need To Mix Music?
We’re delving into the world of mixing and mastering music using Logic Pro X, and you might be wondering about the plugins you need. Truth be told, most DAWs come equipped with the essential plugins for your mixing and mastering journey. However, Logic Pro X stands out for its exceptional array of tools.
Let’s break down the types of plugins you’ll need, categorized into “essential” and “optional.”
Essential Plugins:
- EQ
- Compressor
- Reverb
- Limiter
Surprisingly, these are the fundamental building blocks for your mixing and mastering toolkit. But don’t be fooled by their simplicity. It’s amazing what you can achieve with these four essential tools, and I’ll show you exactly how to wield them in the next section.
Now, let’s briefly touch on some non-essential plugins that can be handy depending on your specific needs:
Optional Plugins:
- Delay/Echo
- Saturation (distortion)
- Noise Gate/Suppressor
- Expander
The usage of these non-essential plugins often depends on the quality of the tracks you’re working with. For example, you may encounter a guitar track with excessive noise. In such cases, a combination of noise gating/suppression and automation can work wonders.
In addition to these, we have a few plugins that can elevate your mixing and mastering experience further:
Recommended Plugins:
- Youlean Loudness Meter: A valuable tool for keeping your music at the right loudness levels.
- Goodhertz Vulf Compressor: Known for its unique analog warmth and character.
- iZotope Audio Lens: A versatile plugin for enhancing audio quality and clarity.
While we won’t delve deep into these recommended plugins today, they can be fantastic additions to your toolkit. Feel free to ask any questions you have about them in the comments section.
Now that you’re equipped with the knowledge of essential and non-essential plugins, and even have some recommendations, you’re ready to embark on your mixing and mastering journey in Logic Pro X. Let’s dive into the next section where I’ll show you precisely how to utilize these plugins effectively.
How To Mix Music: Step-by-Step
Of course, it’s much more difficult to learn how to mix and master music by simply reading about it. I still recommend checking out my course “MIX and MASTER IT Yourself!” if you really need additional support.
If you’re willing to figure some stuff out on your own though, then I know these steps will help!
Step 1 – EQ
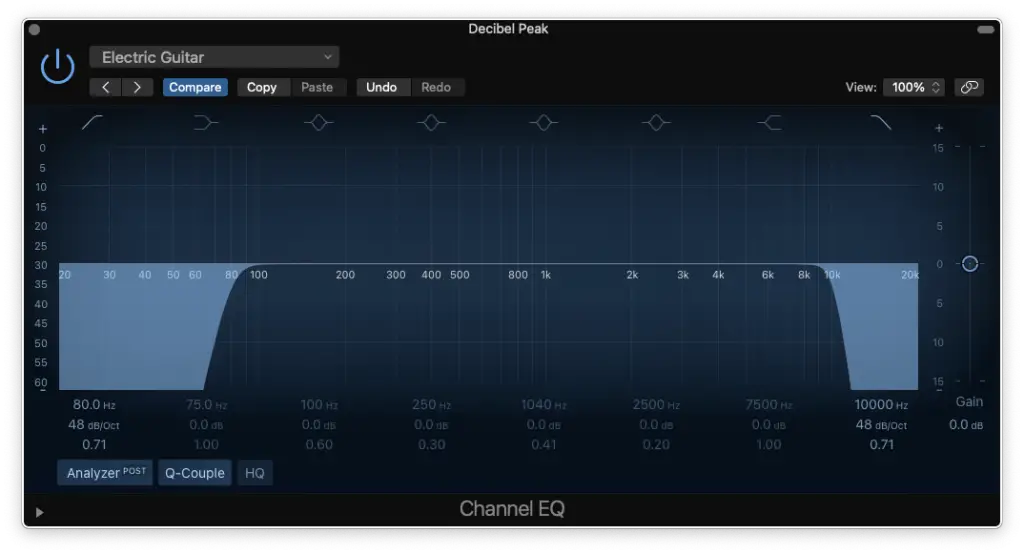
I personally start with EQ (I’m aware that some producers start with compression though).
The first thing you want to do is use a high-pass filter to “clean up” the bottom-end. Secondly, you’ll use a low-pass filter to “clean up” the top-end.
Of course, the actual frequencies you’ll be cutting will vary from instrument to instrument.
For example…
- Electric Guitar (cut at 80-100 Hz and at 10,000 Hz)
- Bass Guitar (cut at 30-60 Hz and at 10,000 Hz)
Make sure to DOWNLOAD MY PRESETS to get an idea for each instrument.
I won’t be showing you how to “tweak” each EQ further because it would be very complicated to do in writing and it varies not just by instrument, but by performance.
That being said, you’ll get a much better idea by checking out MY COURSE.
For now, these EQ presets will give you the framework you need.
Every track needs an EQ, so make sure to take care of all of them.
Step 2 – Compression
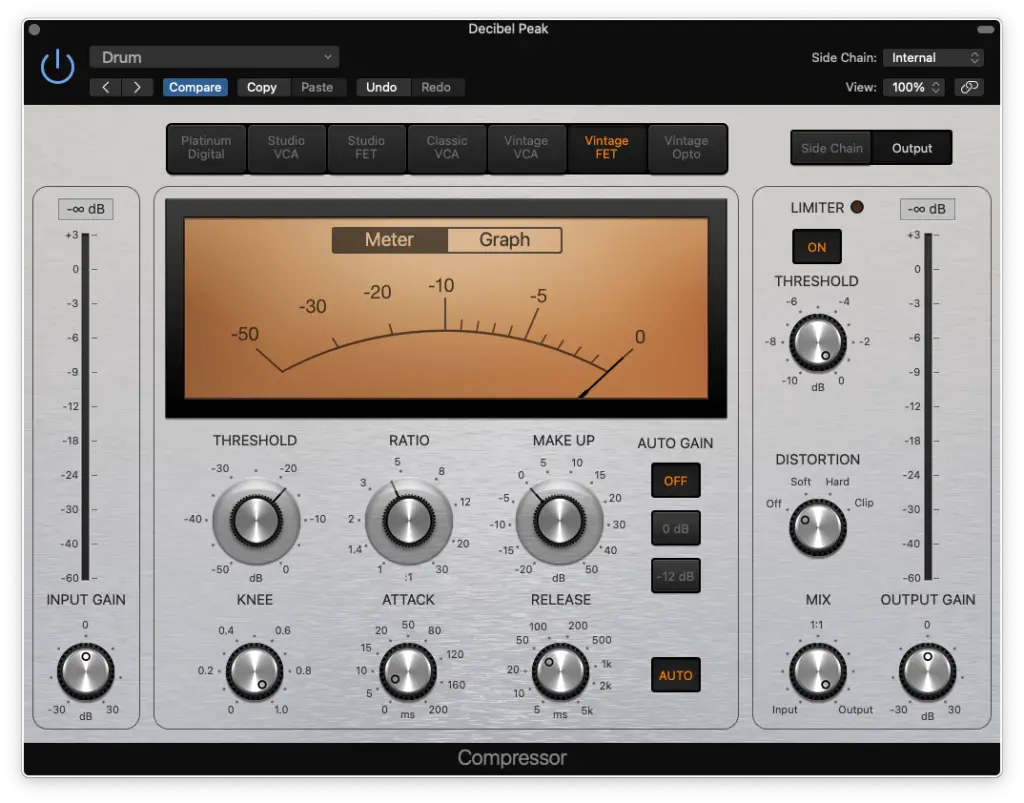
Next up, I insert a compressor on EACH track after the EQ.
Technically, a compressor could actually remove some high-end so you may want to add another EQ after the compressor with a top-shelf boost (I rarely do).
Either way, here are the basic compression settings I use…
- Threshold: -18 dB
- Ratio: 4:1 (for now)
- Make-Up: 0 dB
- Knee: 1 (it’s softer)
- Release: Auto
You’ll notice that I didn’t talk about the “attack” yet. That’s because it’s one of the only parameters we’ll need to adjust on a track-by-track basis.
The other one is the “input gain”.
Essentially, by setting your threshold to -18 dB for each track and adjusting your input gain to get approximately 5 dB of compression… You’re leveling everything out.
In other words, even tracks that were recorded too quiet or too loud will become centered at -18 dB which is a pretty important level to set (read more about it HERE).
However, you need to set your attack before doing that.
In short, if you want less transient (and more sustain) you’ll set the attack time FASTER (0-20ms). More transient and less sustain? Set it SLOWER (20-200ms).
Step 3 – Sub-Mixing
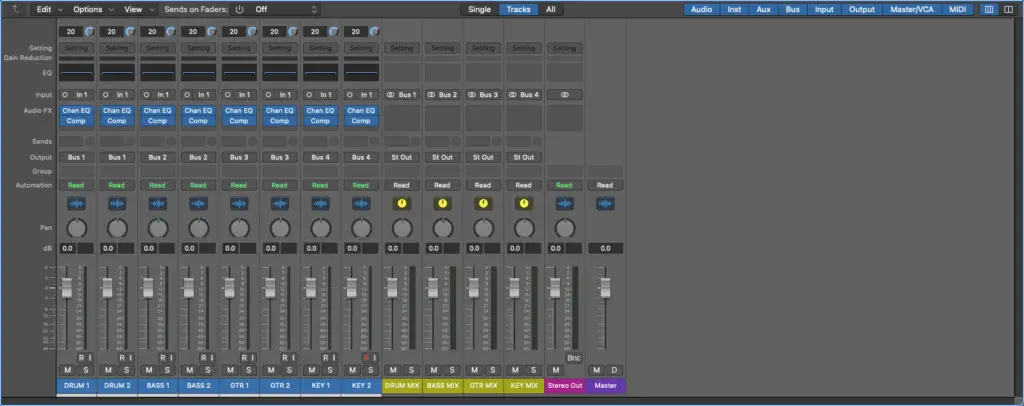
Once you’ve taken care of EQ and compression on ALL YOUR TRACKS, you’re ready to move on to sub-mixing.
That’s essentially when we group our tracks into “sections” by using auxiliary buses.
It’ll make the mixing process much more simple and organized!
How should you group the different tracks? It depends, but I personally group all the drums into one sub-mix, all the guitars into another, etc…
Just use common sense and you’ll be on the right track.
Once you’ve routed all of your tracks to a sub-mix, we’re ready to start mixing the sub-mixes.
Step 4 – EQ (submix)
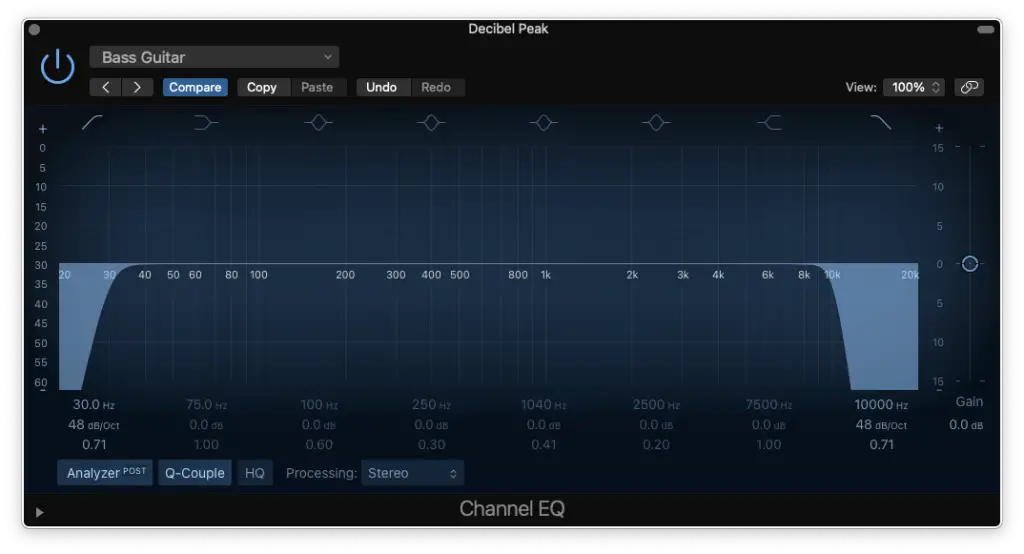
Just like the previous EQ phase, we’re going to simply “clean up” the frequency spectrum.
The actual values of your high-pass and your low-pass filters will depend on the lowest/highest frequencies you cut out of those tracks.
For example, a sub-mix for bass guitars would most likely be…
- High-Pass Filter: 30 Hz
- Low-Pass Filter: 10,000 Hz
You can make tweaks with notches using your musical ear once you’ve completed the “essentials cuts” for each sub-mix.
You’ll want to hear everything in context to make proper EQ manoeuvres though.
Step 5 – Compression (submix)
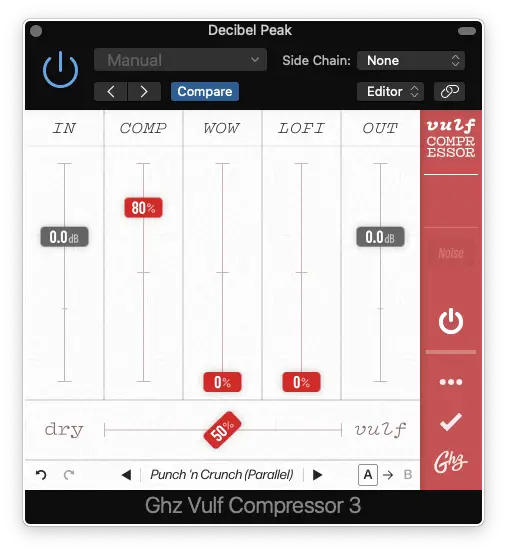
This is the ONLY plugin that I recommend outside of Logic Pro X.
It’s called Vulf Compressor (by Goodhertz). However, you can use ANY compressor that you like that adds colour. For example, an analog modelled Teletronix LA-2A plugin.
The objective here is to reduce our dynamic range once more.
Also, the way these different compressors saturate your signal provide a WIDE variety of sounds. The standard Logic Pro X Compressor is relatively transparent.
It’ll really make a difference in the end, you’ll see!
Step 6 – Reverb
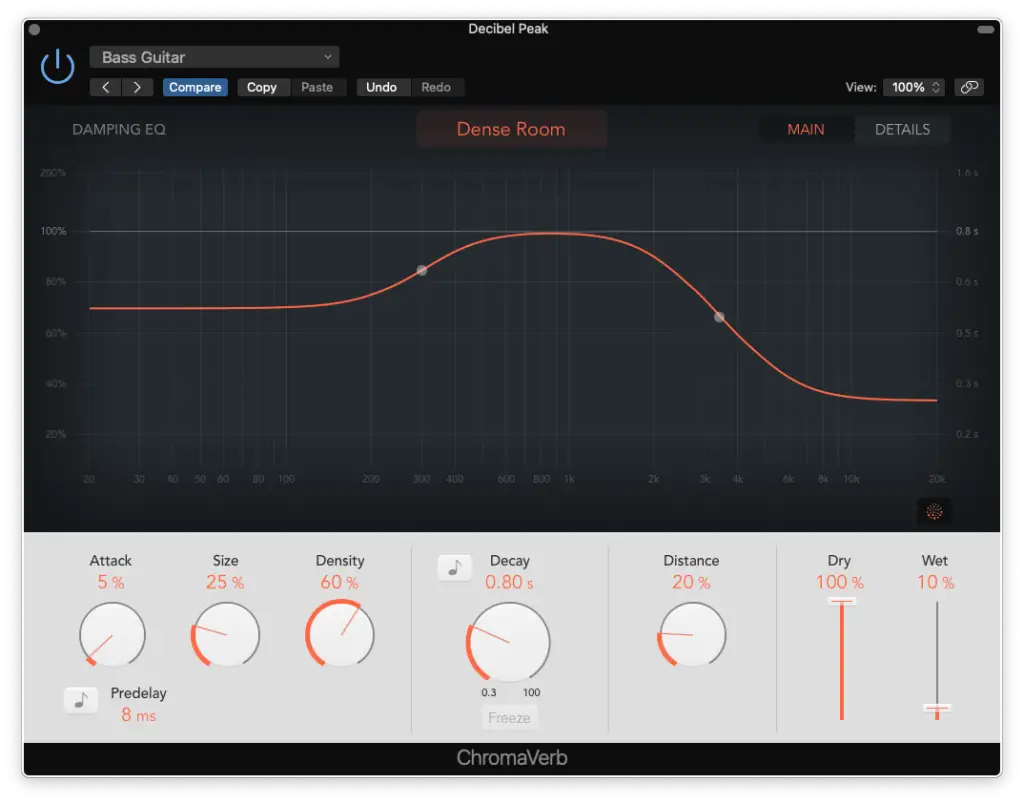
You might be wondering why I didn’t add a reverb on the actual buses of the individual tracks.
That’s because I don’t always need it.
For instance, some guitar amplifiers provide their own reverb. I only add one on each sub-mix because it just makes things sound like they were recorded in the same room.
How To Master Music: Step-by-Step
Alright, so we’re now moving onto the final phase… MASTERING.
Basically, mastering is the equivalent of packaging a product but in this case, it’s also important to get our music to meet certain industry standards.
LOUDNESS is definitely the most important.
However, you shouldn’t need to do nearly as much in the mastering phase. SUBTLETY is key here and if you made mistakes in the mixing phase, this is where they’ll become apparent.
So, let’s see if we need to go back and review or if we’re ready to FINISH THIS!!
Step 1 – Linear EQ
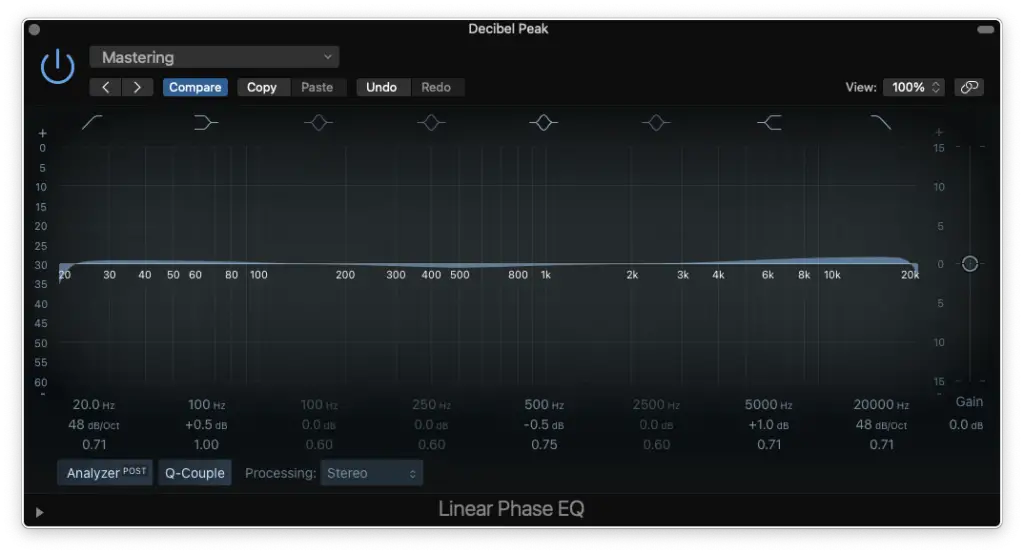
Linear EQ is different from the standard Logic Pro X EQ.
When it comes to EQ plugins, it’s always better to go with linear phase EQs because they’re more transparent. If you want colour, analog modelled EQ plugins are much better.
That being said, the reason I didn’t use Linear EQ on the individual tracks is because it takes up more CPU resources. So, I’ll let you decide which one is best for you.
The idea is to make SUBTLE changes. For example, you might want to give the high frequencies a top-shelf boost to brighten up the mix.
Remember though, this EQ affects the entire mix.
Step 2 – Multi-Band Compression
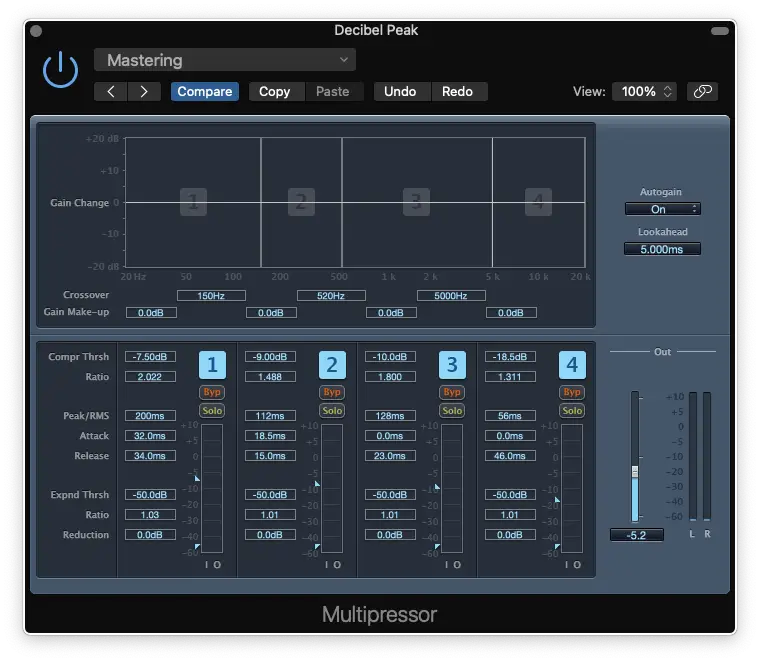
I have to say, the Multipressor is one of my favourite plugins.
It’s essentially a hybrid of a compressor and an EQ. In other words, you can control how each region of the frequency spectrum is compressed.
Feel free to use them on your individual tracks as well, but only if you need more control.
Multi-Band compression is great for mastering because it really shapes the entire mix. It gives it a distinct feel depending on the genre you’d like to imitate.
Step 3 – Compression
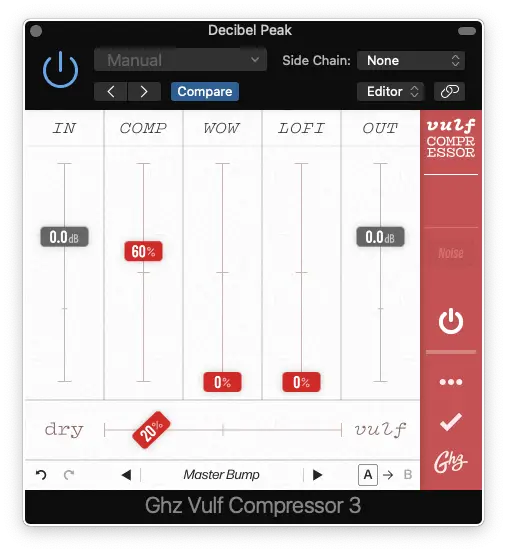
I also add an instance of Vulf Compressor on the master bus.
However, I usually set it to 20% and simply pick one of the two mastering presets (master bump/master hump).
Once again, this just adds a bit more colour and texture to the mix.
Step 4 – Reverb
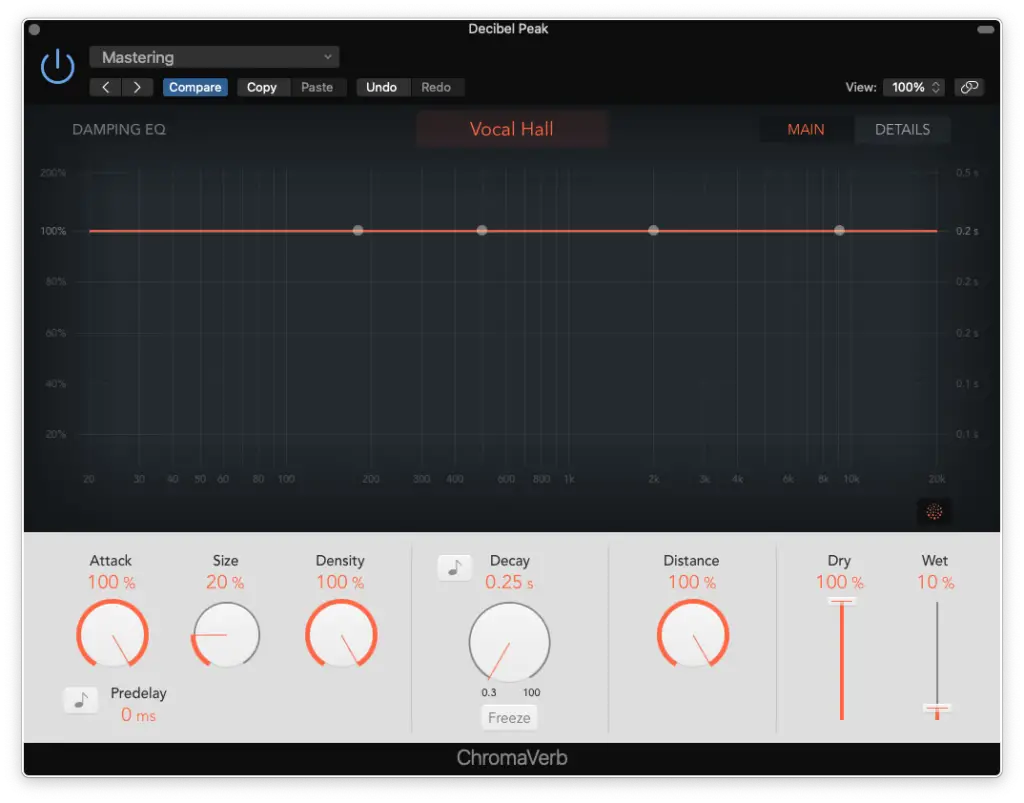
The reverb in mastering is used for the same reason as the reverb in the sub-mix phase.
We’re just trying to “glue” everything together.
I don’t usually set the reverb higher than 10% here, it’s SUPER subtle.
Step 5 – Limiting
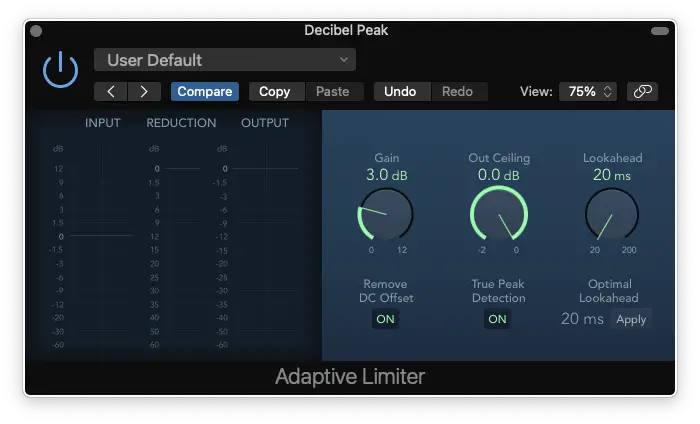
One of the most important plugins for mastering is the LIMITER.
This essentially acts like the “final compressor” and takes off one last -5 dB of gain. It also helps you boost the perceived loudness of your track to bring it up to industry standard.
You should push your track as loud as it goes, but back it off once your track starts sounding broken/distorted. How loud you’ll be able to get it depends on how well you MIXED IT!!
Step 6 – Metering
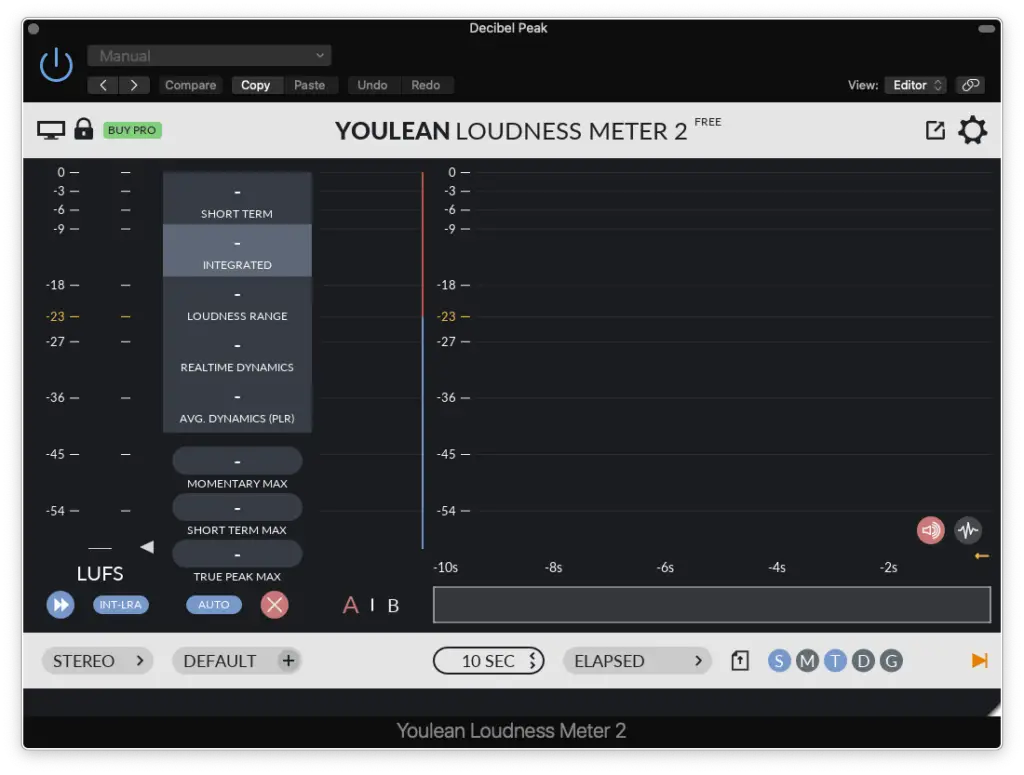
To measure the overall loudness of your master, we currently use Loudness Units (LUFS).
If you want to learn more about LUs, check out THIS ARTICLE.
I personally aim to get the LOUDEST part of my master to about -10 LUFS. Of course, this depends on the genre (i.e. Classical vs Metal) and on the sound you want.
The loudness meter that comes with Logic Pro X is fine, but I personally recommend the Loudness Meter from YouLean.
It has a FREE version that’s already much better than the stock loudness meter.
Mixing and Mastering: BEFORE AND AFTER
Is mixing and mastering necessary?
If you’re still doubting the importance of mixing and mastering, then maybe these before/after examples will convince you…
Kick Drum EQ and Compressor Settings
Achieve the perfect kick drum sound with these essential EQ steps and settings for a powerful foundation in your music mix.
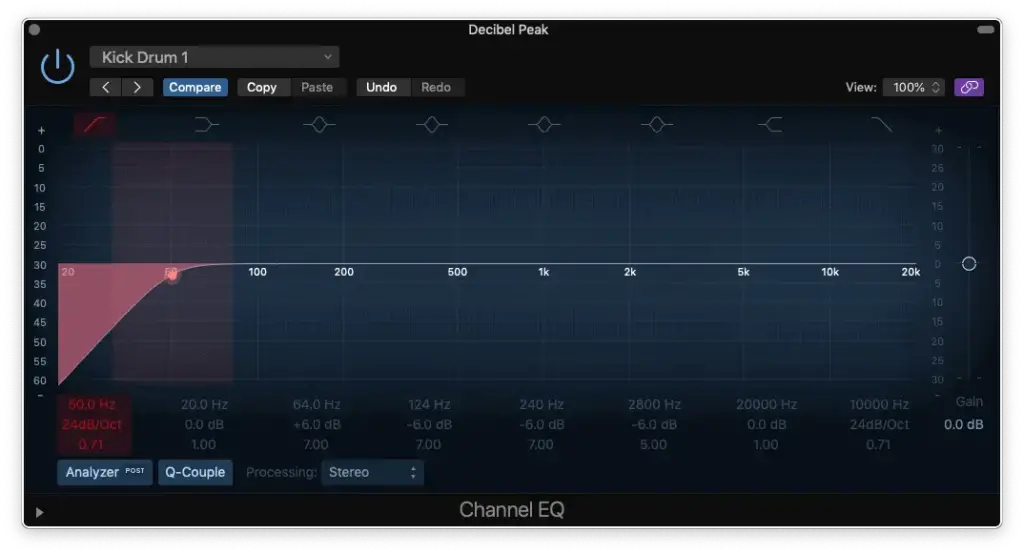
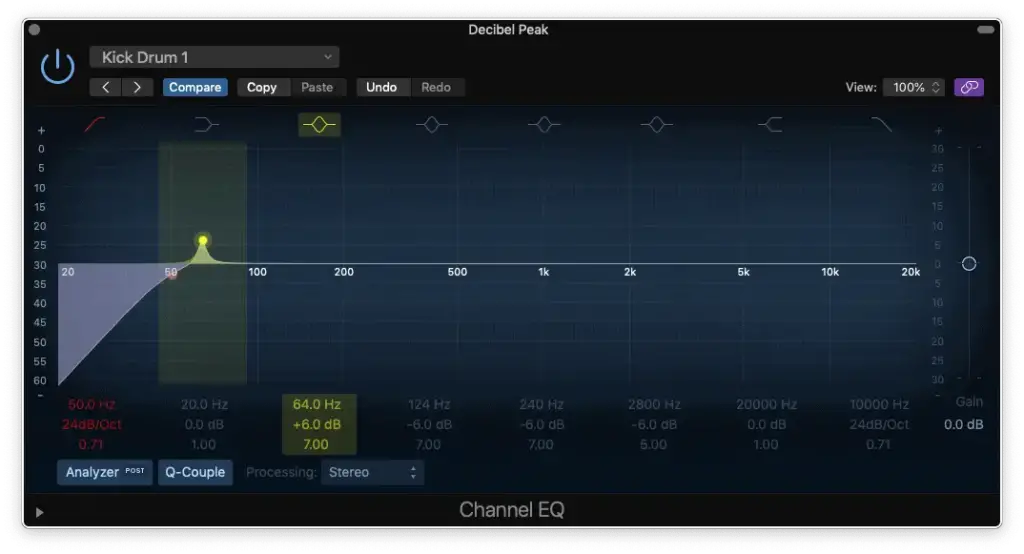
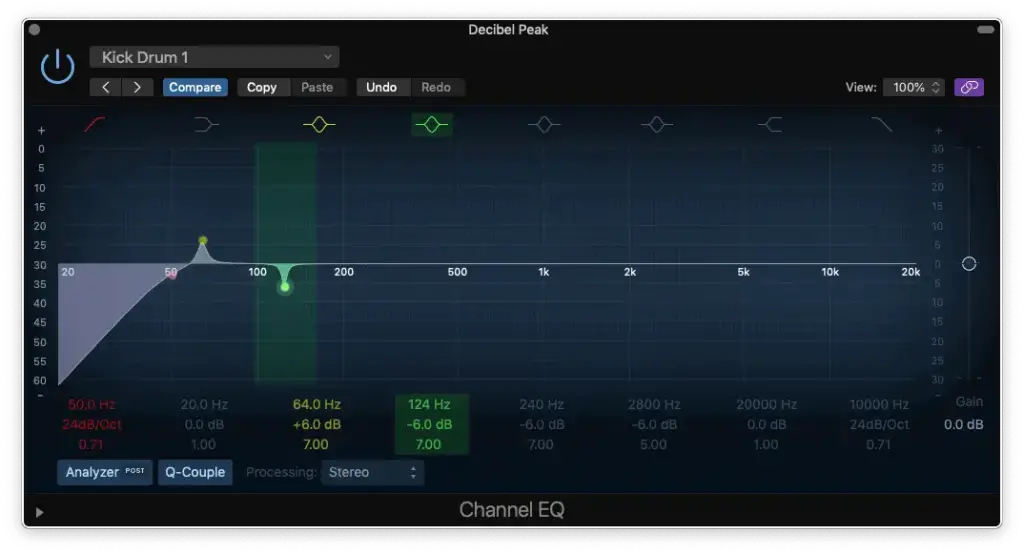
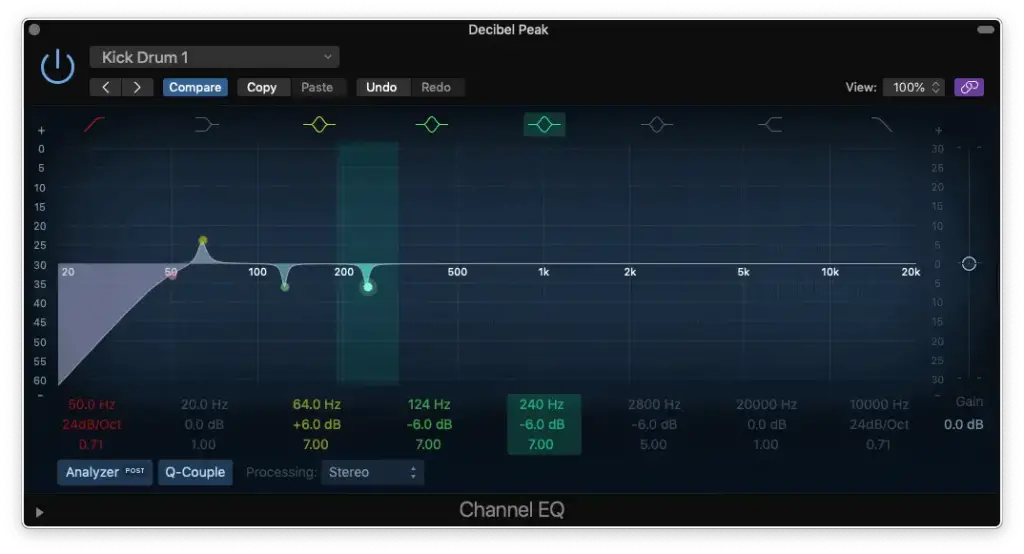
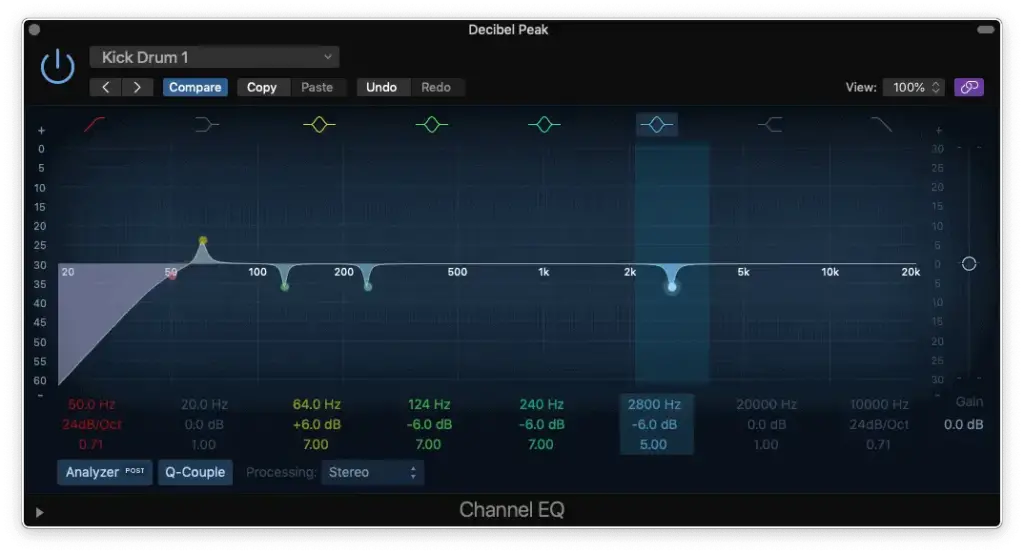
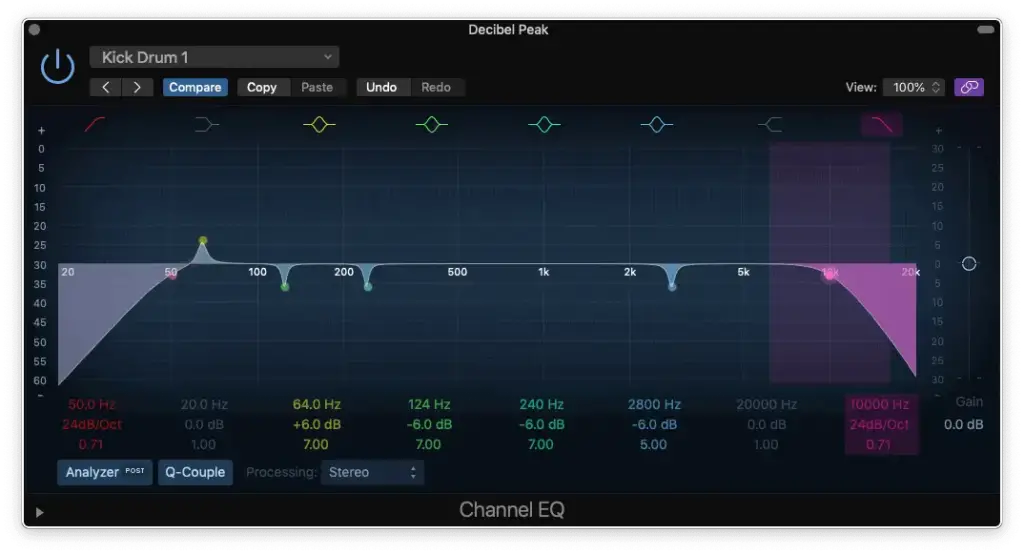
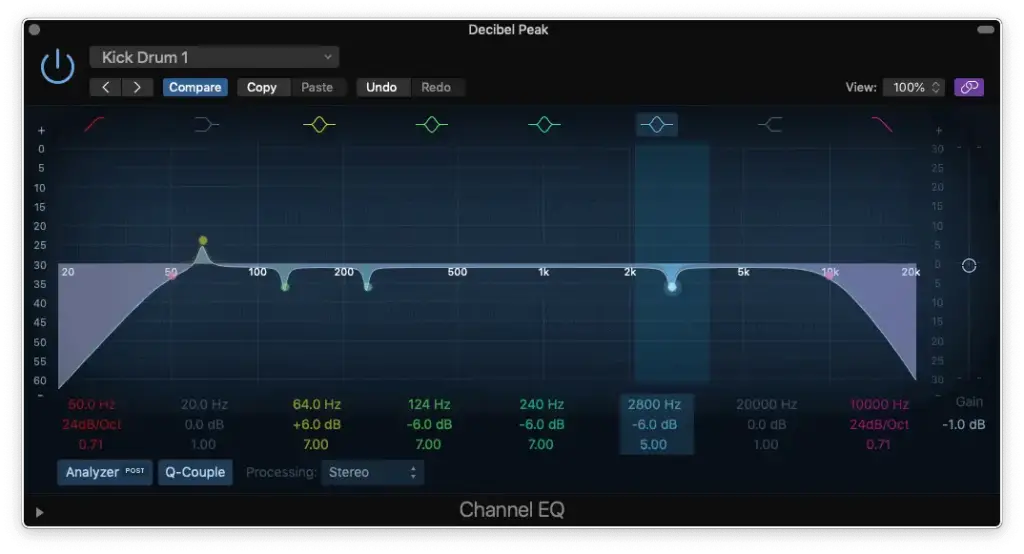
EQ Settings
- HP Filter around 50 Hz
- Boost for “Thump” at 60 – 90 Hz
- Cut for “Unpleasantness” at 100 – 150 Hz
- Cut for “Unpleasantness” at 200 – 250 Hz
- Boost around 1.5 kHz for more “Beater” OR Cut around 2 kHz for less “Plastic”
- LP Filter around 10 kHz
- Reduce Gain to Compensate for any Boosting
Compressor Settings
- Set the “attack” time to let enough of the “transient” through
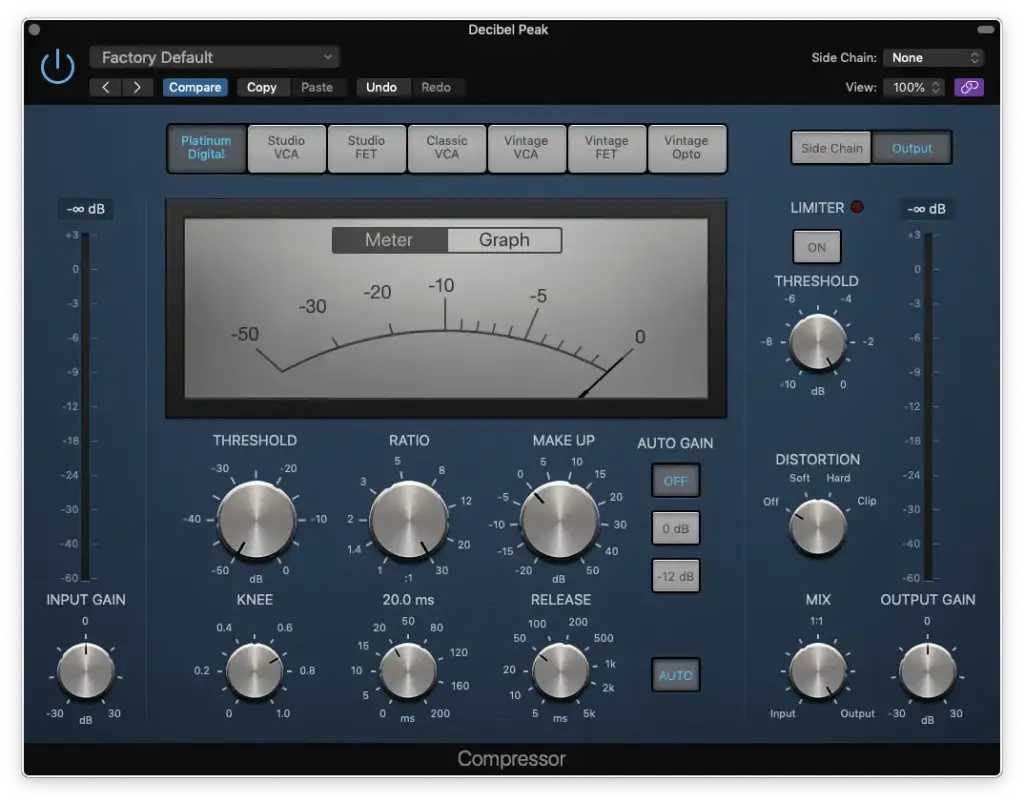
- Set your “ratio” to 3:1
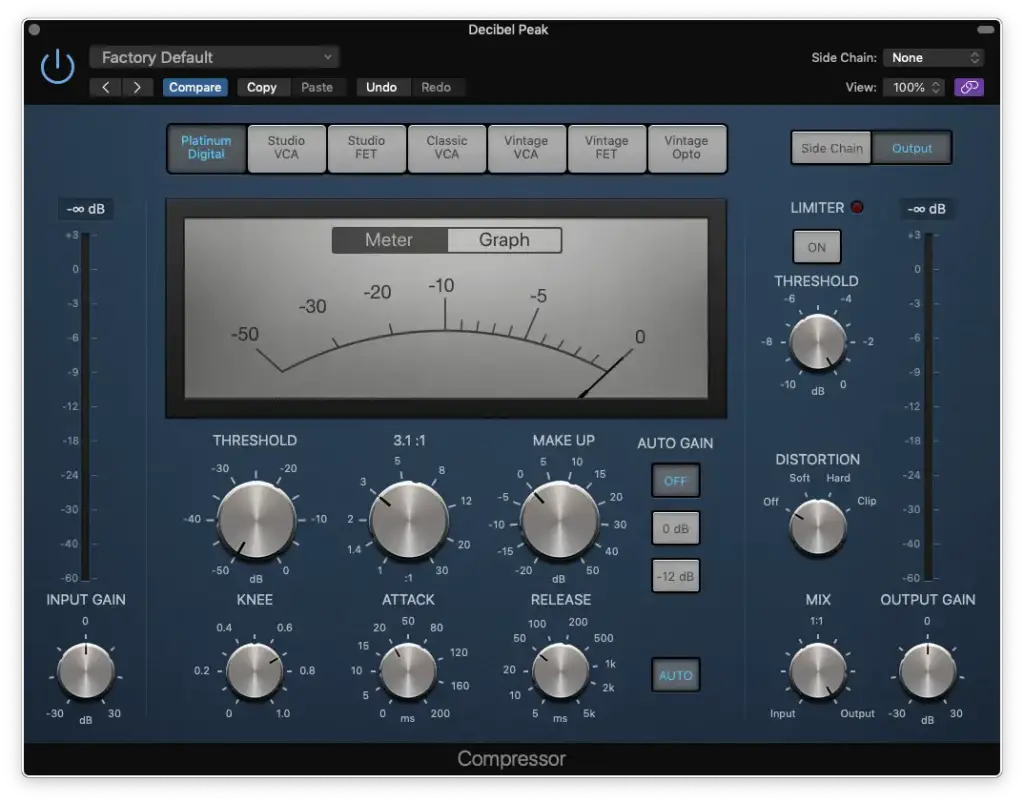
- Set your “threshold” to achieve no more than -6 dB of gain reduction
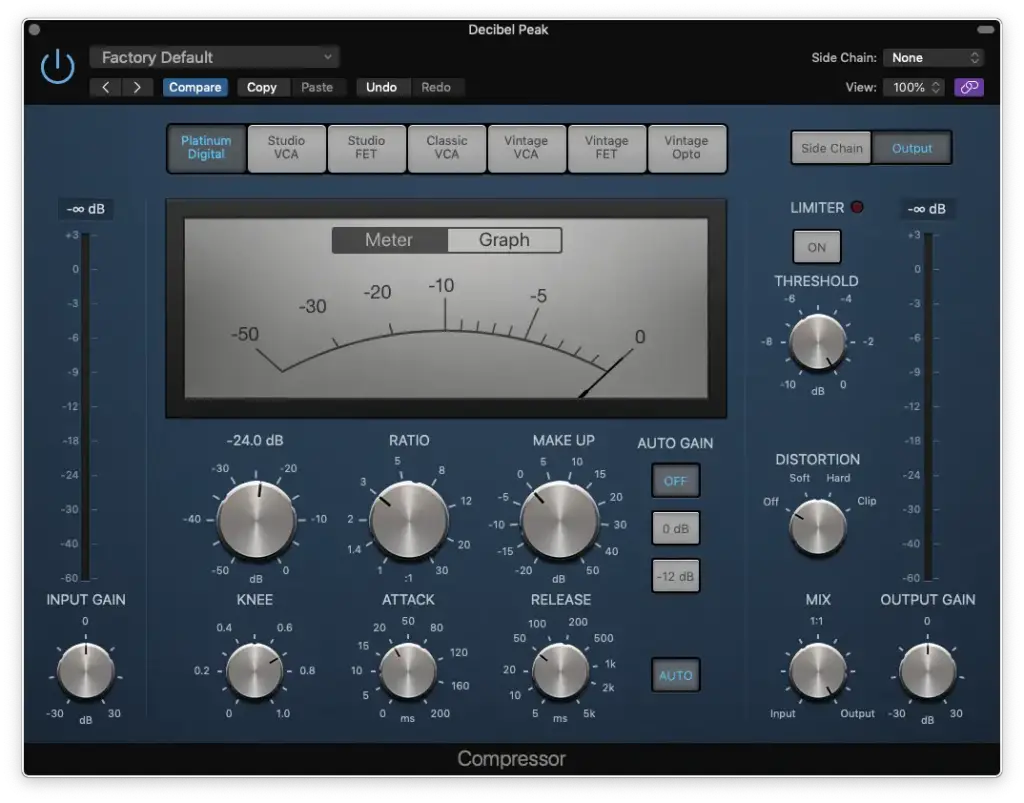
- Set your “make-up gain” to match your original “level”
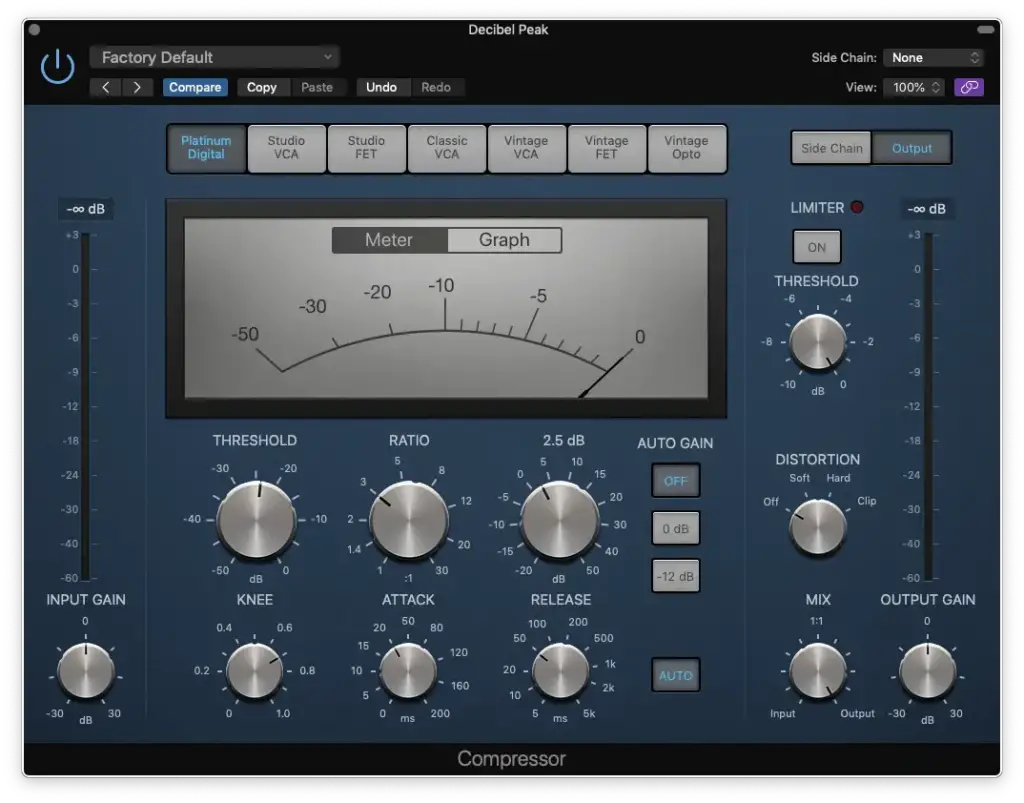
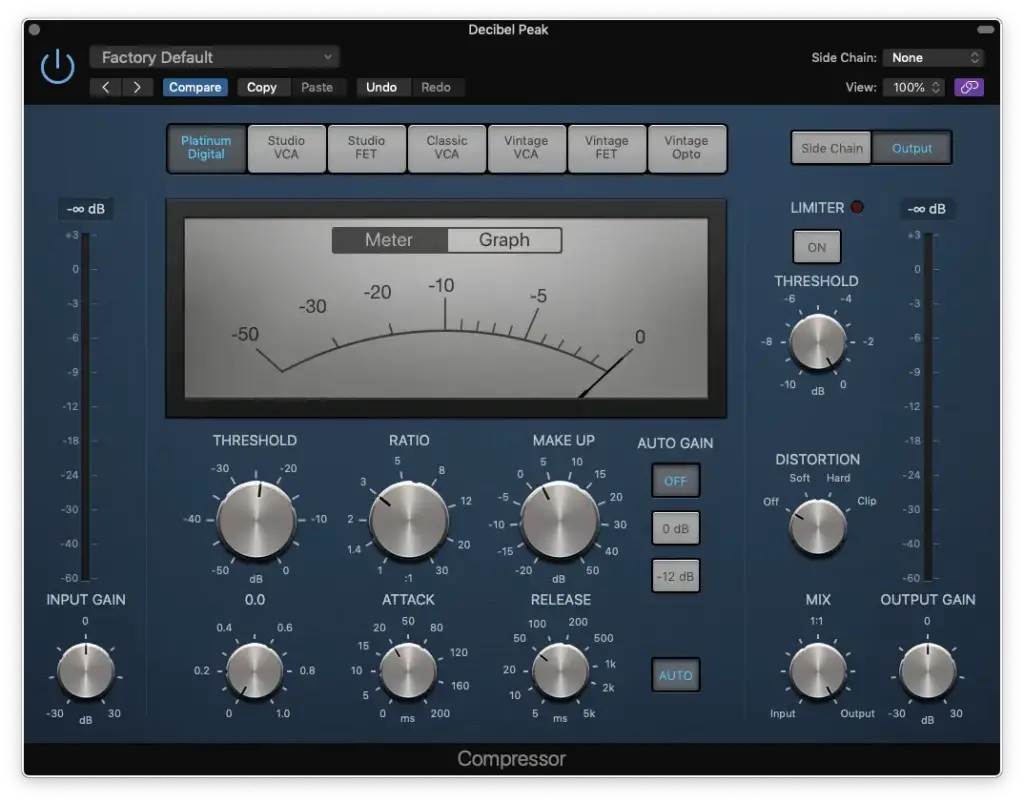
- Set the “knee” to 0 (hard knee) and keep the “auto-release” ON
Snare Drum EQ and Compressor Settings
Enhance the character and clarity of your snare drum with these essential EQ steps and settings.
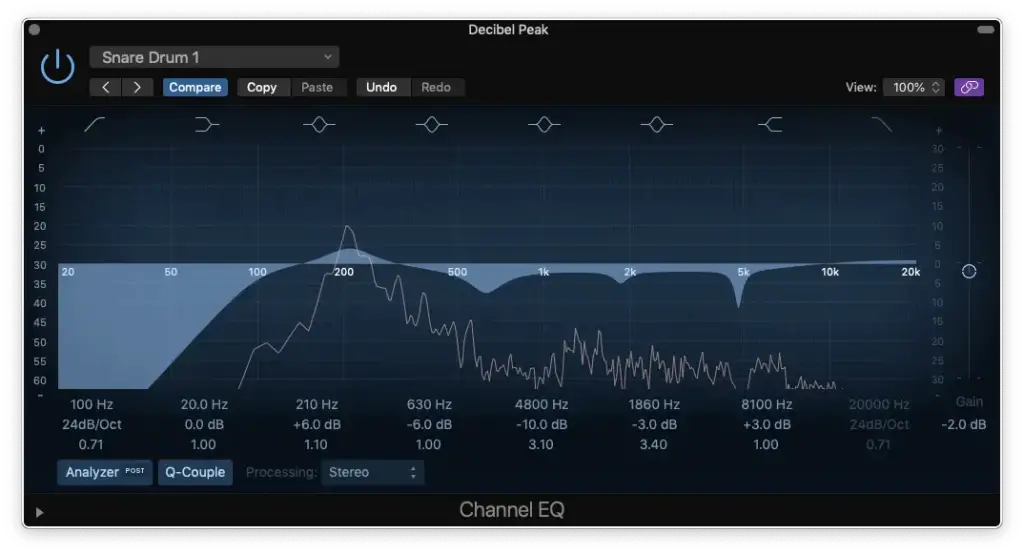
EQ Settings
- LP Filter at 100 Hz
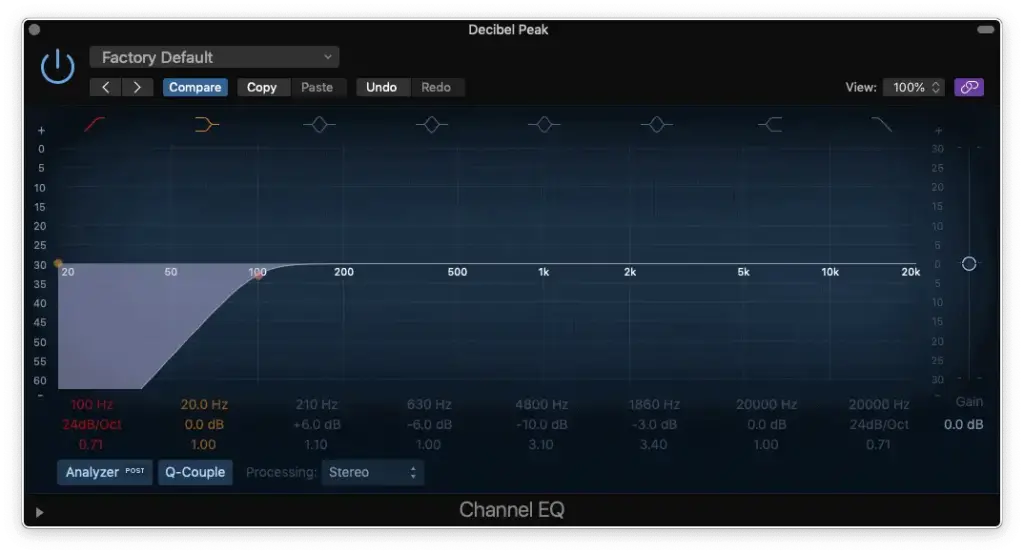
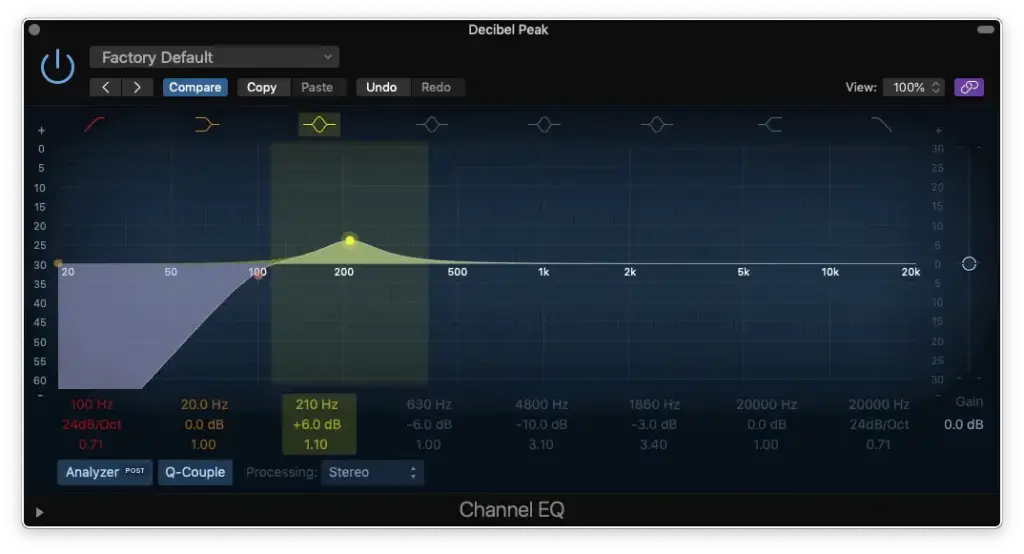
- Boost for “Body” at 150 – 250 Hz
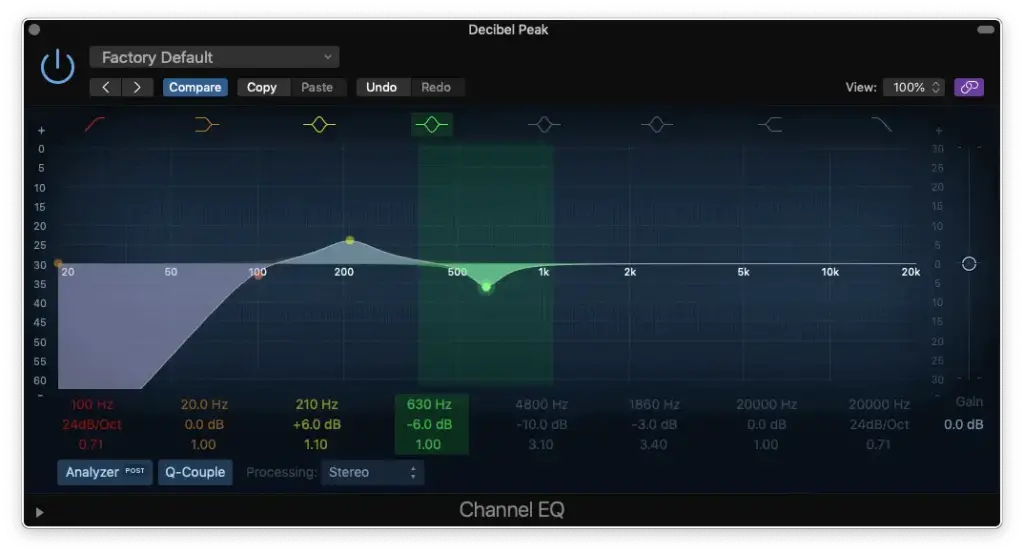
- Cut for “Boxiness” at 500 – 800 Hz
- (optional)
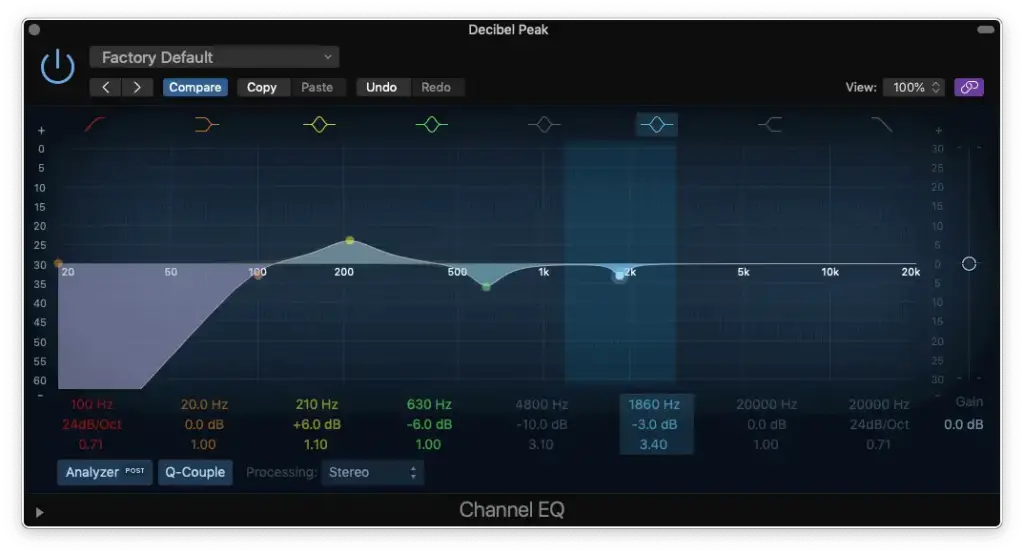
- Cut for “Ringing/Whistling” at 4.5 – 8 kHz
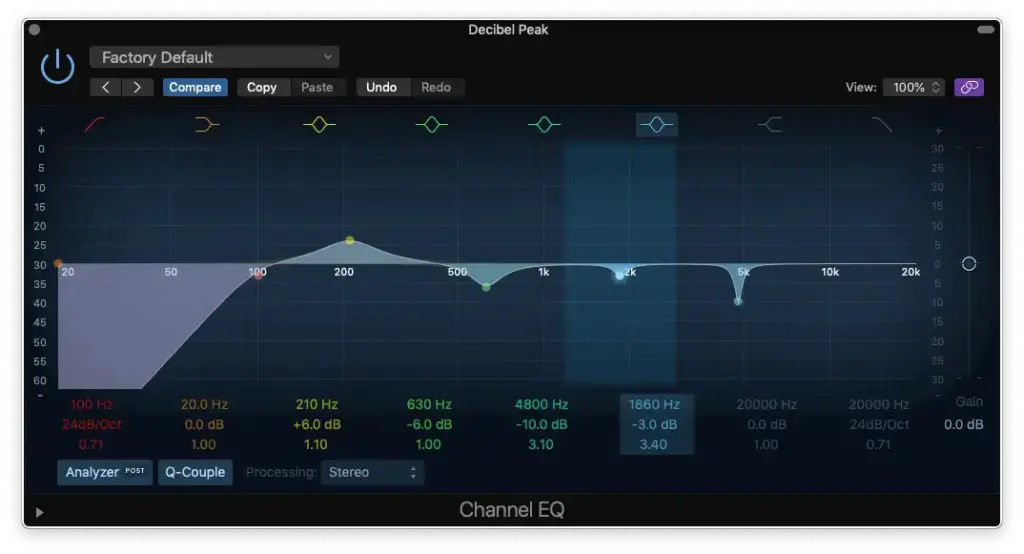
- High-Shelf for “Sizzle” at 8 – 10 kHz
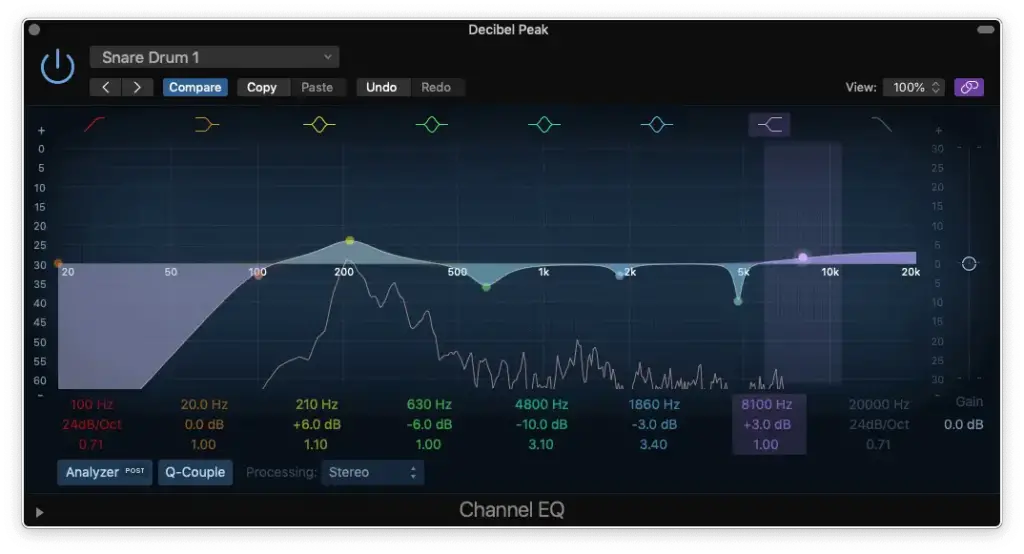
- Reduce Gain to Compensate
Bass Guitar EQ and Compressor Settings
When it comes to EQing your bass guitar, you’ll find both basic and advanced techniques to fine-tune your sound.
Basic EQ Settings
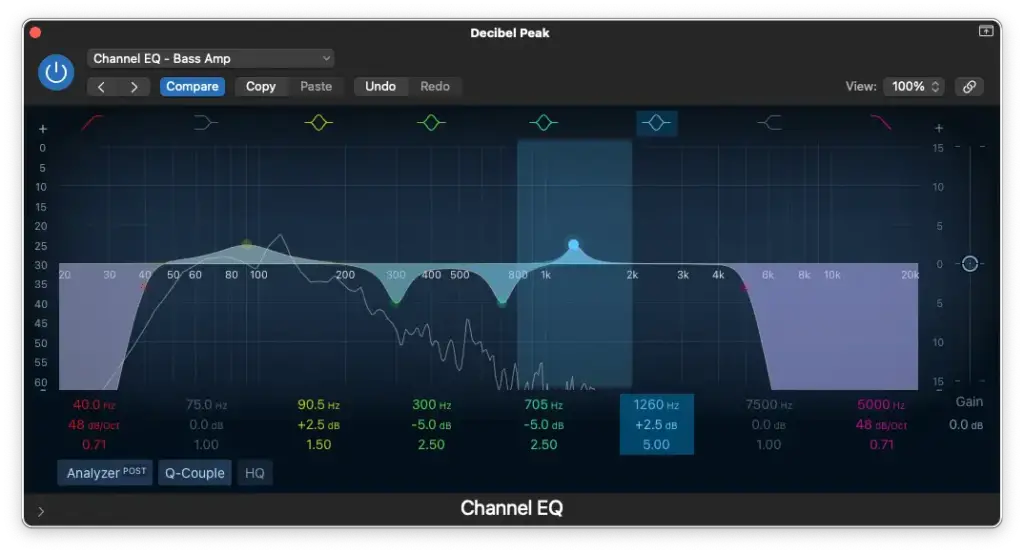
Follow these steps for a basic EQ setup for your “Amp/Amp Sim” track…
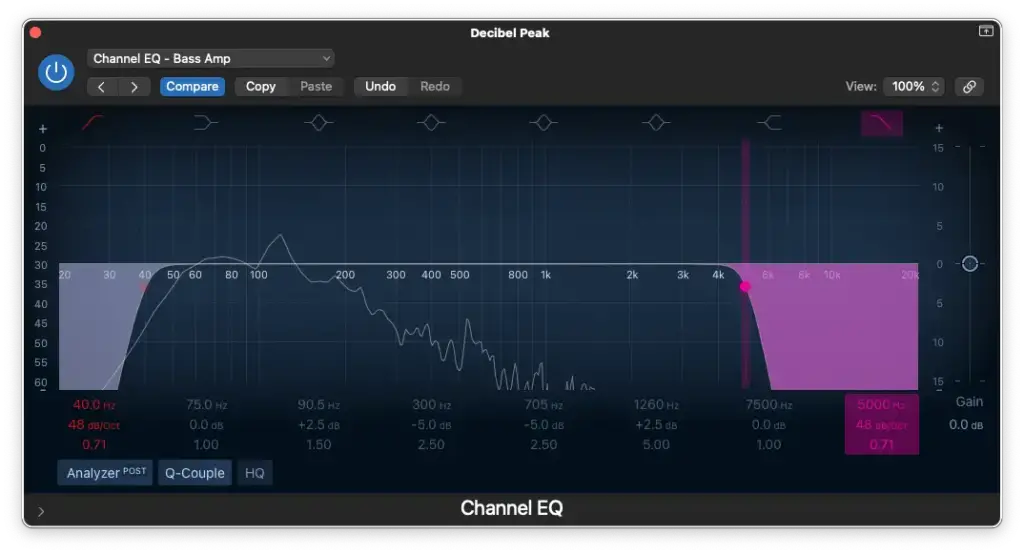
- High-Pass Filter around 20 Hz – 60 Hz.
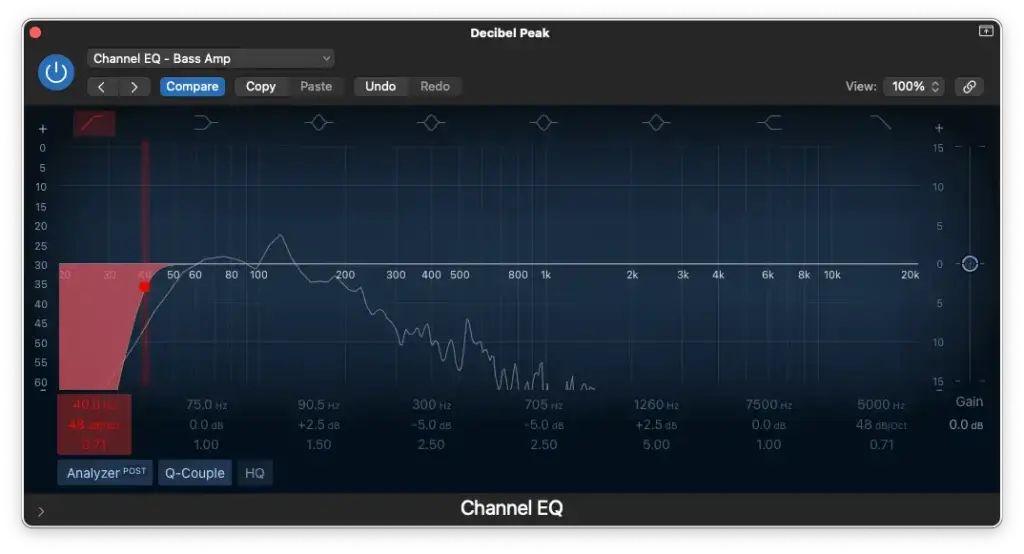
- Low-Pass Filter around 5,000-10,000 Hz.
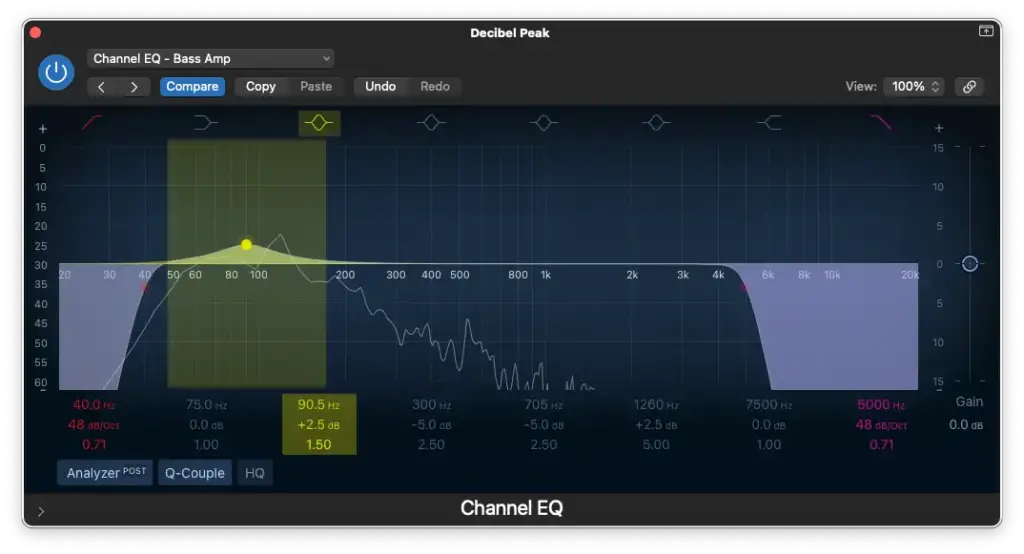
- Boost between 60 Hz – 150 Hz.
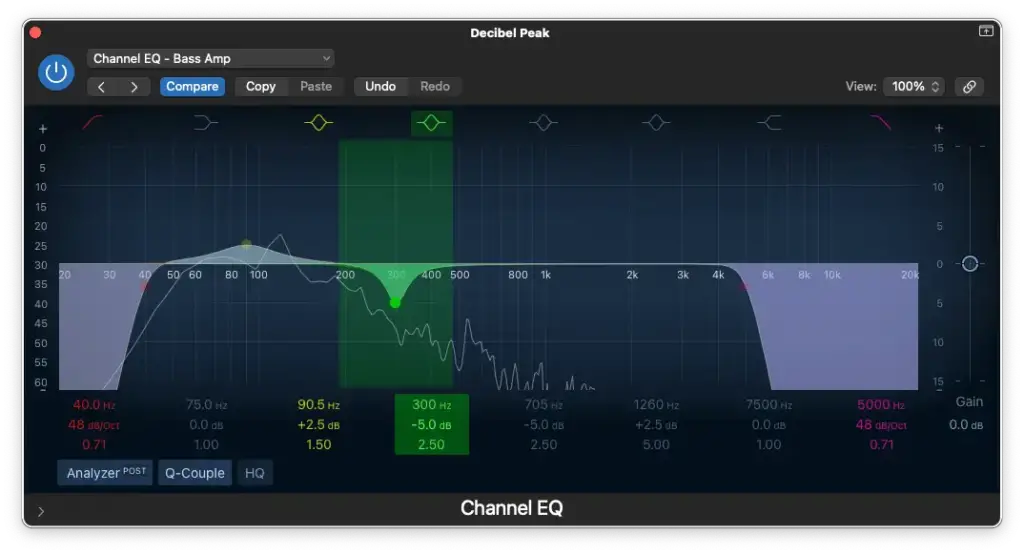
- Cut between 150 Hz – 500 Hz.
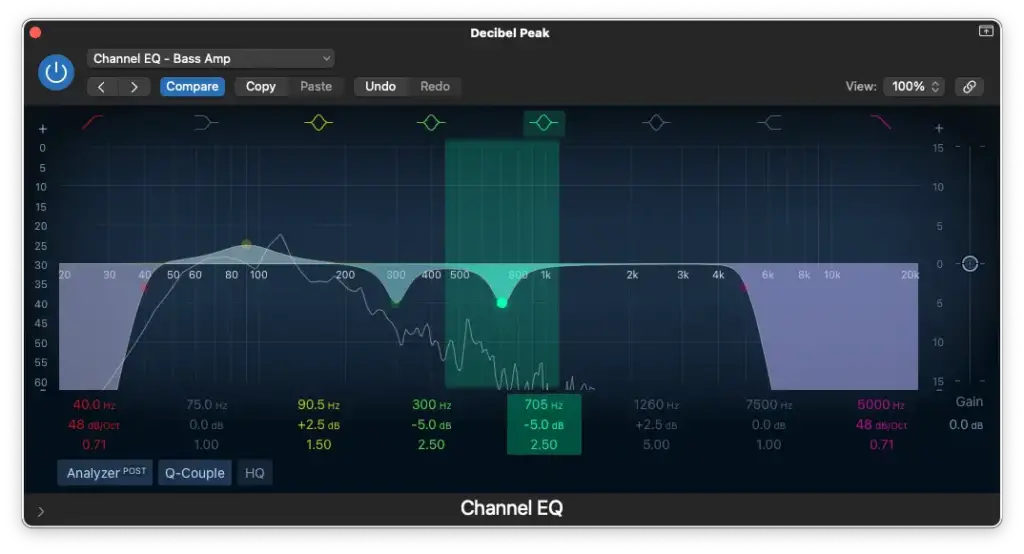
- Cut between 500 Hz – 800 Hz.
- Boost between 1,000 Hz – 2,000 Hz.
- Insert a 2-Band Multipressor, and set the 1st band to end at 100 Hz.

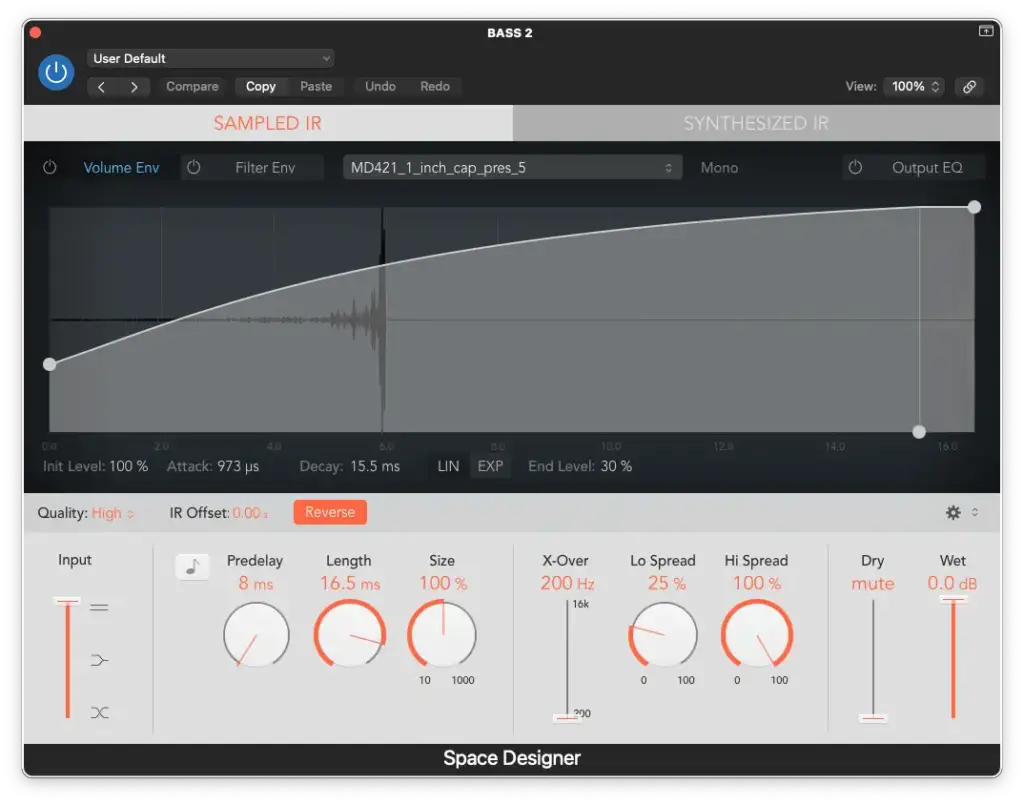
- Insert a Space Designer and load an impulse response.
Advanced EQ Settings
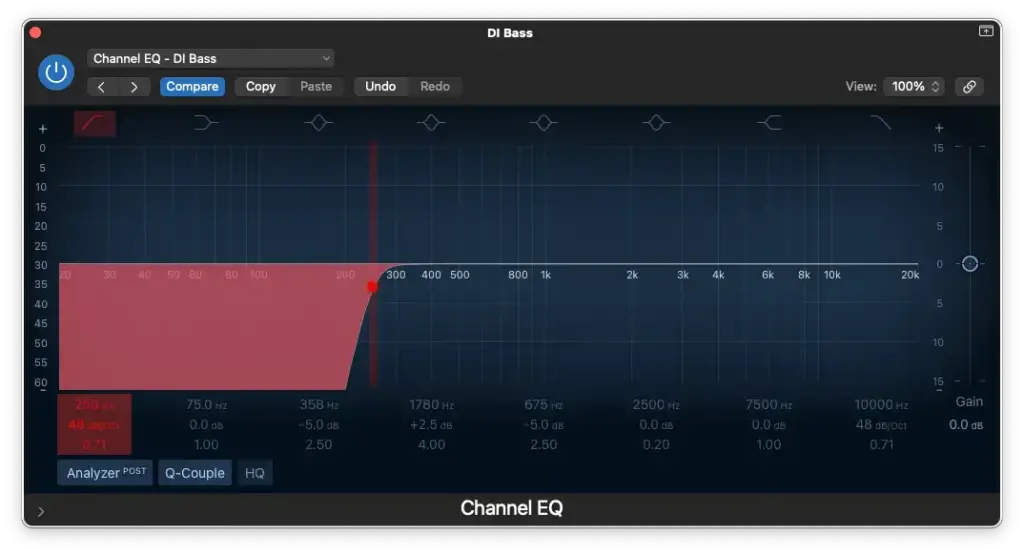
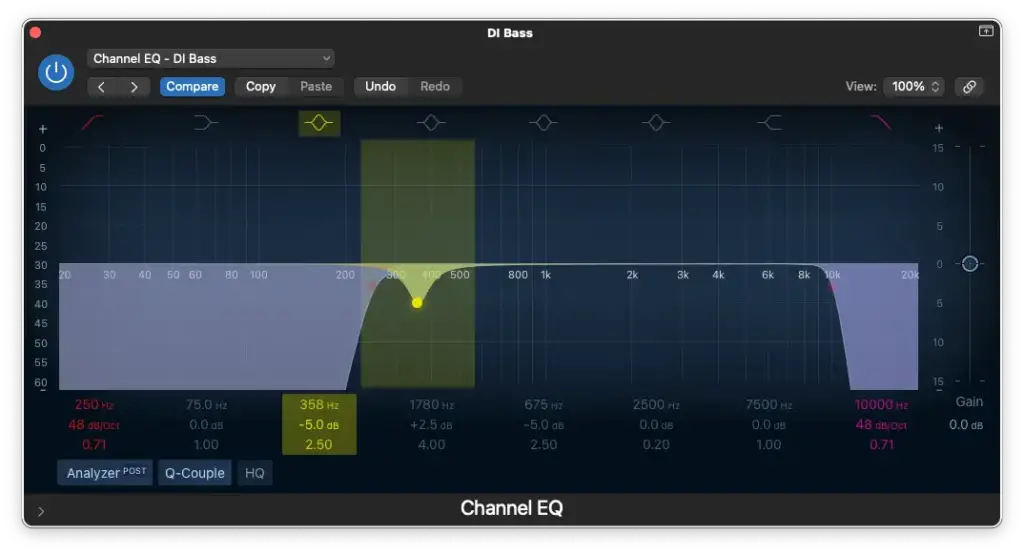
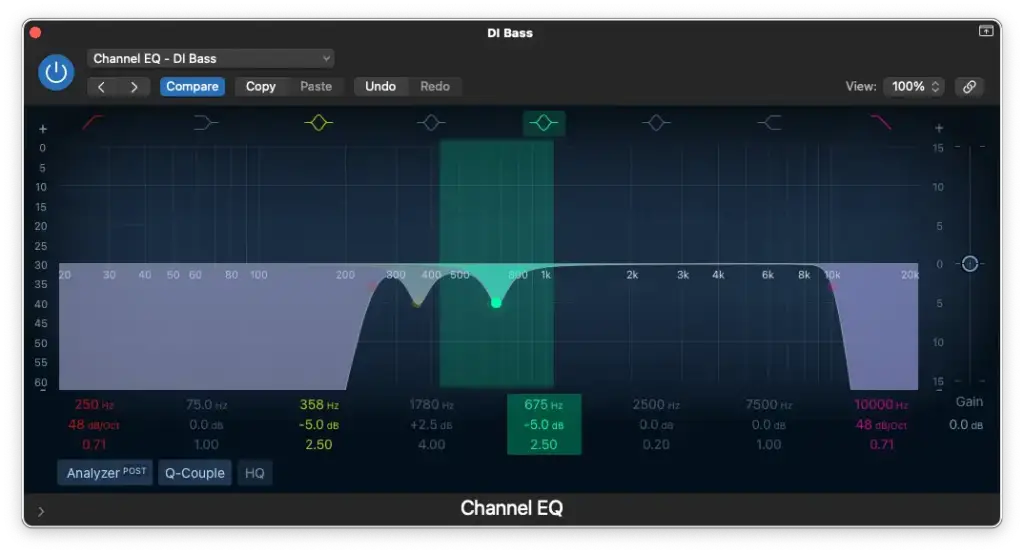
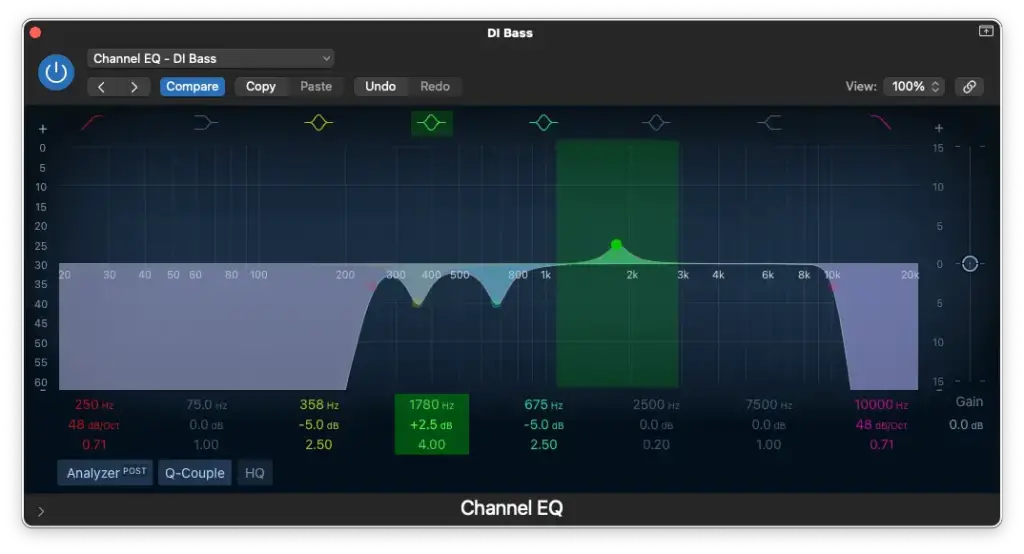
For more advanced EQ adjustments for your “DI Bass” track, follow these steps…
- High-Pass Filter around 250 Hz.
- Low-Pass Filter at 10,000 Hz.
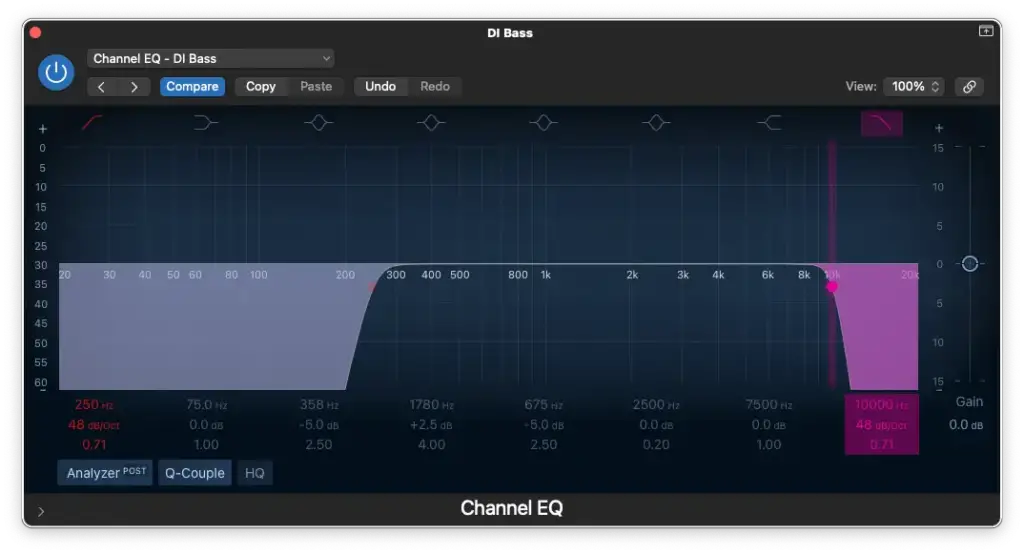
- Cut between 250 Hz – 800 Hz.
- Boost between 1,000 Hz – 2,000 Hz.
Compressor Settings
Applying compression to your bass guitar in Logic Pro X is essential for achieving a well-balanced mix.
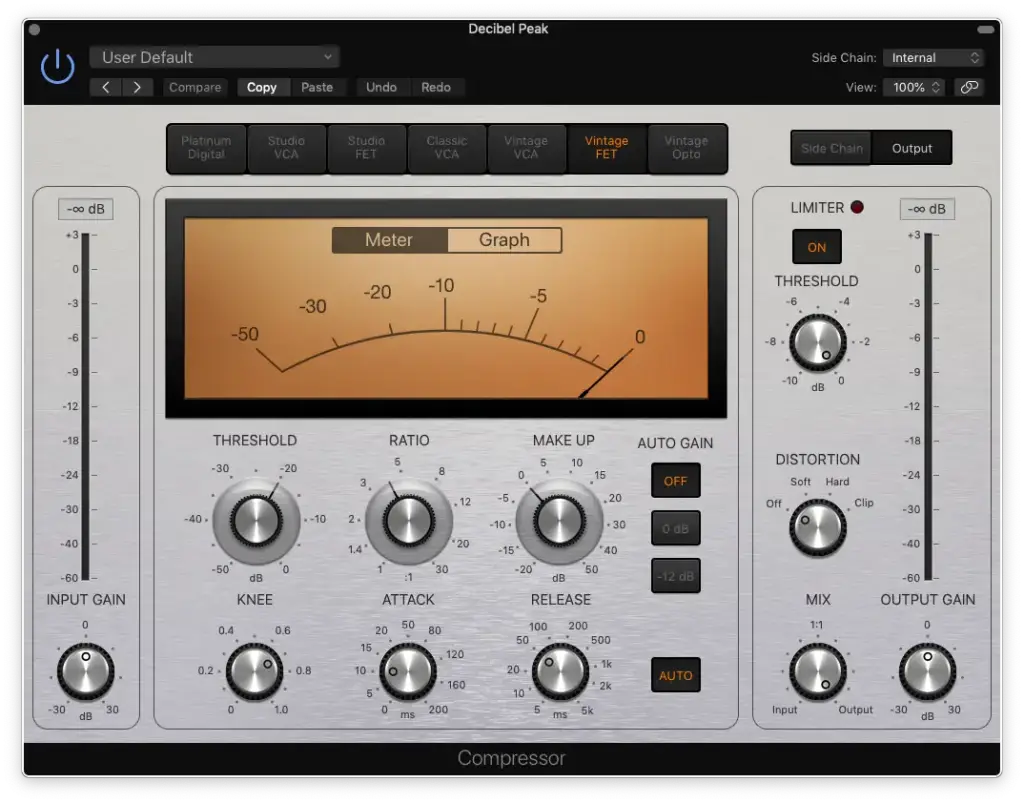
- Step 1: Set ratio to 4:1 Begin with a 4:1 compression ratio. This setting provides a subtle compression effect that maintains the natural character of the bass guitar.
- Step 2: Set attack to 10ms A 10ms attack time is a good starting point for bass guitar. Adjust this value based on the interaction between your bass and kick drum, which will be discussed further in the “mixing bass guitar with your kick drum” section.
- Step 3: Set release to “auto” Leaving the release time on “auto” is sufficient for bass guitar compression. It’s generally not a critical parameter for this application.
- Step 4: Set make-up gain to 0dB Initiate the make-up gain at 0dB. You can make fine level adjustments using the output gain as needed.
- Step 5: Set threshold to -20dB Maintain the threshold around -20dB, ensuring that you achieve 3-6dB of gain reduction. Adjust the input gain to align with the -20dB threshold effectively. Consistency across tracks is crucial, and this method helps maintain similar levels after compression.
Electric Guitar EQ and Compressor Settings
EQ Settings
- High-Pass Filter: Use a high-pass filter to cut frequencies below around 80 Hz. This helps clean up the bottom-end without affecting the guitar’s core tone.
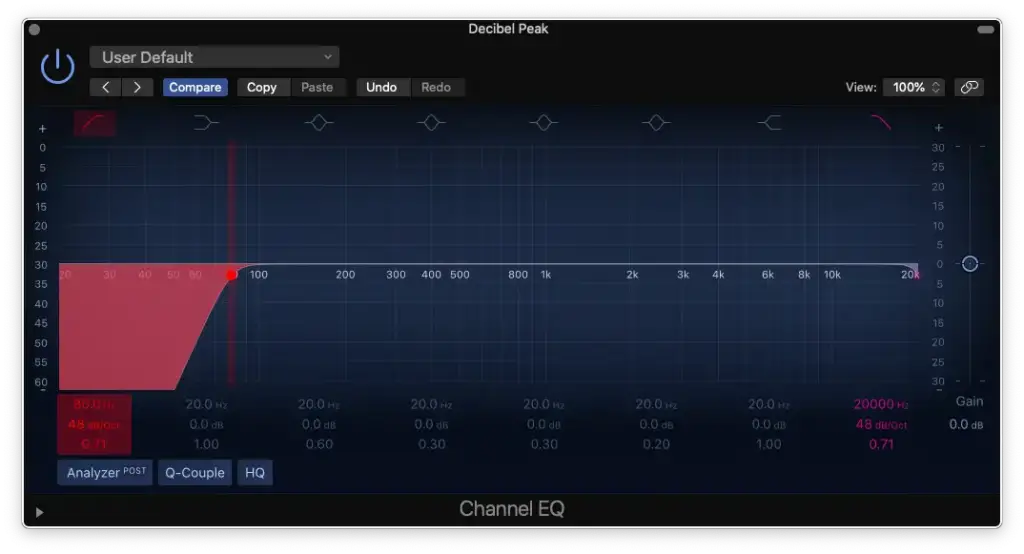
- Low-Pass Filter: Apply a low-pass filter to cut frequencies above about 10 kHz. This focuses the energy in the guitar’s frequency spectrum.
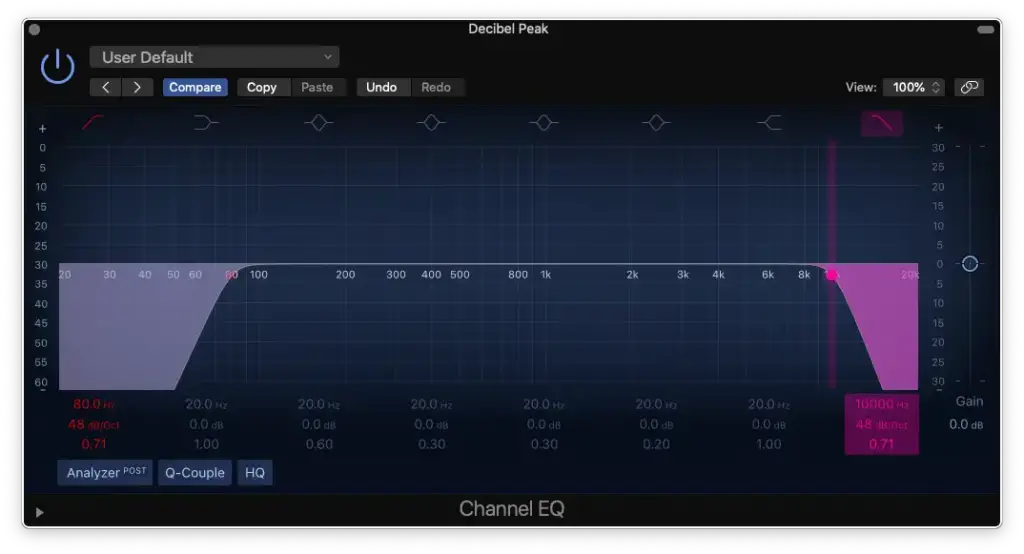
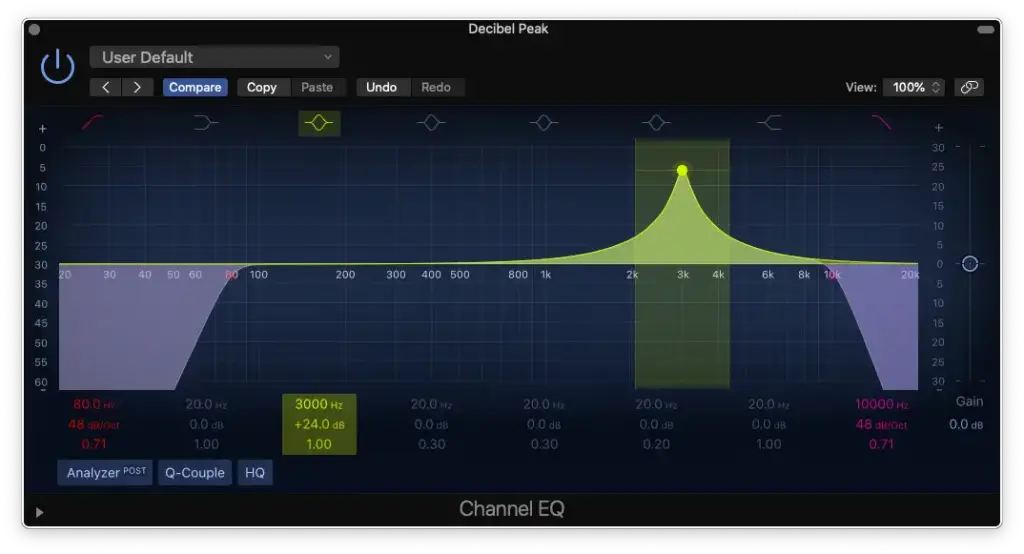
- Tweaking (Optional): Create notches and sweep through frequencies that may sound problematic or irritating. Reduce them by no more than 5 dB to address specific issues.
Compressor Settings
- Threshold: Determine the level at which your compressor starts compressing. Lower values mean more compression. Aim for about 6 dB of gain reduction.
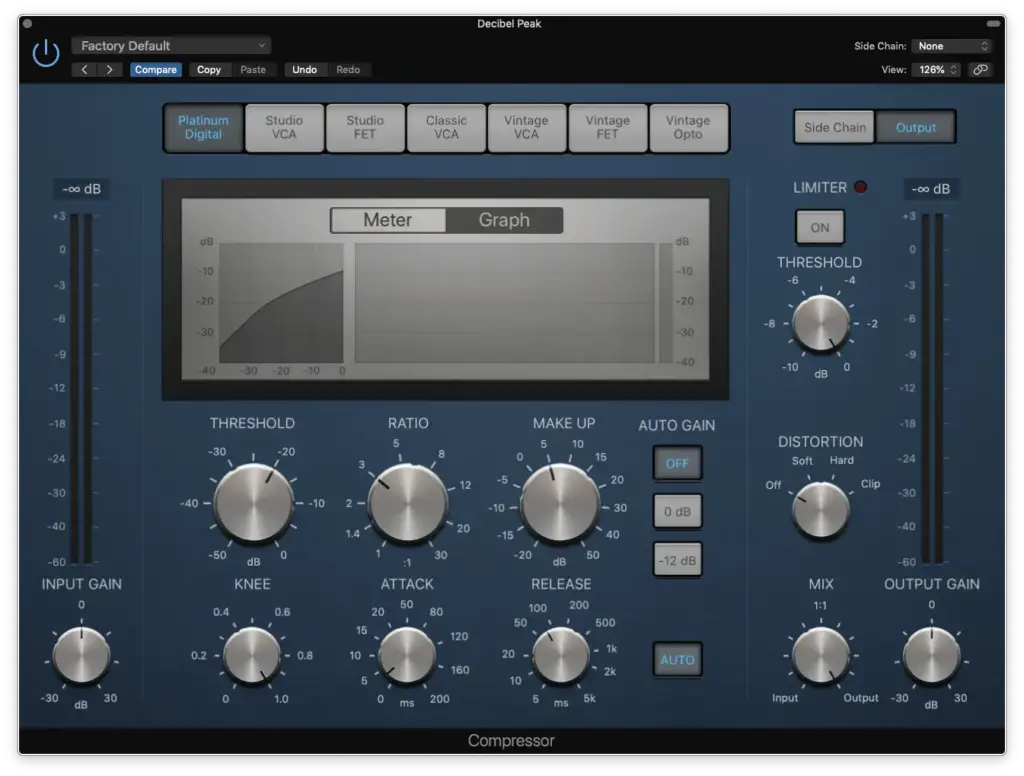
- Ratio: Set the ratio to control the degree of gain reduction above the threshold. A 3:1 ratio is often suitable for guitars.
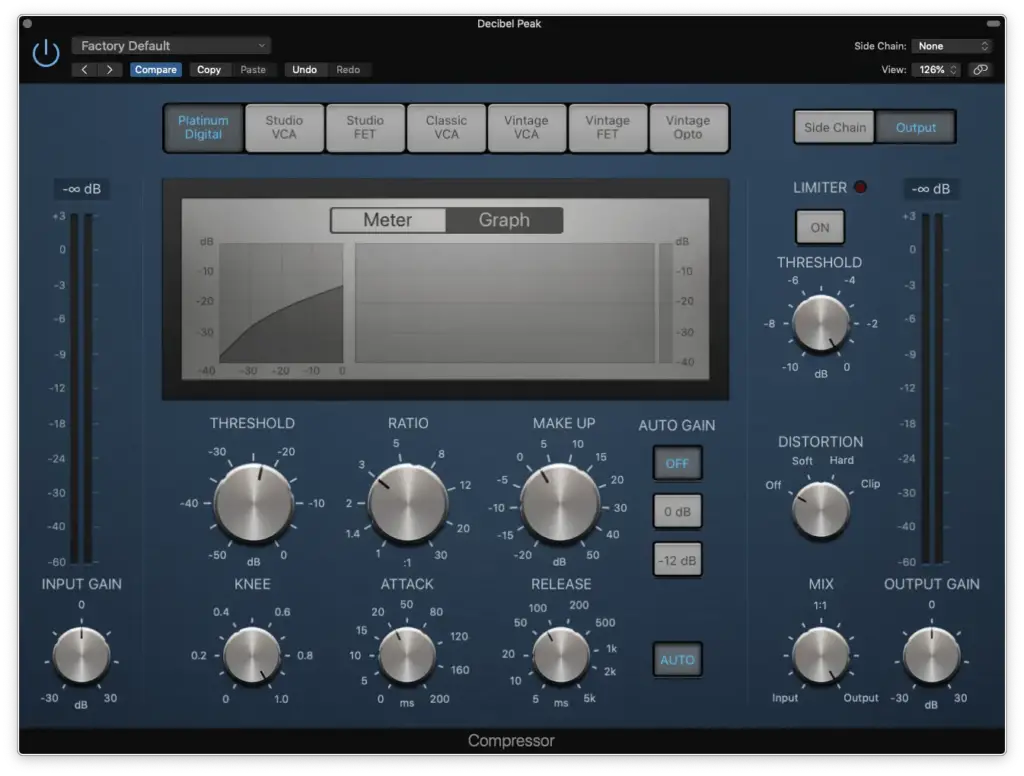
- Make-Up/Output: Use this parameter to compensate for the loss of amplitude due to compression. Match it to the initial amplitude before compression (typically around 6 dB if you reduced by that amount).
- Knee: Choose between a soft knee (smooth) or hard knee (aggressive) to shape the compression curve. For a natural sound, opt for a soft knee.
- Release: Adjust the release time to determine how long the compressor holds onto the signal. A setting around the middle offers a natural response.
Piano EQ and Compressor Settings
Increase your piano’s presence and clarity with the following EQ settings for both beginners and those looking for advanced precision.
Basic EQ Settings
Begin with these settings to enhance your piano’s sound globally.
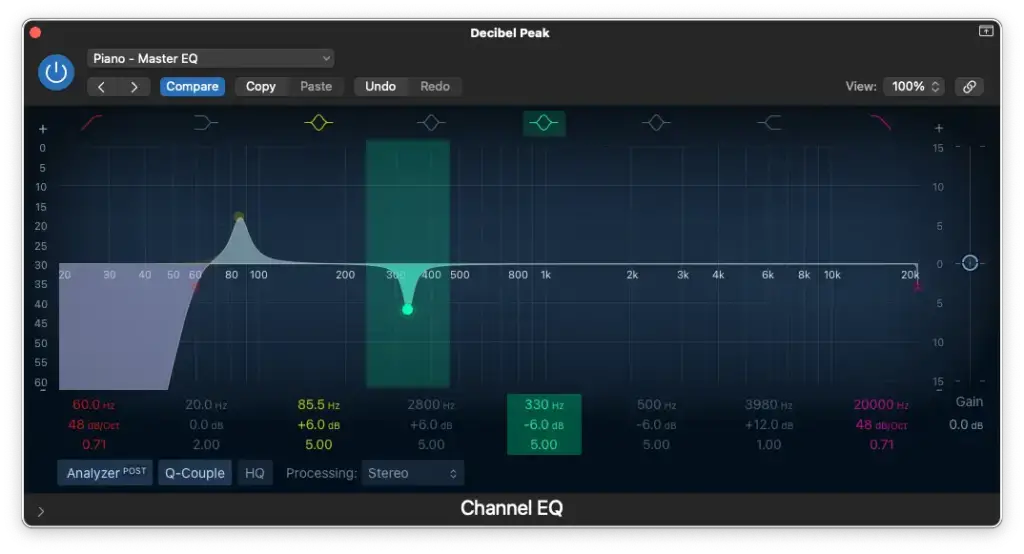
- High-Pass Filter around 60 Hz – 80 Hz
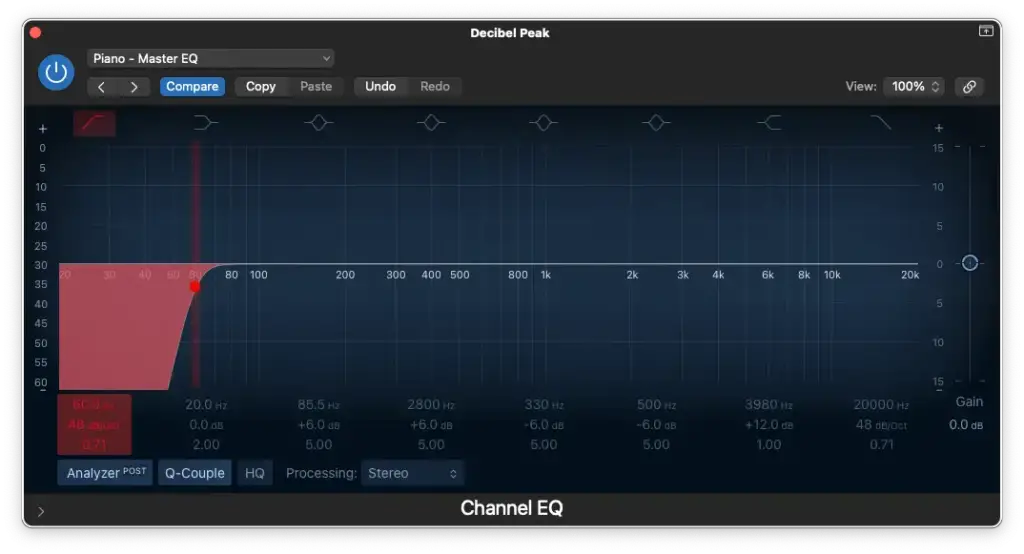
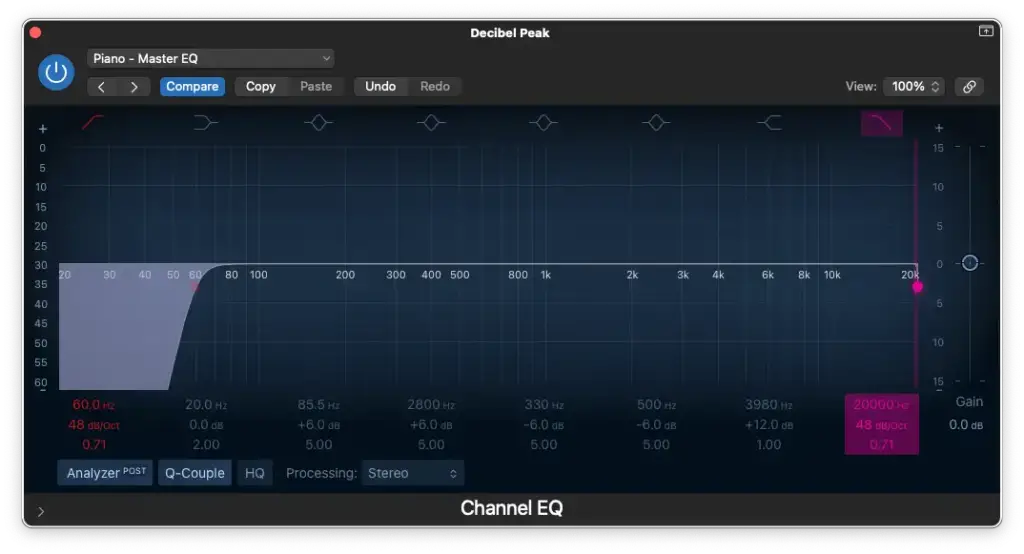
- Low-Pass Filter at 20,000 Hz
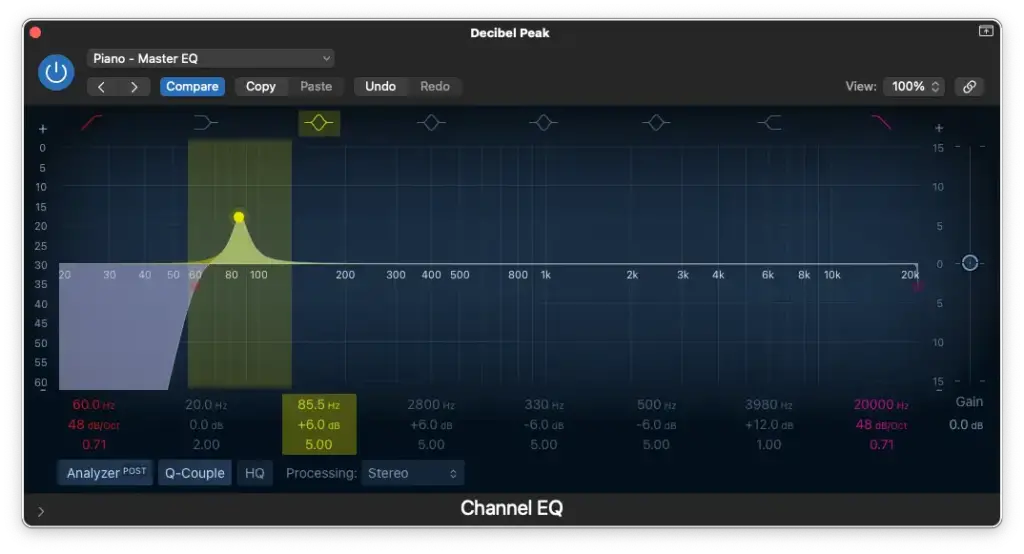
- Boosting/Cutting around 80 Hz – 120 Hz
- Cutting between 200 Hz – 500 Hz
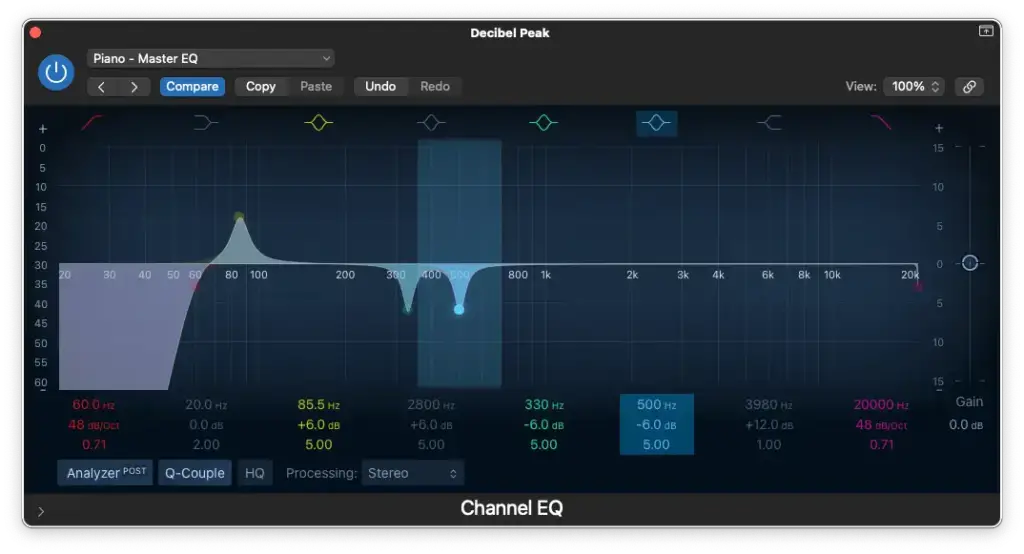
- Boosting around 1,000 Hz – 2,000 Hz
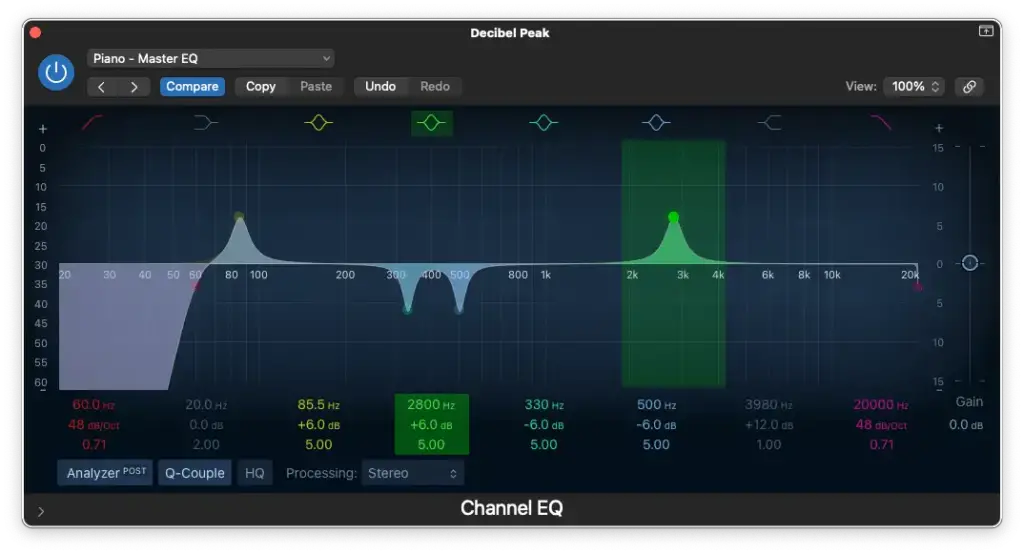
- High-Shelf Boost around 4,000 Hz
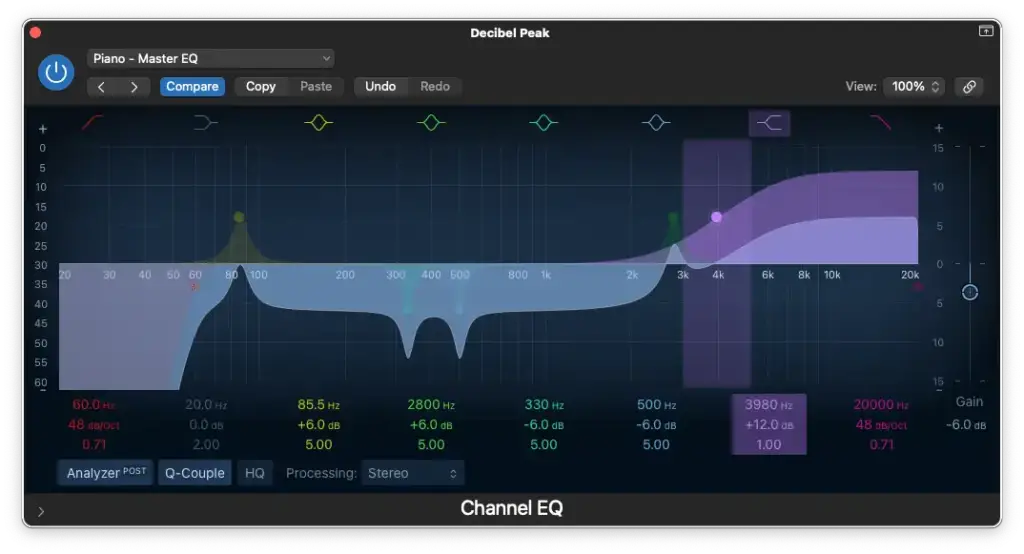
Advanced EQ Settings
For more precision, tailor your EQ settings for individual microphone positions.
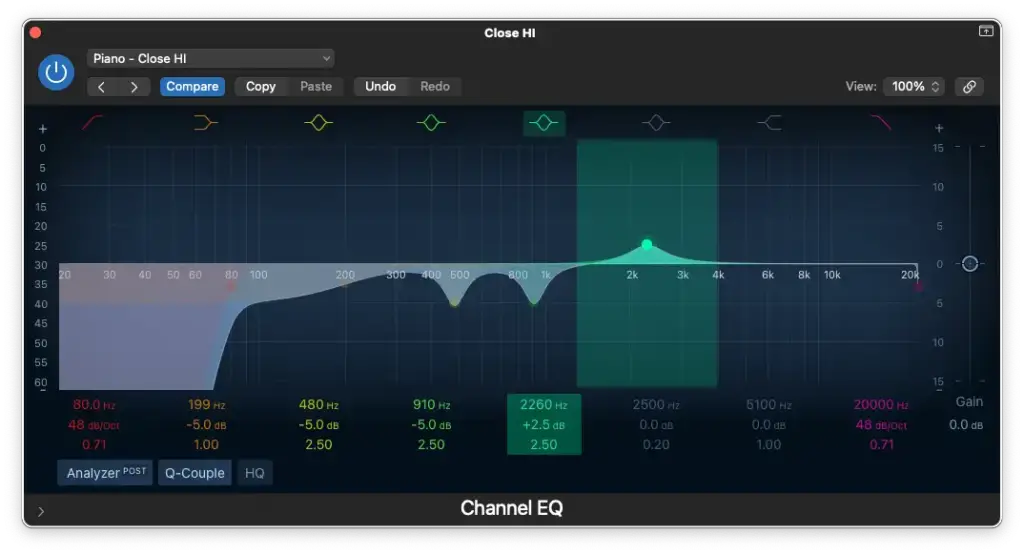
Close Microphone Position (Left/Low)
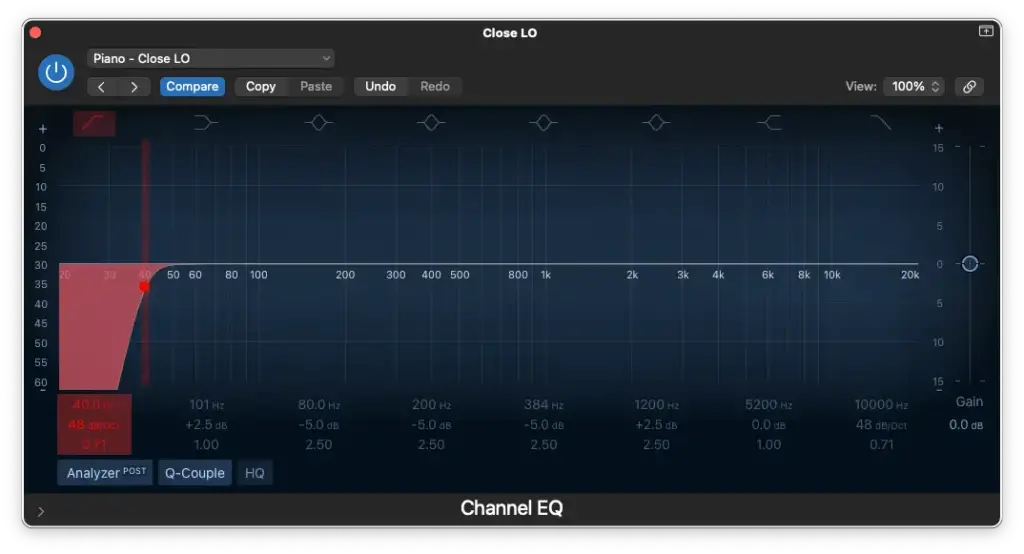
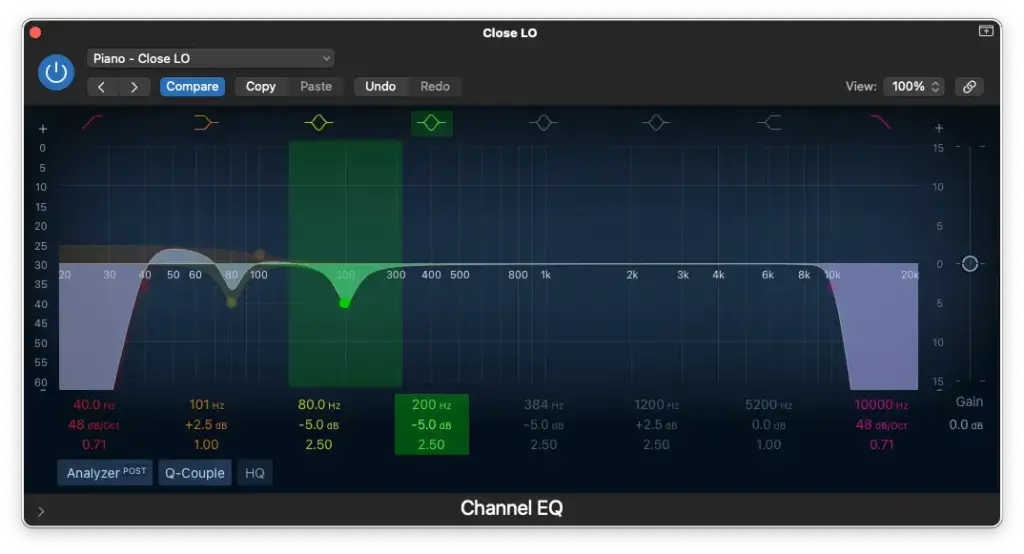
- High-Pass Filter around 40 Hz – 60 Hz Maintain or enhance the low-end with a high-pass filter. Adjust to accommodate the microphone’s proximity to the piano.
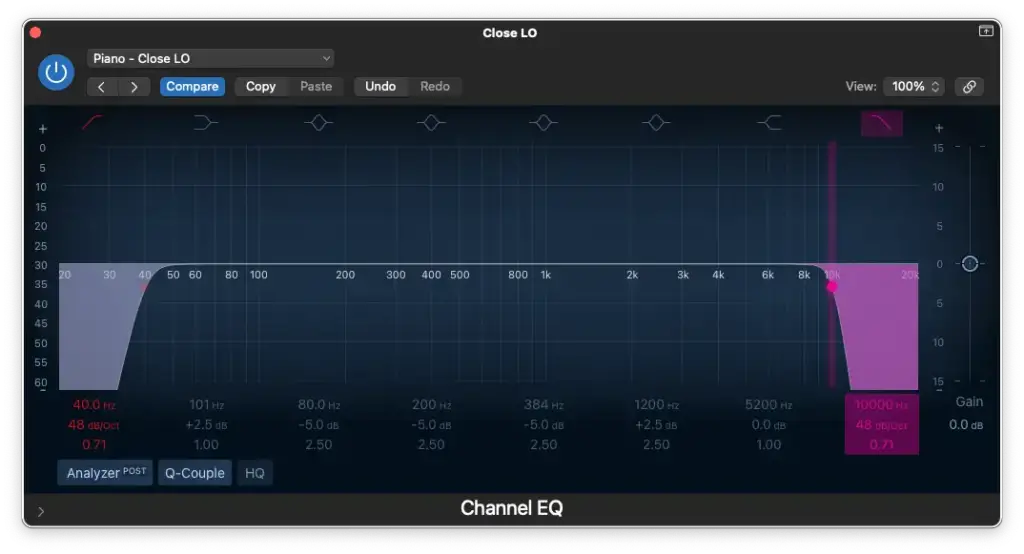
- Low-Pass Filter at 10,000 Hz Darken the tone slightly by applying a low-pass filter at 10,000 Hz. Maintain the filter to avoid excessive high-frequency content.
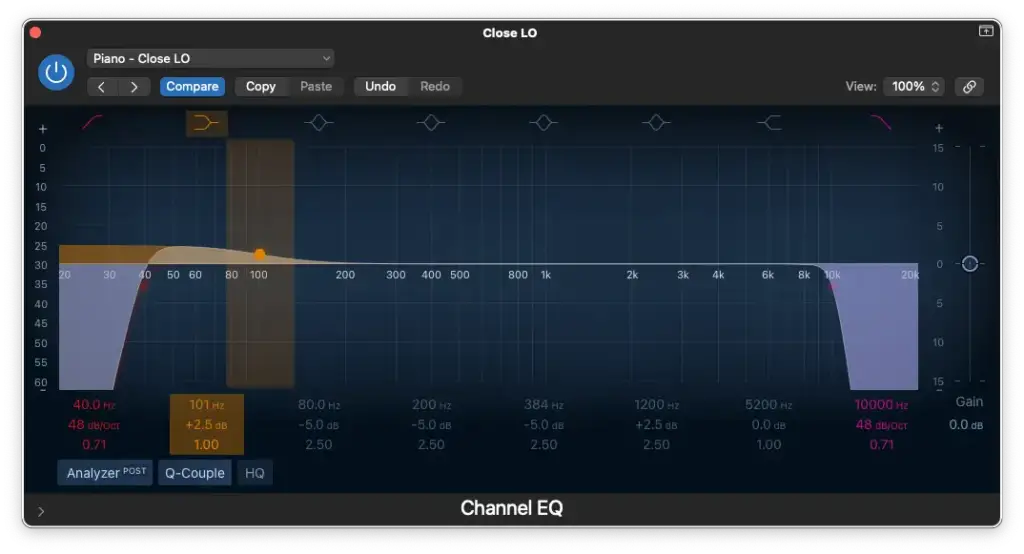
- Low-Shelf Boost around 100 Hz Add thickness to the low-end by slightly boosting around 100 Hz.
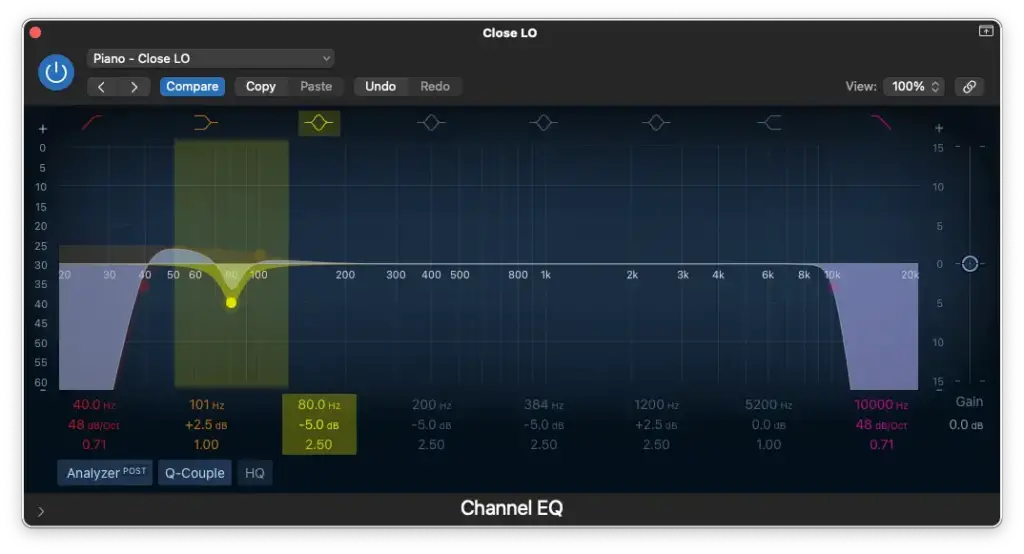
- Cutting around 80 Hz – 100 Hz Create definition in the low-end by making precise cuts between 80 Hz and 100 Hz. This action can enhance the results of the previous low-shelf boost.
- Cutting between 200 Hz – 500 Hz Refine the mids by making cuts between 200 Hz and 500 Hz. This step is crucial for eliminating troublesome frequencies.
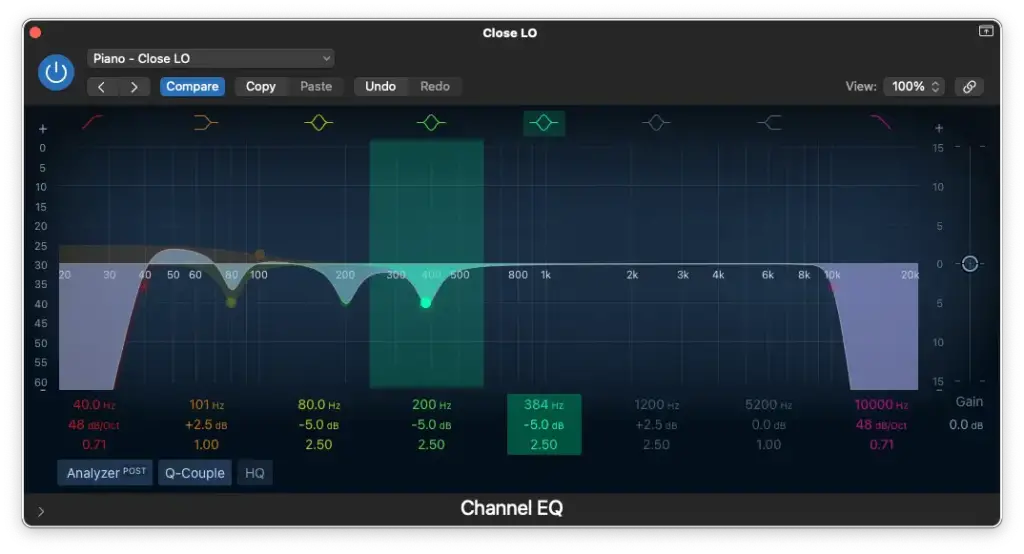
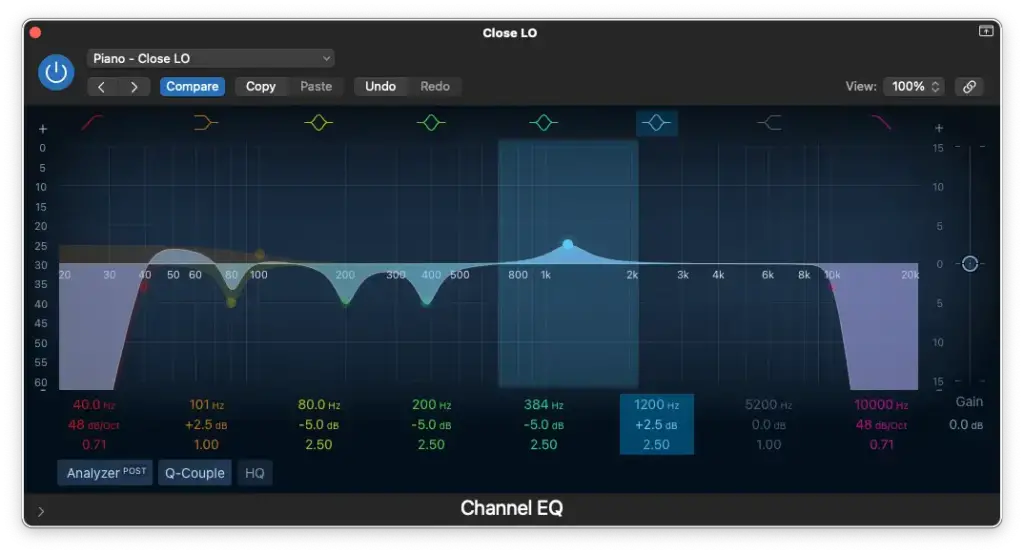
- Boosting around 1,000 Hz Add some crunch to the sound by boosting around 1,000 Hz. Experiment to find the preferred level of crunch.
Close Microphone Position (Right/High)
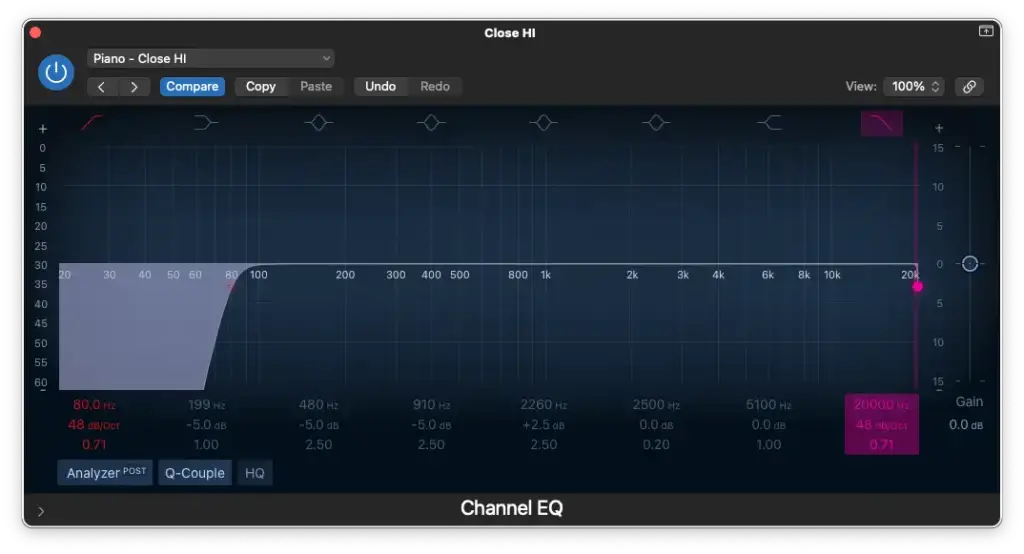
- High-Pass Filter at 80Hz – 100 Hz Free up space in the right-hand by applying a high-pass filter between 80 Hz and 100 Hz. Eliminate unnecessary low frequencies.
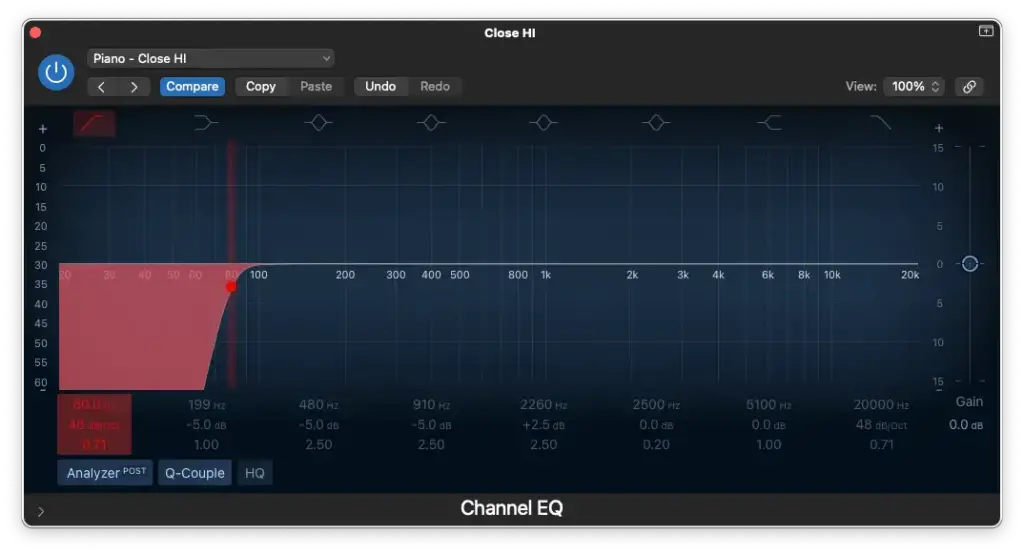
- Low-Pass Filter at 20,000 Hz Maintain audio cleanliness by setting a low-pass filter at 20,000 Hz. Preserve the upper frequencies.
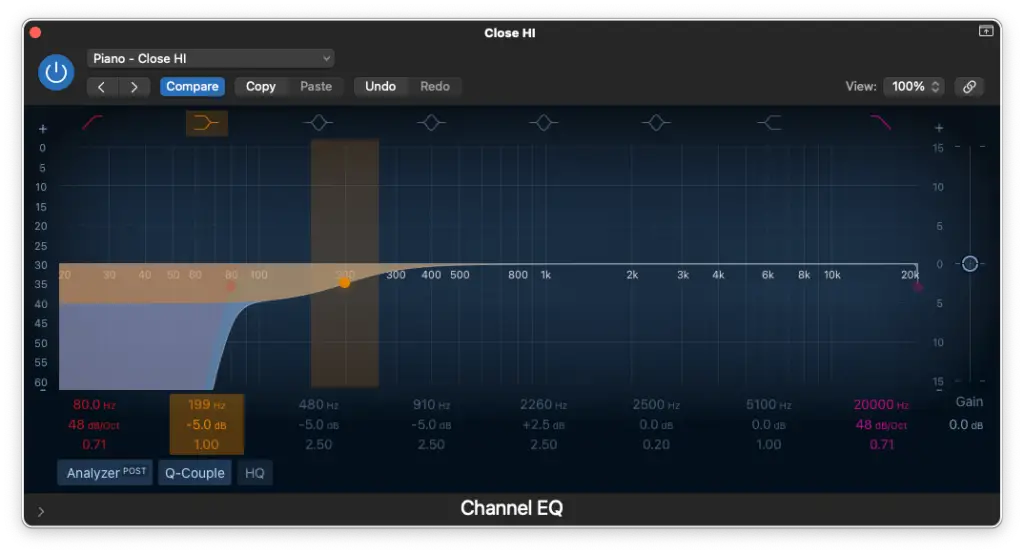
- Low-Shelf Cut around 100 Hz – 200 Hz Balance the tonal properties of the left and right channels by cutting around 100 Hz to 200 Hz in the right microphone.
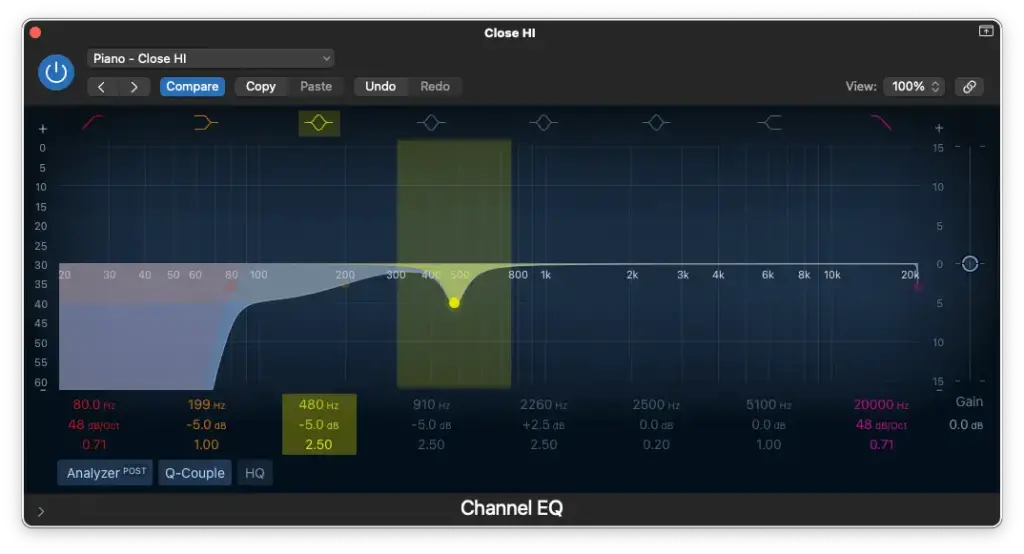
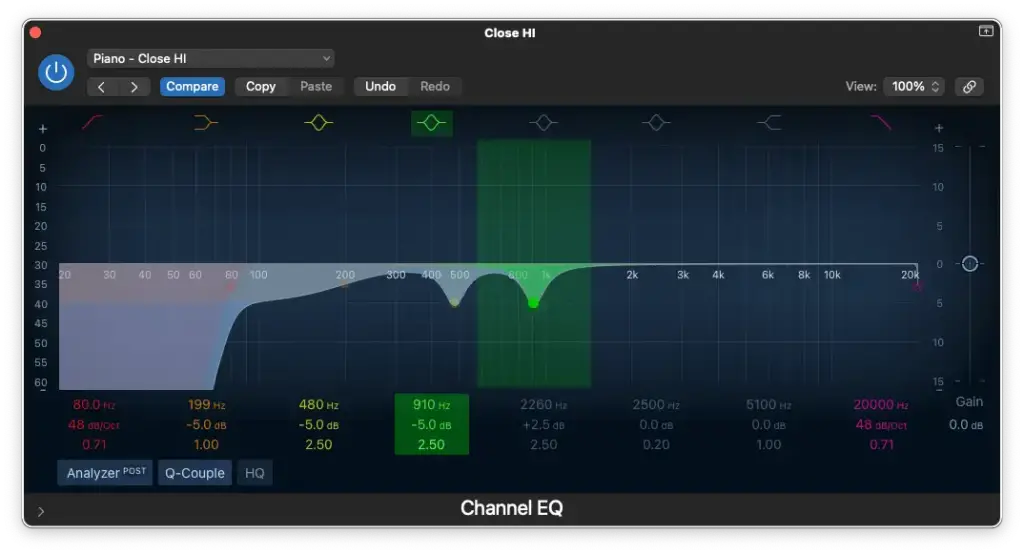
- Cutting between 500 Hz – 1000 Hz Define the high-mids by making precise cuts between 500 Hz and 1000 Hz. Avoid targeting the same frequencies twice with multiple EQ adjustments.
- Boosting around 2,000 Hz Enhance brilliance and sparkle by boosting around 2,000 Hz in the right microphone.
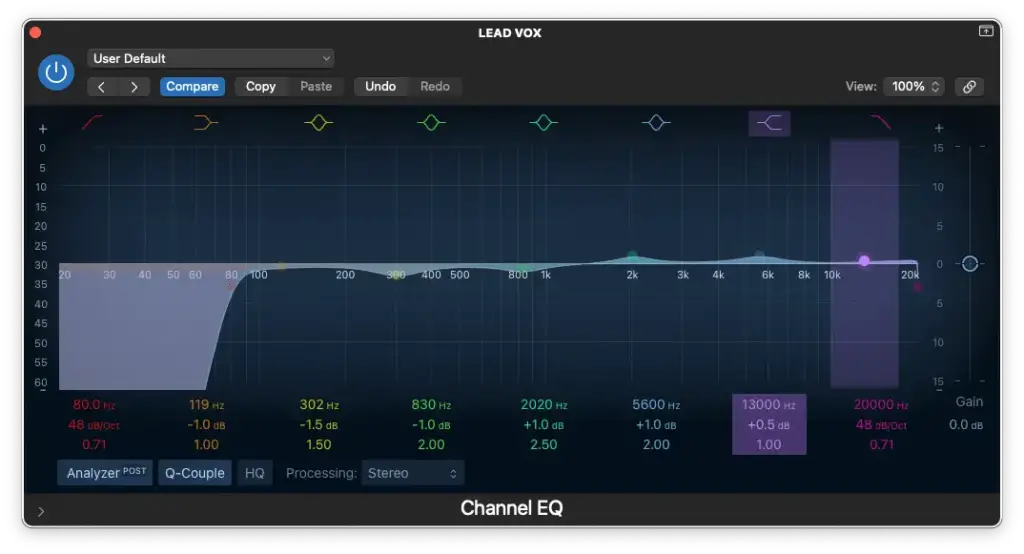
Vocals EQ and Compressor Settings
Vocal Ranges
Begin by understanding your vocalist’s range, whether they are male or female, baritone or soprano. Knowing this will guide your EQ decisions. Different vocal ranges require different treatment, and it also affects the choice of microphone. Microphones aren’t transparent; they add their own character to the sound. So, consider your vocalist’s characteristics, microphone type, and how they’ll blend in the mix.
Here’s a quick reference to vocal ranges:
- Baritone: A2 – F4
- Tenor: C3 – A4
- Alto: G3 – A5
- Soprano: C4 – A5
EQ Settings
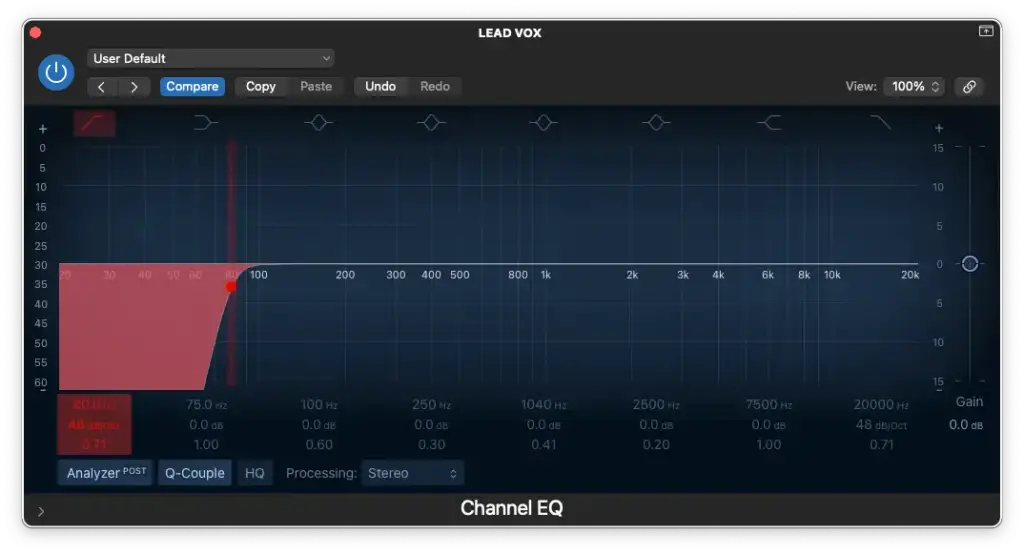
- High-Pass Filter around 60 Hz – 200 Hz
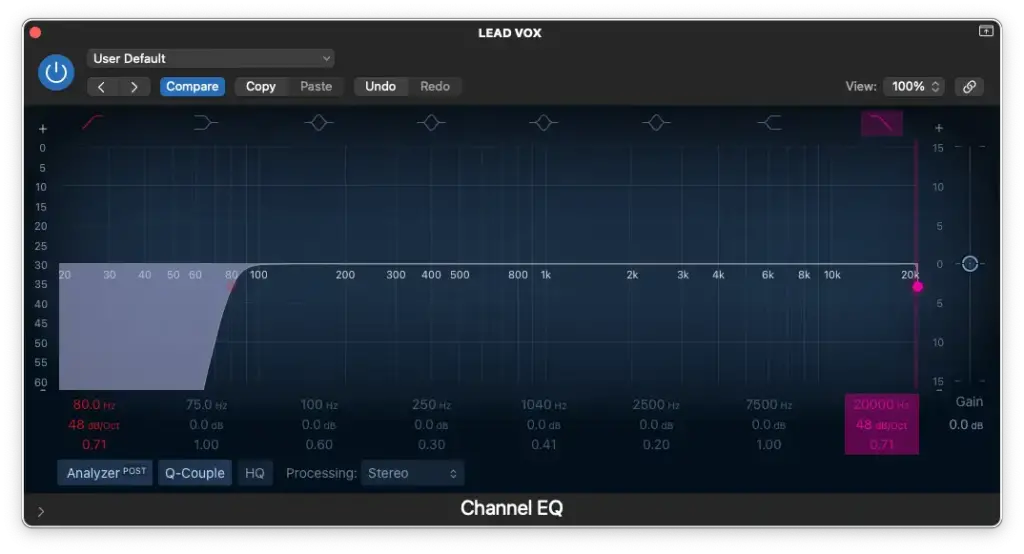
- Low-Pass Filter at 20,000 Hz
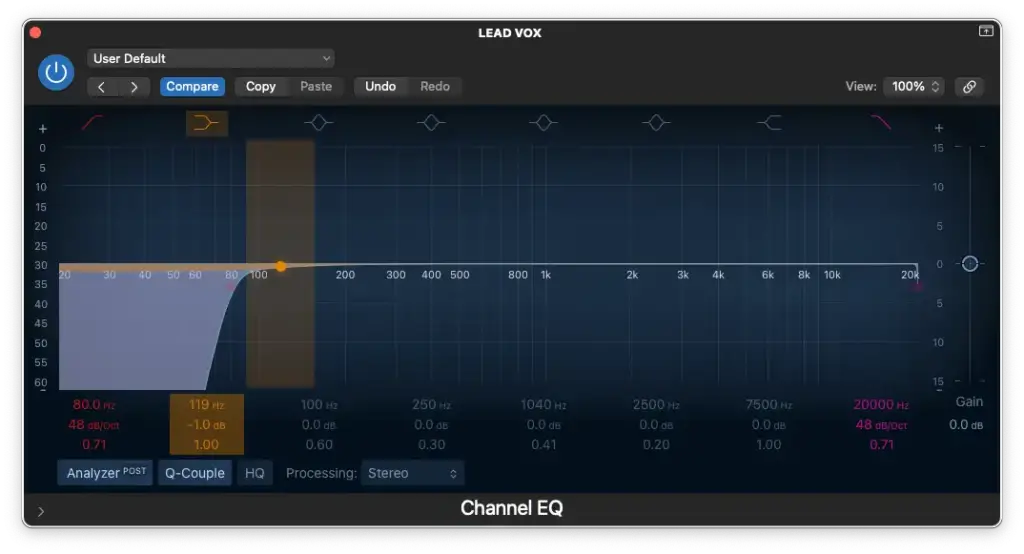
- Low-Shelf around 100 Hz – 200 Hz (for male vocals)
- Cutting around 200 Hz – 500 Hz (to reduce muddiness)
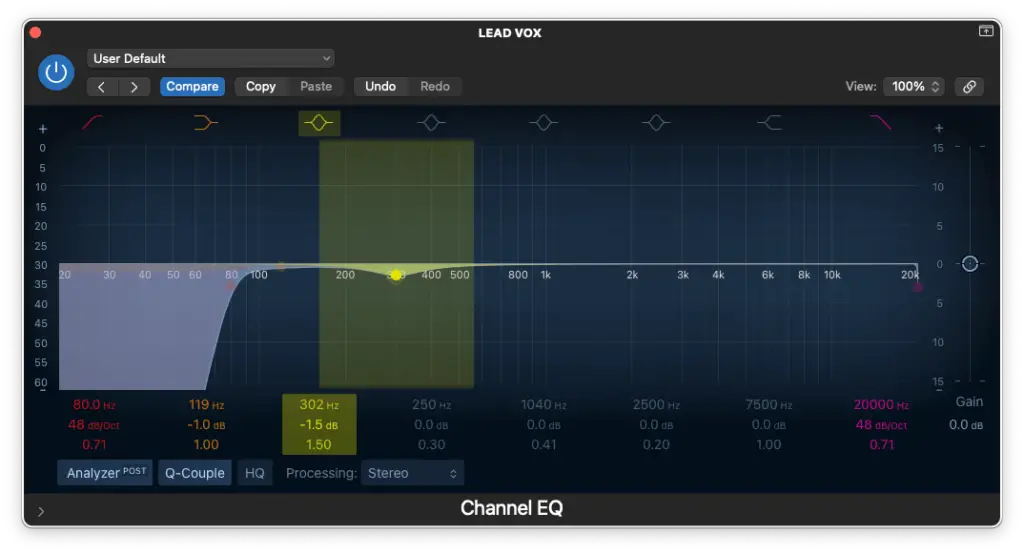
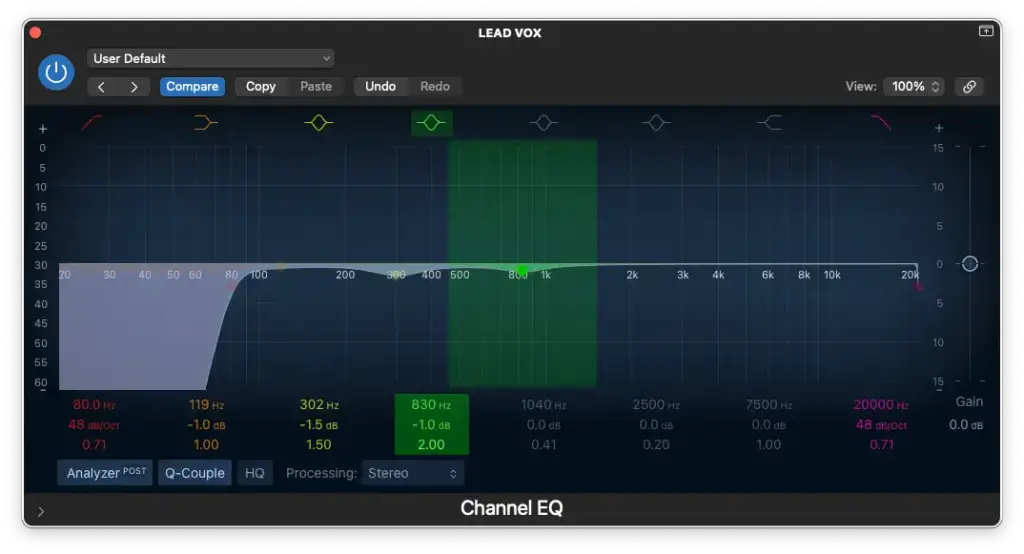
- Boosting/Cutting around 800 Hz – 1,000 Hz (to adjust nasality)
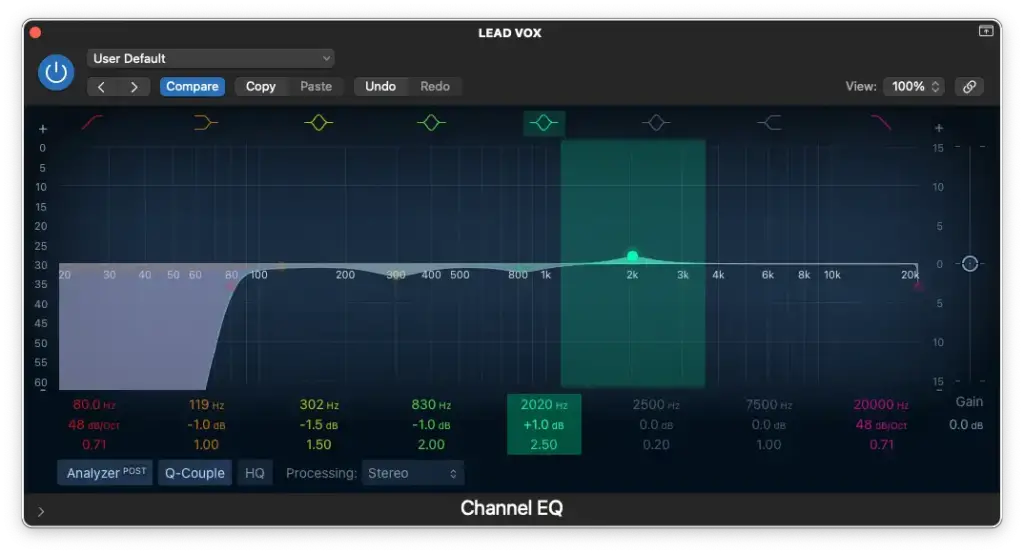
- Boosting around 1,000 Hz – 2,000 Hz (for added bite)
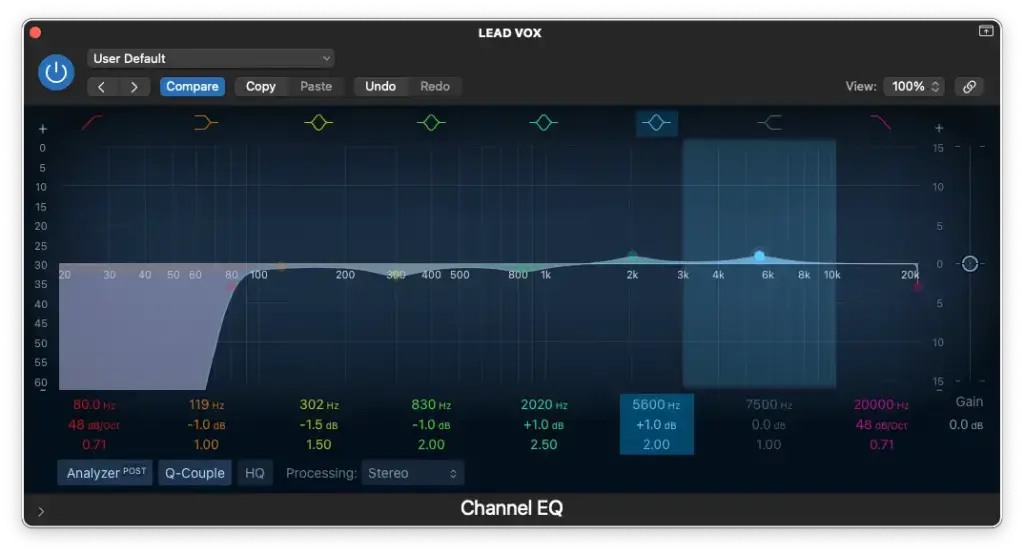
- Boosting around 5,000 Hz – 8,000 Hz (for presence)
- High-Shelf around 10,000 Hz – 15,000 Hz (for airiness)
Frequently Asked Questions (FAQ): Mixing and Mastering
How is mastering different from mixing?
Although almost all of the same plugins are used for both, mixing and mastering are quite different.
It’s all about the INTENTION.
Mixing involves lots of “cleaning up” and techniques that assist the individual tracks in sounding like they belong together. That comes by accentuating certain characteristics and obscuring others.
Mastering, on the other hand, is much more focused on loudness.
Of course, some colouration can still be done in the mastering phase but it’s much more subtle and aimed at the final product.
Technically speaking, you could get your track to sound EXACTLY the way you want it in the mixing phase and simply use a limiter and loudness meter to get your track up to industry standard.
That being said, mastering is just as subjective as mixing.
Personally, my tracks just wouldn’t sound the same without my mastering chain. It’s like a signature sound that you can apply to anyone’s music.
How loud should a master be?
Nowadays, we measure loudness in Loudness Units (LUFS).
That being said, you’ll find that most tracks (we’re talking about popular music here) average -10 LUFS.
Does that mean that your track needs to be as loud?
It really depends on the genre and how much dynamic range you want to preserve. Part of what makes your track “louder” is the level of compression.
If you go too far, you’ll also end up with an unpleasantly distorted master.
I personally aim for -10 LUFS and it usually gets me the results I’m looking for. However, I always tell myself “as loud as possible without compromising tonal quality”.
In other words, prioritize the SOUND over the actual loudness.
How loud should a mix be before mastering?
If you ask me, you should aim to get your mix to average -18 dB.
You can read more about that HERE, but let’s just say it’ll come in handy if you’re using any analog modelled plugins on your master bus.
Either way, the truth is it doesn’t really matter BECAUSE…
You can just as easily reduce the level before any particular plugins by using a trim/output gain knob (which is present in the EQ and Compressor in Logic Pro X).
How can you make a mix sound good on all devices?
It may not be the answer you’re looking for, but…
You’ll simply need to go through LOTS of trial and error before getting your mix to sound good on all devices. That’s why I prefer to mix and master a track in TWO HOURS OR LESS.
I never said that I don’t eventually go back to tweak things!
The reality is that you could spend DAYS refining your mix with your setup, but you have no idea what it’ll sound like on someone’s earbuds.
So, the sooner you bounce your track, the sooner you can start taking notes.
That being said, the process of refining your mix to sound good on all devices can take WEEKS. Everytime you hear something’s off, take notes and make the edit when you get home!
Summary: How To Mix and Master Music in Logic Pro X
Did that simplify your life or what?!
Maybe the entire process of mixing and mastering still feels a bit overwhelming, but the best way to conquer it is by diving right in and putting your knowledge into action.
As I mentioned earlier, if you’re looking for EVEN MORE guidance and an in-depth learning experience, my online course, discreetly named “MIX and MASTER IT Yourself” is readily available for you to explore. Alternatively, for a more personalized touch, consider scheduling a 1-on-1 lesson with me over Zoom.
For everyone else, I hope the starter presets I’ve provided will prove to be invaluable in getting you started on your musical journey as swiftly as possible.
Remember, everything we’ve covered can be achieved using only the STOCK plugins in Logic Pro X – EQ, Compressor, Reverb, and Limiter. These are the fundamental tools you need for both mixing and mastering. While the rest is subjective, having a good pair of headphones (or two) is essential. Although speaker monitors are strongly recommended, I managed without them for many years, so don’t let that hold you back.
If you have specific questions about mixing and mastering, or if you’d like to share your experiences, don’t hesitate to leave your thoughts in the comments section below. We’re here to help!
Now, you’re equipped with the knowledge and tools to take your music to the next level. Don’t let the challenges of mixing and mastering hold you back – embrace the process and let your creativity shine. What’s your biggest difficulty when it comes to mixing and mastering? Share your thoughts, and let’s continue this musical journey together!
Sources
https://blog.andertons.co.uk/learn/what-is-a-guitar-amp-impulse-response
https://support.apple.com/en-ca/guide/logicpro/lgcef2af4d05/mac

