If you’ve ever found yourself wrestling with the complexities of EQing drums, you’re not alone!
Crafting a professional and balanced drum sound is a key element in achieving that polished, radio-ready mix. In this guide, we’ll unravel the mysteries of how to EQ drums, providing you with the essential knowledge to take your drum mixes to new heights.
As you continue reading, you’ll gain insights into the nuances of subtractive and additive EQ, discover the best EQ plugins for the job, and receive a step-by-step breakdown on how to EQ each drum element – from the commanding kick and snappy snare to the thunderous toms and sparkling cymbals.
Ready to take your drum mixes to the next level? Don’t miss our actionable tips and detailed walkthroughs. Plus, stay tuned for an exclusive offer at the end of this article, designed to fast-track your journey to becoming a proficient music mixer and master.
Let’s dive in and unlock the secrets of mastering the art of EQing drums.
Table of Contents
Subtractive vs Additive EQ
The debate surrounding subtractive versus additive equalization has raged on among music producers for years.
Some argue vehemently in favor of one over the other, emphasizing the supposed impact on distortion and phase. However, let’s delve into the heart of the matter and uncover whether these differences are as substantial as they may seem.
“Subtractive EQ is better”
One common belief is that additive EQ introduces more distortion and phase issues than subtractive EQ.
The truth, however, is that you’ll get degradation even with subtractive EQ if you subtract too much! In the digital age, both subtractive and additive EQ, when applied judiciously, can yield pristine results without noticeable degradation (especially using a linear EQ).
The key is understanding the tools at your disposal and using them with precision.
“Professionals don’t use EQ”
For those who advocate against using EQ altogether, arguing that it alters the natural essence of the sound, consider this: the essence of a well-mixed track lies in its ability to carve a space for each element.
Subtractive EQ, in particular, serves as a sculptor’s chisel, cutting away frequencies that could otherwise muddy the mix.
But, you may also want to use additive EQ to bring out certain elements in the mix.
The Middle Ground
Contrary to the divisive opinions on this matter, the pragmatic approach is to recognize that both subtractive and additive EQ have their place in the mixing engineer’s toolkit. It’s not about adhering to a rigid doctrine but understanding the needs of the mix.
In the context of drum EQ, we’re not aiming to make the drums sound better for their own sake.
Instead, we’re wielding EQ as a means to shape the sonic landscape, allowing each drum element to coexist harmoniously within the mix.
Whether it’s subtracting unwanted frequencies or adding a touch of brilliance, our goal is to sculpt a balanced soundscape that serves the mix.
Best Plugins To EQ Drums
When it comes to EQing drums, the right choice of plugins can make all the difference in achieving a professional and nuanced sound.
While stock plugins that come bundled with your digital audio workstation (DAW), such as Logic Pro, are powerful and versatile, exploring additional options can open up new creative avenues.
Let’s dive into some classic favorites and shed light on the different types of EQ plugins that can improve your drum mixing.
Stock Plugins: A Solid Foundation
Logic Pro, like many other DAWs, provides a robust set of EQ tools right out of the box.
Plugins such as the Channel EQ and Linear Phase EQ offer a wide range of features, making them formidable contenders for drum EQing.
Before venturing into third-party options, familiarize yourself with these tools.
That’s what we’ll be using as an example is this guide, but any EQ plugin will do!
Classic Choices:
- FabFilter Pro-Q 3: Renowned for its intuitive interface and surgical precision, Pro-Q 3 is a favorite among professionals. Its dynamic EQ capabilities and real-time spectrum analysis make it a go-to for shaping drum frequencies with finesse.
- Waves SSL G-Equalizer: Modeled after the classic SSL 4000 G console, this plugin imparts a warm analog character to your drums. The SSL G-Equalizer is celebrated for its musicality and ability to add color to your mix.
- Sonnox Oxford EQ: Trusted in top studios, the Sonnox Oxford EQ is praised for its transparency and flexibility. Its five bands and comprehensive features make it a versatile tool for shaping drum sounds.
Types of EQ Plugins:
Parametric EQs:
These are the workhorses of drum EQing. Parametric EQs like the ones found in Logic Pro allow you to precisely control frequency bands, gain, and Q-factor. This level of control is invaluable when sculpting the tonal balance of individual drum elements, from the thump of the kick to the snap of the snare.
Linear Phase EQ:
Linear phase EQs, such as Logic Pro’s Linear Phase EQ, maintain the phase relationship of the original audio, preventing any phase shifts that could occur in traditional EQs. This is particularly useful when dealing with complex drum mixes, ensuring clarity without sacrificing the integrity of the sound.
How To EQ Kick
It’s litteraly the foundation of your mix; the kick drum.
Regardless of the genre, the kick drum usually shares most of its characteristics.
You might need to emphasize the bottom-end or even the “thump”.
Let’s listen to an example to give us some context…
You might be thinking to yourself, “that sounds fine the way it is”.
It’s true that the drum recording you just heard sounds full and was clearly recorded in a studio environment using professional microphones and placement. However, we’re not hearing it in the context of a full mix.
Let’s isolate the kick drum to hear what needs to be done…
It’s a subtle difference (as it should be), but the EQed kick will retain its bottom-end and “thump” in the context of a mix.
If we don’t apply the following EQ steps, we might lose out on that…
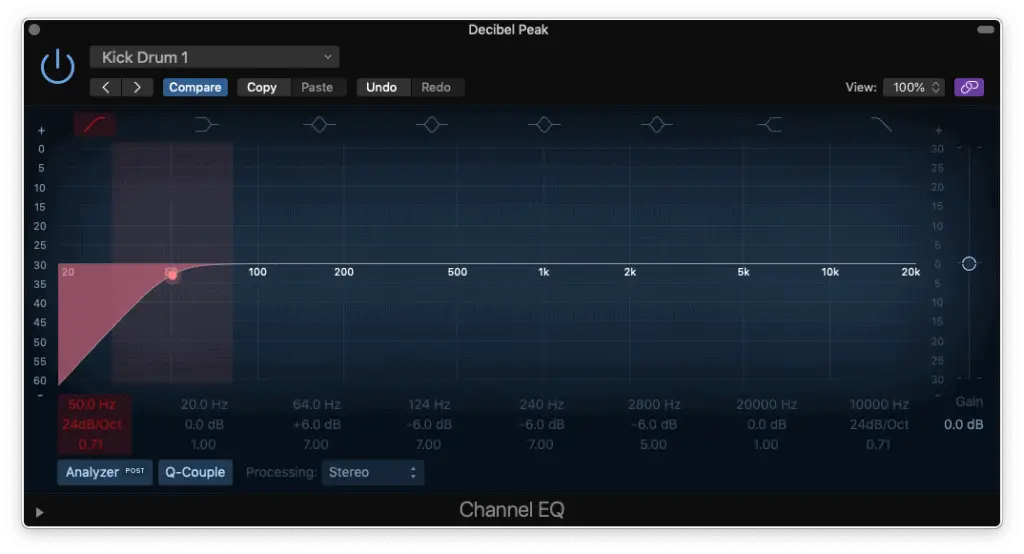
Step 1 – HP Filter around 50 Hz
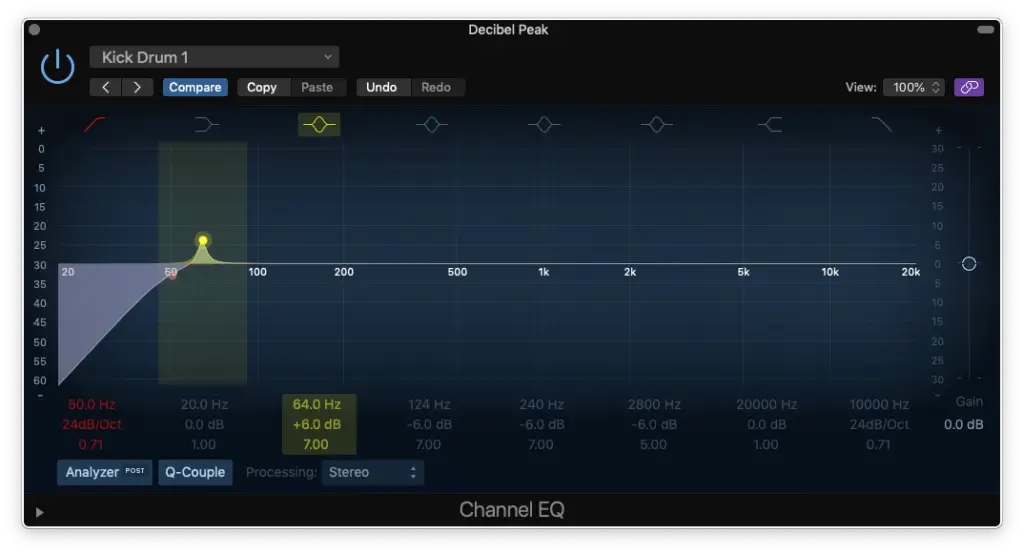
Step 2 – Boost for “Thump” at 60 – 90 Hz
Step 3 – Cut for “Unpleasantness” at 100 – 150 Hz
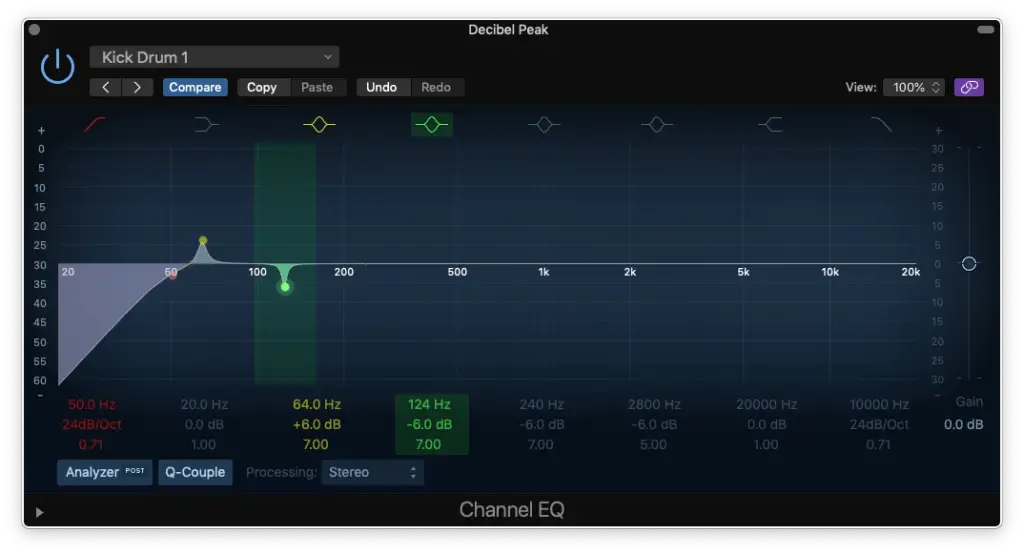
Step 4 – Cut for “Unpleasantness” at 200 – 250 Hz
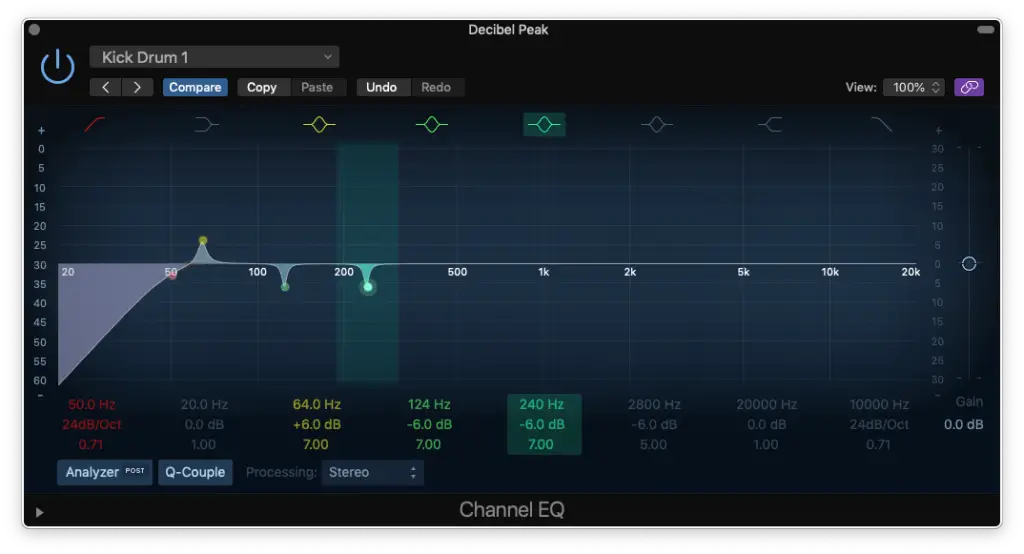
Step 5 – Boost around 1.5 kHz for more “Beater” OR Cut around 2 kHz for less “Plastic”
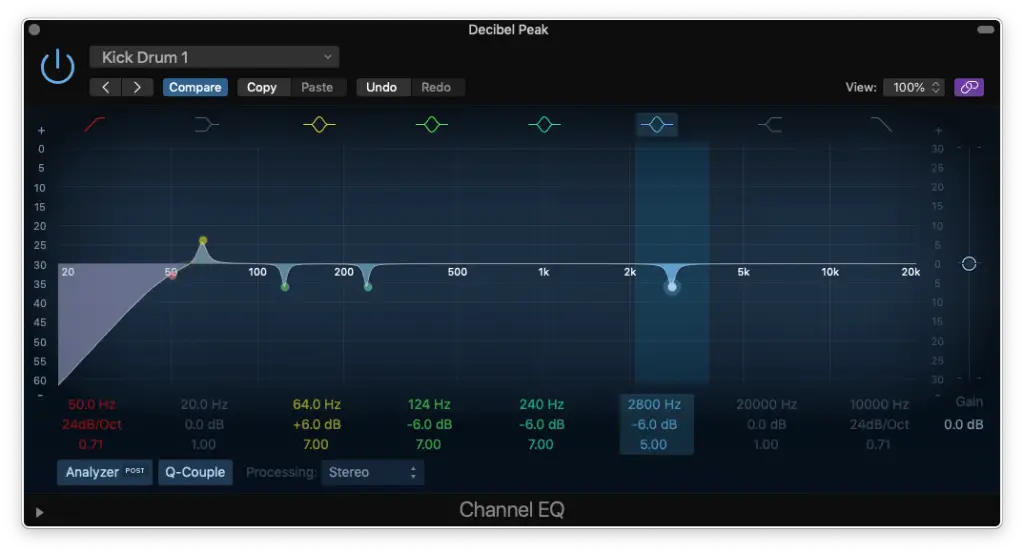
Step 6 – LP Filter around 10 kHz
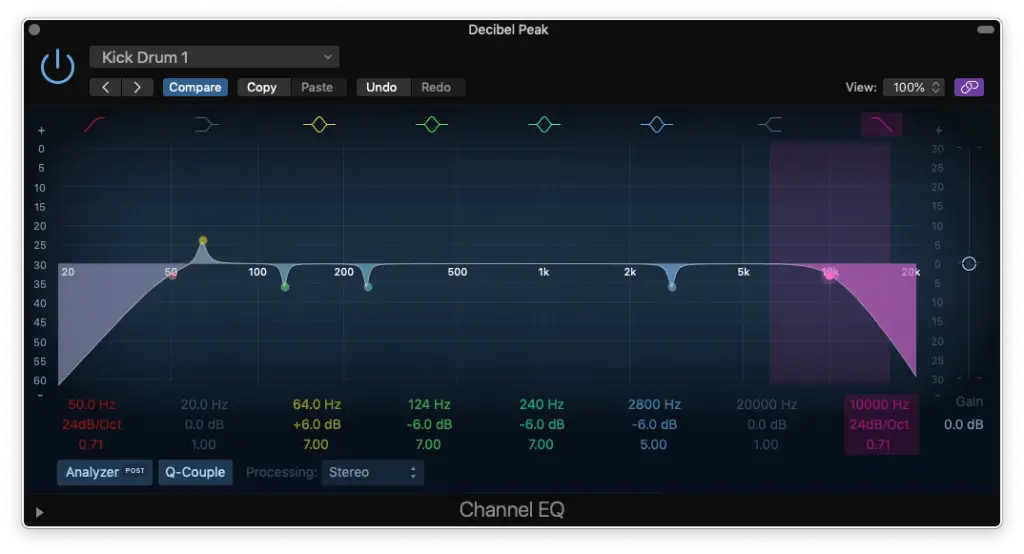
Step 7 – Reduce Gain to Compensate for any Boosting
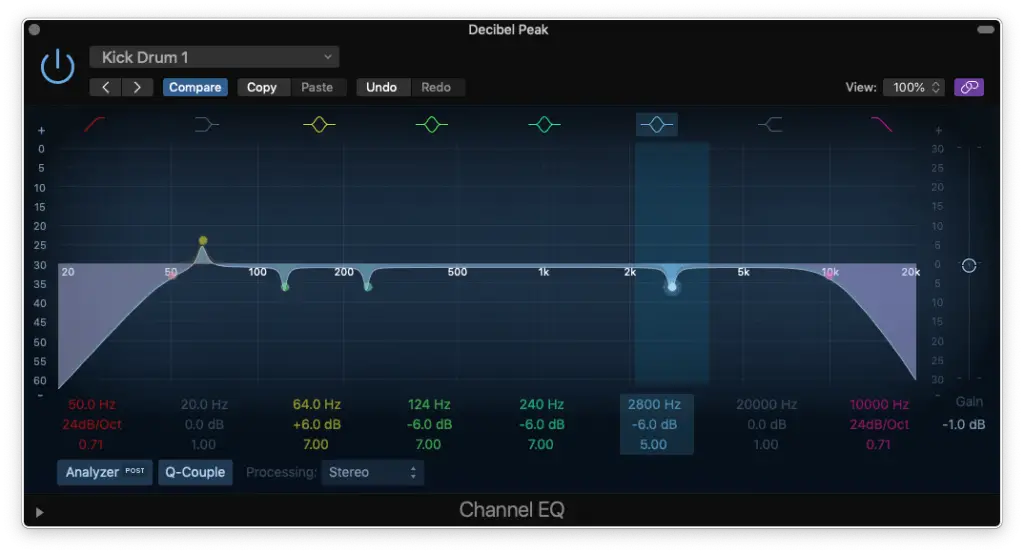
Of course, the exact frequencies I stated won’t apply to every single kick. You’ll need to use your ears and adjust for that.
You’ll also want to widen the “Q” to make your EQ moves sound more seamless (as if we weren’t using a parametric EQ).
How To EQ Snare
It’s the backbone of pretty much every beat you’ve ever heard.
The snare drum is so important that it either makes or breaks a track!
That’s because it’s usually in the “foreground” of our mix and because that, needs special attention.
Let’s listen to the same example as before, but focus on the snare…
Once again, it sounds fine. BUT, will it make the cut?
In this case, probably not! So, we need to give this particular snare more body and more top-end.
That’s what we want to preserve!
Now, let’s isolate it to hear how this snare is transformed from bonely to beastly…
Once again, subtle different. But, you can hear that it sounds fuller.
How did I do it? Let’s follow these steps…
Step 1 – LP Filter at 100 Hz
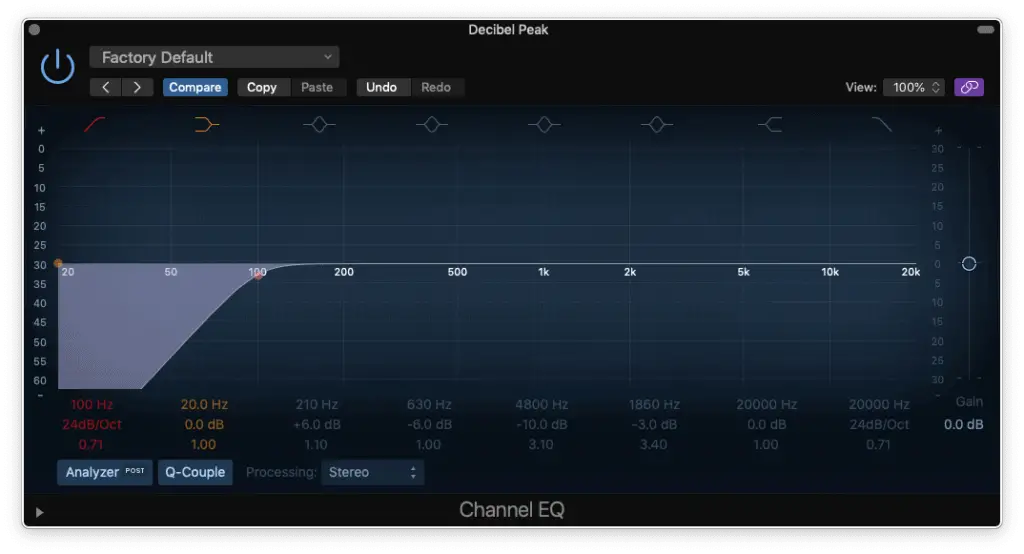
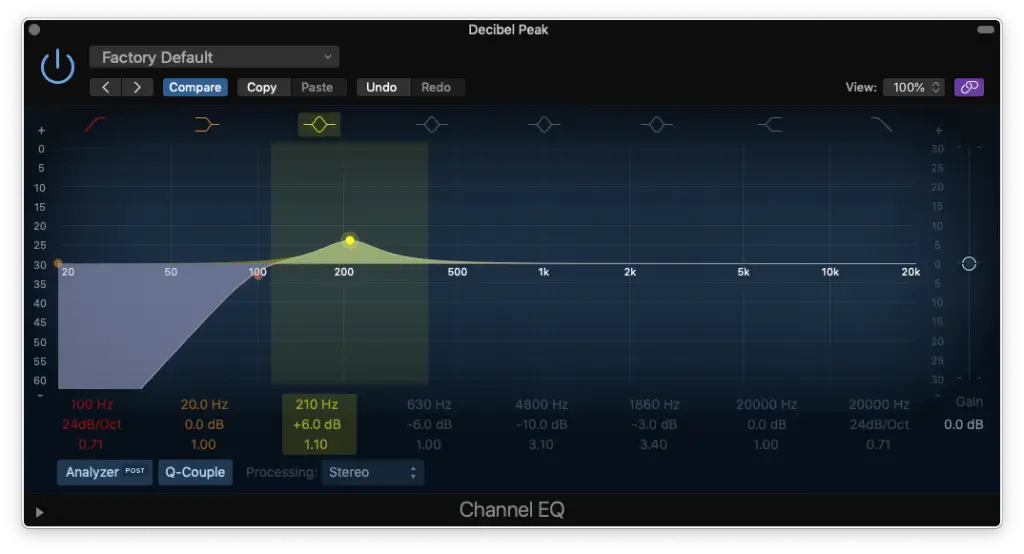
Step 2 – Boost for “Body” at 150 – 250 Hz
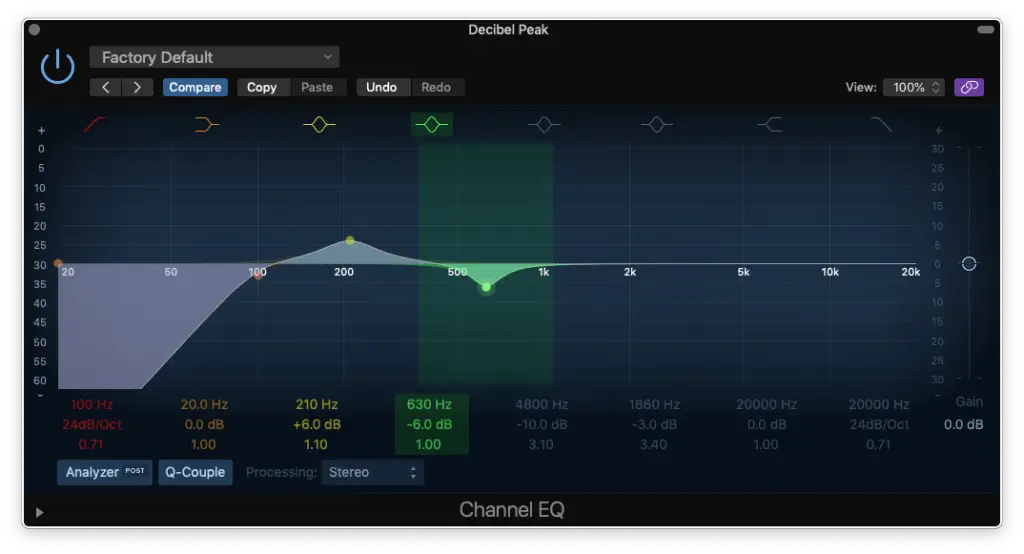
Step 3 – Cut for “Boxiness” at 500 – 800 Hz
Step 4 (optional)
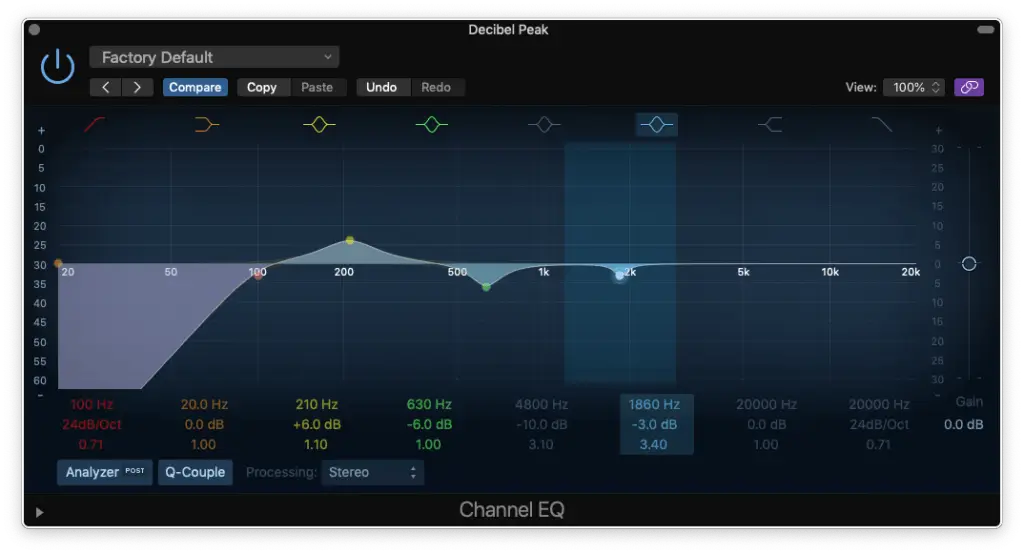
Step 5 – Cut for “Ringing/Whistlin” at 4.5 – 8 kHz
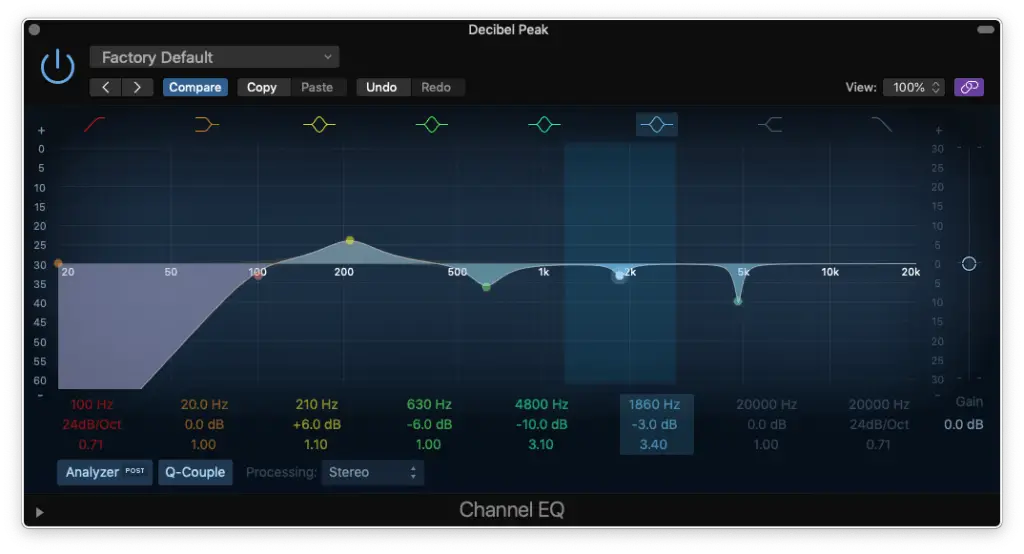
Step 6 – High-Shelf for “Sizzle” at 8 – 10 kHz
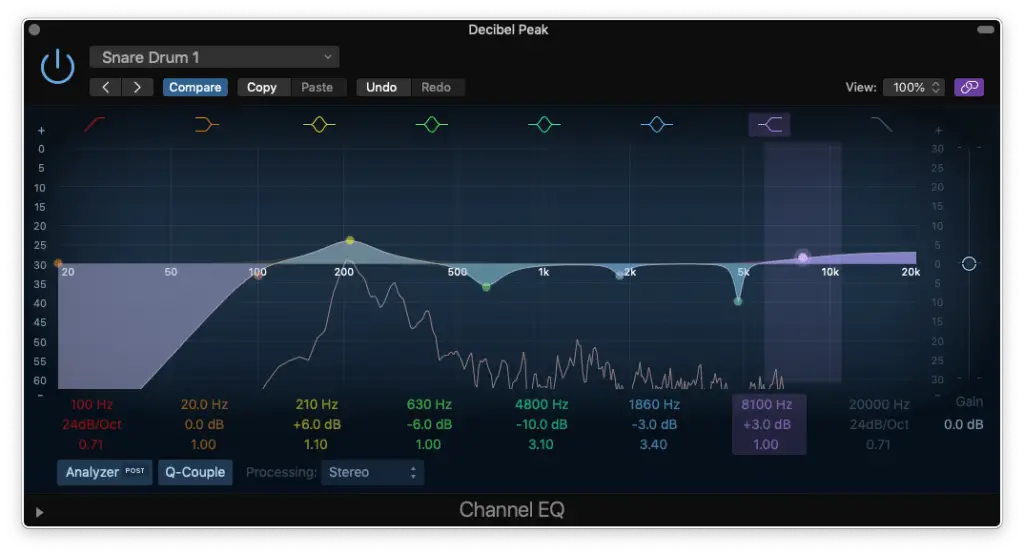
Step 7 – Reduce Gain to Compensate
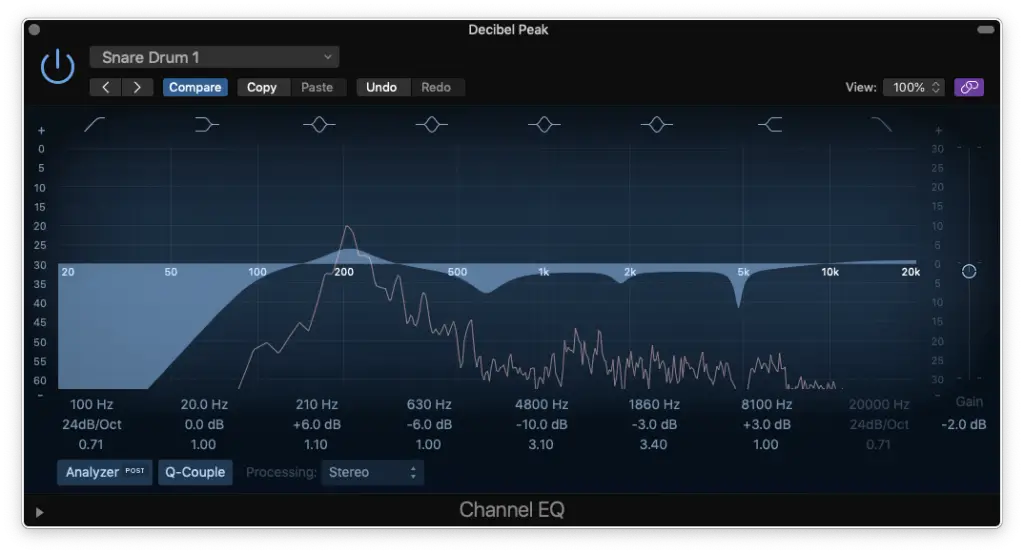
Kick drums are more difficult to discern, but snare drums definitely aren’t!
That being said, you’ll definitely want to treat each snare you work with as its own instrument. Take extra time to tweak the EQ to bring out the things you like and obscure the things you don’t.
Remember, this snare drum is going to the forefront!
Summary: How To EQ Drums
Congratulations on completing your introduction to drum EQ mastery!
In this comprehensive guide, we’ve explored the intricacies of sculpting drums to fit perfectly in any mix.
We began by addressing the age-old debate of subtractive vs. additive EQ, challenging preconceptions and emphasizing the need to wield EQ not merely as a tool for enhancement but as a means to seamlessly integrate drums into the mix.
We stirred the commotion by dissecting the myths surrounding distortion, phase issues, and the age-old question of whether one should refrain from using EQ altogether.
The takeaway? A balanced approach that acknowledges the strengths of both subtractive and additive techniques.
Moving forward, we delved into the toolbox of EQ plugins, acknowledging the prowess of stock options in DAWs like Logic Pro while exploring classic third-party choices like FabFilter Pro-Q 3, Waves SSL G-Equalizer, and Sonnox Oxford EQ.
We deciphered the nuances of parametric and linear phase EQs, empowering you to make informed decisions based on your artistic vision.
Now, as we stand at the crossroads of knowledge and creativity, it’s time to take action!
If you’re eager to amplify your skills and dive deeper into the world of mixing and mastering, consider joining our exclusive online course. You’ll learn how to mix an entire track from drums, to bass, to guitar and beyond.
Click HERE to enroll NOW!! Spaces are limited.
Thank you for reading. Feel free to consult our other guides on mixing and mastering…

