- Using EQ on bass guitar in Logic Pro X
- Using compression on bass guitar in Logic Pro X
- Using reverb on bass guitar in Logic Pro X
- Using sub-mixes to organize your bass tracks in Logic Pro X
- Mixing bass guitar with your kick drum
- Download my signal-chain (presets) for mixing bass guitar
Using compression on bass guitar in Logic Pro X
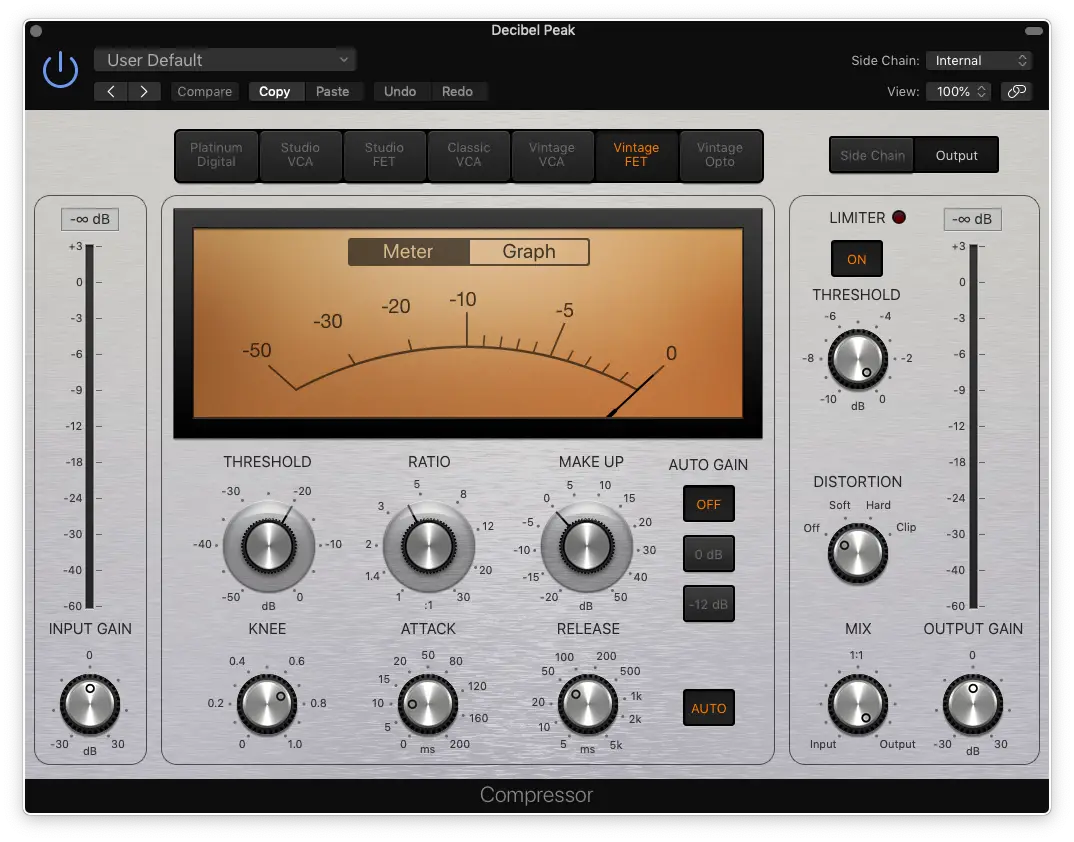
The second plugin in my signal-chain for mixing bass guitar is Logic Pro X’s legendary compressor. It’s actually my favourite “utility” compressor because it literally has EVERYTHING you could ever need from a compressor (and more).

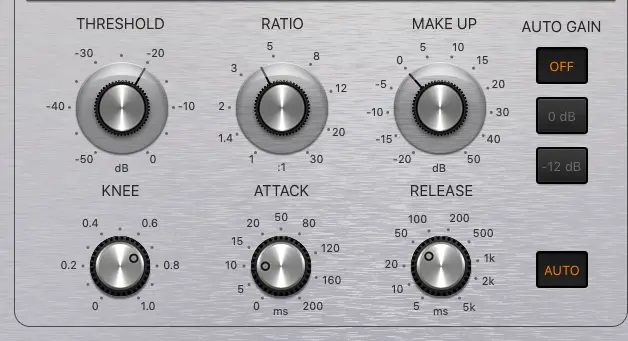
- Step 1: Set ratio to 4:1
- Step 2: Set attack to 10ms
- Step 3: Set release to “auto”
- Step 4: Set make-up gain to 0dB
- Step 5: Set threshold to -20dB
- Step 6: Adjust input gain until 3-6dB of gain reduction is achieved
Here are some of my favourite features:
- Input/Output Gain
- Input/Output Mix
- Distortion/Saturation
The input/output gain is really useful if you recorded your bass guitar too “hot” and want to set your levels right.
The input/output mix basically allows you to parallel compress your bass guitar within the same plugin.
The distortion/saturation is pretty self-explanatory, but it saves us the need to add an additional saturation plugin (which is always appreciated)!
Pretty cool, right?
If you don’t understand what any of that meant, no worries! We’re diving into the essential compression settings that you’ll need to successfully mix your bass guitar in Logic Pro X (or any other DAW).

The first thing I start with is the compression “ratio”.
Now, I like to keep things subtle so I usually work with 4:1 on pretty much everything. I don’t think there’s an ideal compression ratio, but remember that the higher the number (for example, 10:1), the more compressed/unnatural your track sounds.
Once again, I’m sure I’ll have some of you disagreeing with me.
That’s also fine with me, but I prefer to use multiple compressors in stages to achieve my sound. That’s why I’m not too aggressive on each compressor. In other words, you’ll get better results if you use more than one compressor, so don’t push each one too hard.
The next parameter we’ll be looking at is the “attack” time.
I usually work with 10ms for bass guitar, but that’ll depend on the settings you’ll be using for your kick drum. We’ll also be covering that in the section called “mixing bass guitar with your kick drum”, but just remember that they should be different values.
I usually leave the “release” time on automatic (it’s really not important).
I also leave the make-up gain at 0dB (I make adjustments using the output gain if anything).
The only other parameter we’ll be concerned with is the “threshold”. As you’ll realize at some point or another, the threshold is completely relative to the amplitude of your signal.
HOWEVER, I like to make sure I keep it around -20dB while achieving no more than 3-6dB of gain reduction.
If anything, I adjust the input gain to justify my threshold being at -20dB. By using this method on EVERY track, I can guarantee that all my tracks are pretty much the same level after the compression stage. That’s something I didn’t learn in school (or even on the internet)!


