I spent WAY too much time looking up how to use Logic Pro X with Zoom and trying solutions that were either too complicated and/or didn’t seem to work. That’s why I prioritized SIMPLICITY when coming up with my own personal solution to using Logic Pro X with Zoom…
The simplest way to use Logic Pro X with Zoom is to use Loopback by Rogue Amoeba (and/or other similar software).
If I’ve got your attention, here’s what we’ll be discussing:
- The common issues with other “DAW-to-Zoom” solutions
- Modifying your Zoom settings to accommodate Logic Pro X
- Setting up Loopback to route Logic Pro X’s audio to Zoom
- The best alternatives if you can’t use Loopback (for Windows-users)
- The simpler the solution, the better the results
The common issues with other “DAW-to-Zoom” solutions
So, I’ve tried pretty much everything when it comes to routing Logic Pro X (or any other DAW) to Zoom (or any other video conferencing software). It’s the same concept if you’re trying to route your DAW’s audio to another software like OBS.
Anyways, I’d had enough and was looking for something simple and easy to manage.
Here are the issues I was seeking to solve:
- The Zoom audio driver (ZoomAudioDevice) requires your project to be 48KHz
- Using Soundflower/BackHole disables the ability to monitor in-DAW
- Creating aggregate/multi-output DOESN’T actually combine your ins/outs
If you’ve done some trial/error of your own, you’ll most likely understand where I’m coming from with all of these. If you’re just getting started, let’s go over some of the other solutions out there.
Using Zoom’s Audio Driver: One of the most common solutions is simply to use Zoom’s audio driver (which should be installed automatically). It seems simple enough, but the BIG problem is that your DAW/project sample rate needs to be set to 48KHz. If that’s not an issue for you, then look no further. For most of us though, that’s clearly the deal-breaker.
Using Soundflower/BlackHole: If you can’t use Zoom’s audio driver, you can always consider installing virtual audio drivers such as Soundflower/BlackHole. BlackHole just seems to be more reliable nowadays (especially for Zoom), but you’ll still lose the ability to monitor your audio in Logic Pro X because this virtual driver will become your “virtual output”. In other words, your attendees will be able to hear your audio, but you won’t. Lastly, if you’re using a webcam/USB microphone, you’ll need to alternate between both since Zoom doesn’t take multiple inputs.
Creating Aggregate/Multi-Output Devices: This last option seems to be the most popular, but the truth of the matter is that it requires lots of tweaking/setting up and the worst part… It doesn’t even work 100%. What I mean by that is that it DOESN’T actually combine your inputs/outputs into one “master” audio device. It becomes an audio device with multiple inputs/outputs, but it DOES allow for some additional flexibility. If all your audio (including your microphone) will be passing through Logic Pro X, then it’ll be fine. However, if you’re using any other devices for audio (like a webcam/USB microphone), it WON’T WORK. It’s also a pain to set up and requires you to constantly modify your DAW’s settings and to create “sends” just to have your audio routed properly (it’s very difficult to manage, especially with projects you’ve already created).
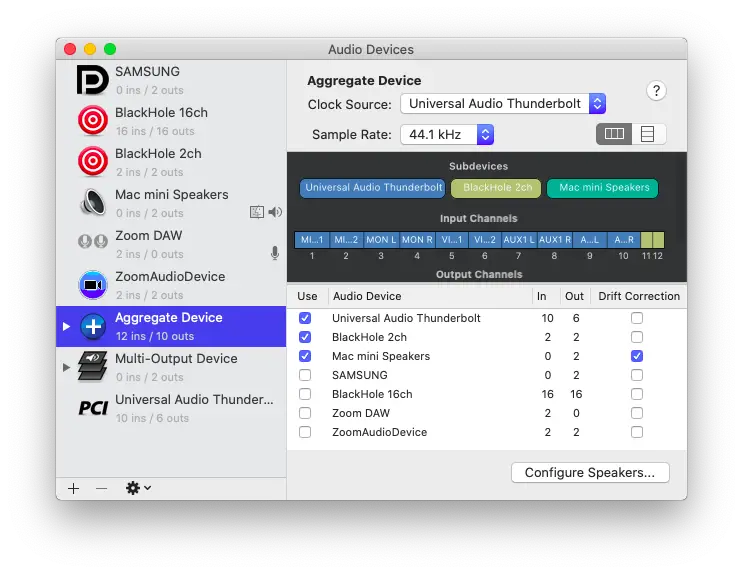
Most of the guides/tutorials I’ve read and seen talk about using aggregate/multi-output devices.
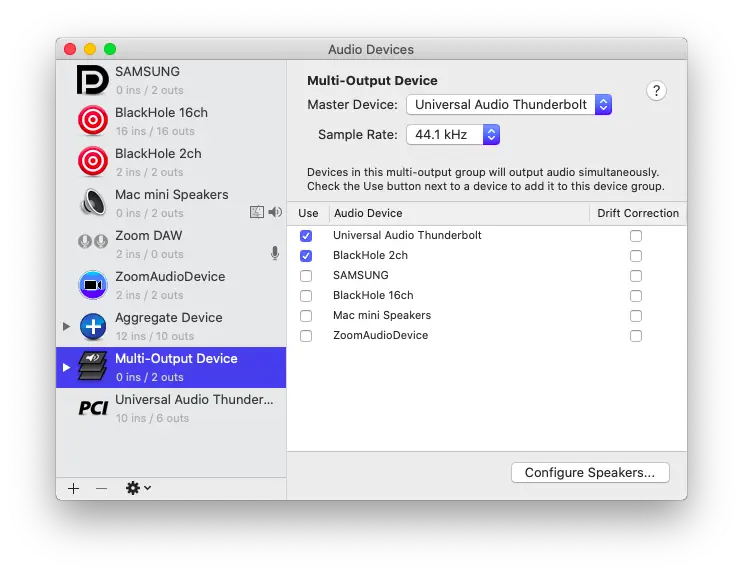
It makes me wonder if these individuals actually use Logic Pro X with Zoom on a daily basis (or professionally)…
I’d lose my mind configuring/re-configuring everything before/after meetings and depending on the type of setup you’re going with, it might be different each time.
If something went wrong during the meeting, it’d be very difficult to fix the issue without cancelling the meeting altogether.
That’s not something you want to worry about if your attendees are paying!
Maybe I’m making it sound more complicated than it actually is…
However, there’s likely a reason why it didn’t work for me and why YOU’RE still searching for answers!
Let me put your mind at ease; the method I’ll be suggesting requires very little preparation. All you’ll need is the piece of software and you can leave your Logic Pro X settings AS IS. It’ll be like nothing’s changed except you’ll have complete control of where your audio is routed.
Before getting into that though, we just need to make sure Zoom is optimized for stereo/high-quality audio.
That’s the one bit of information I found that seems to be pretty much universally accepted!
Modifying your Zoom settings to accommodate Logic Pro X
Did you know that some settings are actually hidden in your Zoom application? To enable these “hidden” options, you’ll need to log in to your Zoom account on your browser (not the app).
By enabling these options, you’ll have the ability to stream audio in stereo and in high-quality.
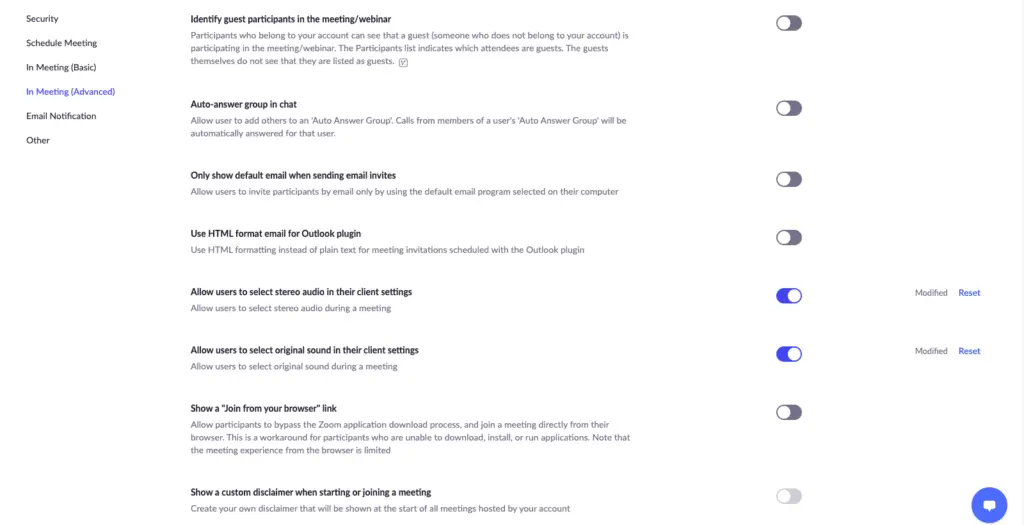
Step 1: Under “Settings/In-Meeting (Advanced)”, you’ll want to enable “Allow users to select stereo audio in their client settings” and “Allow users to select original sound in their client settings”. That’s it!
Step 2: In your Zoom application, you’ll have uncovered some hidden settings under “Audio/Music and Professional Audio”. Enable all of them!
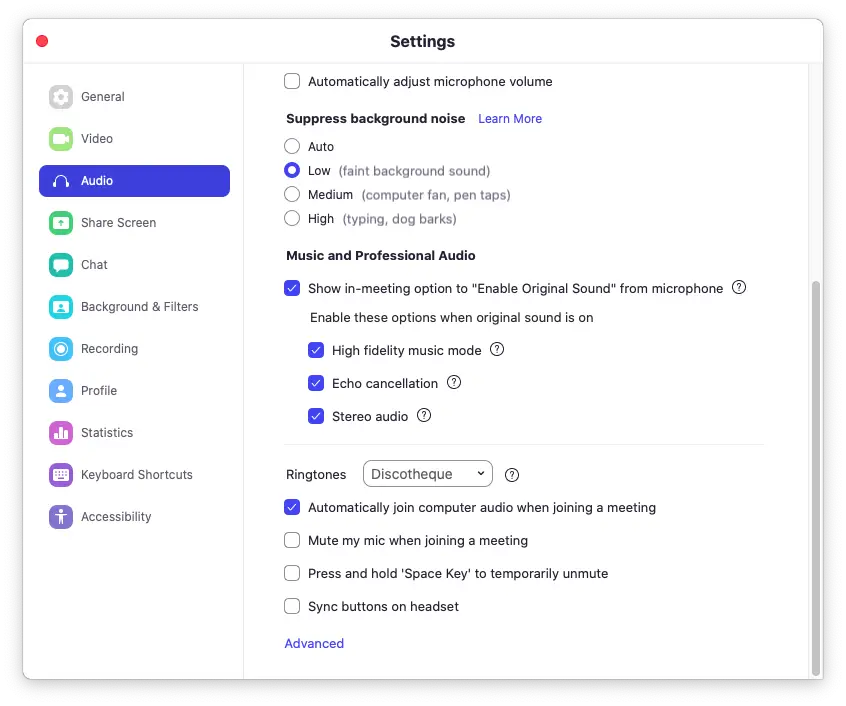
Step 3: Depending on the method you’ll use, I personally recommend disabling “Automatically adjust microphone volume” and setting “Supress background noise” to Low.
That’s pretty much it!
You’ll now be capable of streaming high-quality audio in stereo regardless of the method you chose to go with. The final step is usually necessary, otherwise your non-voice audio will be filtered as if it were background noise (I don’t know why).
If you came here to simplify your life though, the next section is what this guide is all about!
Setting up Loopback to route Logic Pro X’s audio to Zoom
As I mentioned earlier, the simplest way to use Logic Pro X with Zoom is by installing Loopback by Rogue Amoeba. It’s an incredibly light-weight and elegant application designed to assist you in routing audio from just about any sound source (internal and/or external).
The best part is that it provides visual feedback, so you can see exactly what you’re doing (and hear what you see).
Think of Loopback as the definite mixing console for your entire computer! However…
- Loopback is available for MacOS exclusively (we’ll be discussing alternatives later)
- Loopback ISN’T FREE, but it can be used without a license for up to 20 minutes (I’m sure you can think of a workaround)
That last point is important because you can in fact use it for 20 minutes (then restart it) before the audio quality begins to degrade. I don’t recommend doing this though… I recommend purchasing this high-quality piece of software (no affiliation, just love it) because of the TIME AND HEADACHE it’ll save you.
If it’s too expensive for you, then you’re most likely not using Logic Pro X and Zoom professionally. In that case, you’ll want to consider the provided alternatives in the next section.
That goes for you Windows-users as well (you brave souls).
NOW, let’s solve the problem in LESS THAN 1 MINUTE. READY?!
Step 1: Once you open the application, simply rename the default virtual device to something you’ll recognize (I used “Zoom DAW”).
Step 2: Delete the audio Pass-Thru.
Step 3: Add your audio sources. I personally don’t recommend adding Logic Pro X (or any other DAW) to the list. That’ll require you to change your in-DAW settings. Instead, I route the audio from my audio interface (because that’s what I use to make music) which has many different virtual outputs. Your audio interface might be different, so play something in your DAW to see which ins/outs have activity. Lastly, you can add your webcam/USB microphone to the list.
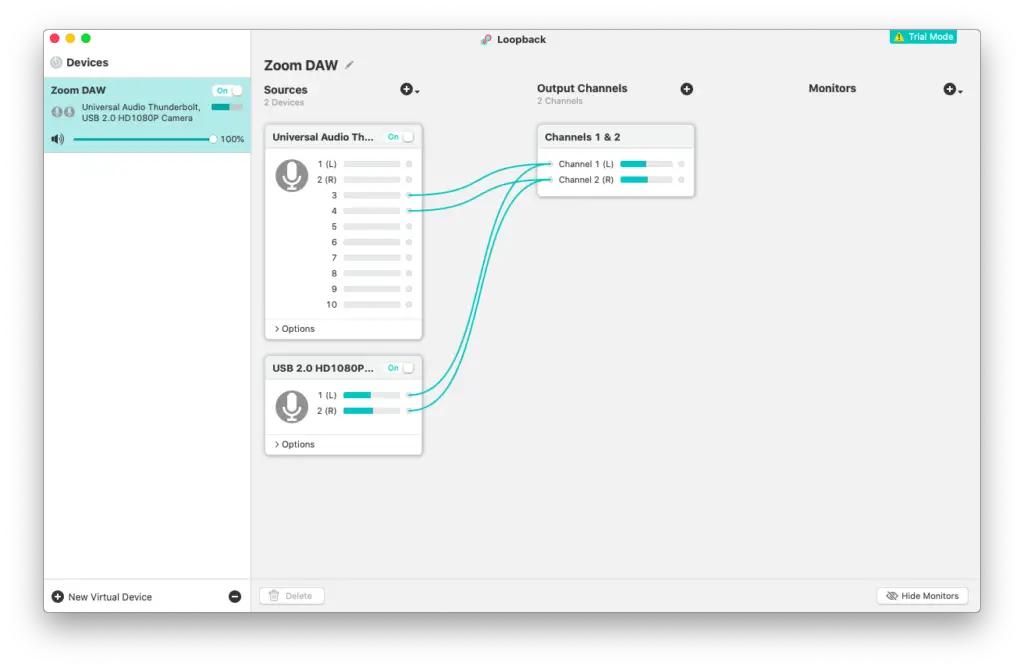
Step 4: In Zoom, simply select your newly created audio device for Microphone ONLY. You can set the speaker output to whichever device you’ll be using (audio interface in my case).
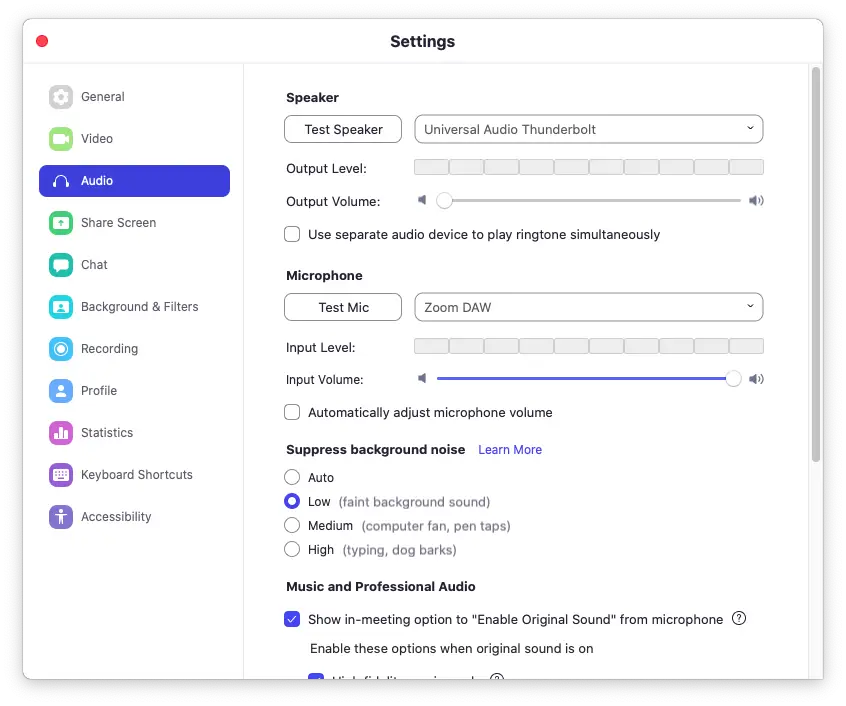
And there you have it!
If you haven’t realized, the main difference with this type of software is that it actually COMBINES/MIXES your different audio sources into ONE. Aggregate devices created with Audio Midi Settings don’t accomplish the same thing.
That’s why you’ll have to (at best) alternate between your devices during the Zoom meeting.
By using Loopback by Rogue Amoeba, everything is ready to go once you launch the application. If you ever need to make changes during the Zoom meeting, you can see how simple that would be.
The interface is super clean and user-friendly!
What about some alternatives though?
The best alternatives if you can’t use Loopback (for Windows-users mostly)
If you’re looking for a FREE alternative to Loopback that works on both Mac and Windows, you’ll want to check out VoiceMeeter by VB-Audio. It’s the best one I found.
However, you can actually “name your price” if you want to support the developer!
Similar to Loopback, it’s basically an internal audio mixer that takes audio from internal/external sources. It then combines them and allows you to create virtual outputs.
For example, one of these outputs can go to your headphones while the other goes to Zoom (or any other video conferencing software).
If you’re looking for something with more functionality though (especially if you’ve got some type of podcasting/broadcasting setup with many external devices inter-linked), you might want to consider Dante Via.
It’s not free, but you can try it for 30-days.
It’s mainly if you’ll need to route audio from one (or many) computers to another. They also sell the hardware you’ll need to make that happen.
This falls more into the “audio networking” realm though.
I’ll keep looking and update this post if I find any other options. If YOU find any other options, please let us know in the comments! For now though, VoiceMeeter seems to be the best FREE alternative for Mac/PC users.
Basically, you need an internal audio mixer.
FYI: UAD’s Console won’t work with devices other than their own, so that’s not an option (I use it, so I know).
The simpler the solution, the better the results
If you take one thing from this guide, it’s this… Use Loopback (or VoiceMeeter) to use Logic Pro X with your Zoom meetings. Everything else was simply to illustrate all the stress/hassle I went through to come to this solution (minus the instructions, of course).
This 5-10 minute read hopefully saved you HOURS of stress and research.
I still wanted you to be aware of the other options though. You’re more than welcome to try them out (maybe they’ll meet your needs), but just know that my way is definitely the simplest.
If you’re as busy as I am, then you most likely prioritize simplicity/minimalism.
That’s why I stopped using Windows and started using hardware/software that SIMPLY WORKS!!
I came to this world to make music and at most, to teach it.
If you came to this world to create unnecessary problems for yourself, then this website is most likely not for you… If I can help make your life SIMPLER though, feel free to reach out! If you’re having difficulty setting up Loopback, ask away in the comments!
I also want to hear about your successes and findings. Is there a simpler fix than this one?
Thanks for reading, I hope you get where I’m coming from. I just want all of us to keep doing what we love (and do more of it) minus the stress. Now go out there and make some music!








8 thoughts on “The Simplest Way To Use a DAW With Zoom”
Dear Stefan,
I am almost there yet – but your advice is golden in any case!
Got Loopback, and although I didn’t understand what I was doing I fiddled around with it. Now I do have the output from Logic together with my USB headset mic as input into Zoom – marvellous!
There’s just a little “latency/feedback” now when I use the USB headset as “speaker” in Zoom, but that’s minor, and if my students don’t have that (which they don’t, the Zoom recording has a clear audio without that little latency of my voice) then I’m fine…
Thanks a bunch for taking the time to explain all that for us n00bies out there… 😉
Best,
Jörg
Hey Jörg,
I’m so glad to hear that it worked out! The setup took a little while for me too at first.
Once you get it done once though, you’re set for life!
It’s my pleasure, keep me posted if you ever need assistance with anything else.
Thanks for stopping by, take care 🙂
– Stefan
Hi Stefan,
Thank you for writing this article. I am able to have logic output audio through Zoom, however, my problem is latency. Have you found a solution for that other than Loopback? Will Loopback take care of this problem?
Thank you so much in advance for any feedback!
Lourdes
Hey Lulu!
The person on the other end will always experience some form of latency because of the internet. If you’re talking about just the audio latency though, Loopback essentially routes your audio where you need it to go. It doesn’t add or remove latency, it simply redirects your audio.
If you have more information, that would help me assess your situation and to better guide you.
Thanks for reading, glad you enjoyed the article!
– Stefan
Hi Stefan, thanks for all this info. Although, it hasn’t quite worked for me…
I followed the steps and it all looks right, however the audio being sent to Zoom via my ‘Zoom DAW’ virtual device is not being effected by Logic Pro – which is my sole driver for doing this. I want my students to hear my electric guitar WITH effects added as it passes through Logic.
However, by telling my Zoom DAW that my source is my Focusrite interface, it’s simply passing on the raw signal from the interface input…
What am I missing here?
Hey Danny!
In your case, you’d need to route the audio from the Logic Pro app and not your audio interface.
I’m using a UAD audio interface so it might be different.
Basically, the Loopback app allows you to route audio directly from other apps too. Have you tried doing it that way?
Otherwise, you might need to configure your virtual outputs from Logic Pro itself.
Let me know where you’re at and I’ll try guiding you with the information you give me. Thanks!
– Stefan
I appreciate this great simple instruction page! It worked so simply. I did buy the Loopback app because I also use extended midi setups. It will help a lot with that as well as the VO session I have between where I am in Thailand and the UK today.
Thanks!
Hey Daniel,
I’m glad to hear that it made your life simpler!
Yes, the Loopback app has lots of uses outside of what’s discussed in the article. It sounds like you’ve already got a great understanding of how to use it. Keep up the good work!
Thanks for stopping by.
– Stefan