You’ve heard all about the benefits of using impulse responses and now you want in!
Good news, it’s actually SUPER easy to get started with impulse responses… All you need is an electric guitar, an audio interface and some plugins.
If you’re missing anything, make sure to read THIS ARTICLE before moving on.
Once you’ve got your materials though, you’ll only be missing an actual impulse response.
I’ll be showing you where to get them (some are FREE), how to make your own (if you want) and recommending some useful tools along the way!
BUT first, let’s start by getting an understanding of impulse responses…
- Impulse Responses: What are they and how do they work?
- How To Use Impulse Responses on Electric Guitar
- How To Create Your Own Guitar Cab Impulse Responses
- Where To Download FREE Impulse Responses
- Summary: Beginner’s Guide to Impulse Responses for Electric Guitar
Impulse Responses: What are they and how do they work?
Perhaps you’ve only recently heard of impulse responses, but they’ve been around!
The term “impulse response” is general and simply refers to an electrical measurement, so we need to specify whether it’s the impulse response of any of the following…
- Amplifier
- Speaker Cabinet
- Microphone
- Acoustic Space
In the sound realm, an impulse takes the form of a silent .wav file that needs to be interpreted.
Nowadays, guitarists usually use impulse responses to replace guitar cabs.
Some even replace guitar amps altogether! When profiler amps were introduced (like the Kemper Profiler), you could essentially “steal” the tone of any guitar amp and/or cabinet.
Pretty cool, right? That’s the potential of impulse responses!
It’s much more common to use impulse responses to emulate speaker cabs and/or acoustic spaces though. The impulse response of an acoustic space is sometimes referred to as “convolution reverb”.
Keep reading to find out how to use IRs for electric guitar, how to create them and where to find them…
How To Use Impulse Responses on Electric Guitar
You knew that you could use impulse responses on anything. Right?
Electric guitar is a popular choice because of the impulse response community built around it, but every instrument that uses a speaker cabinet could definitely benefit.
Traditionally, it was only possible to load impulse responses using profiler amps…
Well nowadays, you can easily load impulse responses using plugins…
- Space Desginer (included w/ Logic Pro X)
- LeCab2 by LePou (FREE)
- Pulse by Lancaster Audio (FREE)
- Impulsive by 3 Sigma Audio
- IR Loader Impulse Response Tool
If you’re looking for the most cost-effective solution though, you’ll definitely want to use a plugin.
However, that might not be an option if you’re not working out of a DAW. For example, if you’re using impulse responses during a live performance.
Regardless, the steps to load an impulse response are relatively the same.
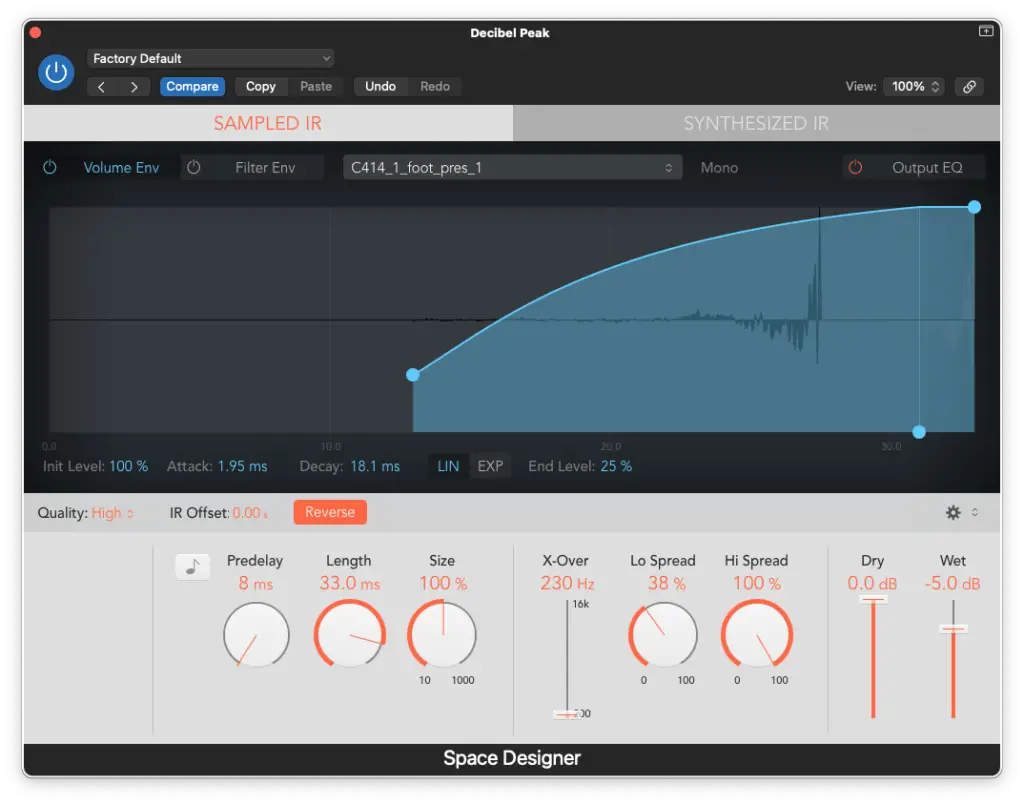
I’m going to demonstrate using Space Designer (which is included with Logic Pro X)…
Step 1
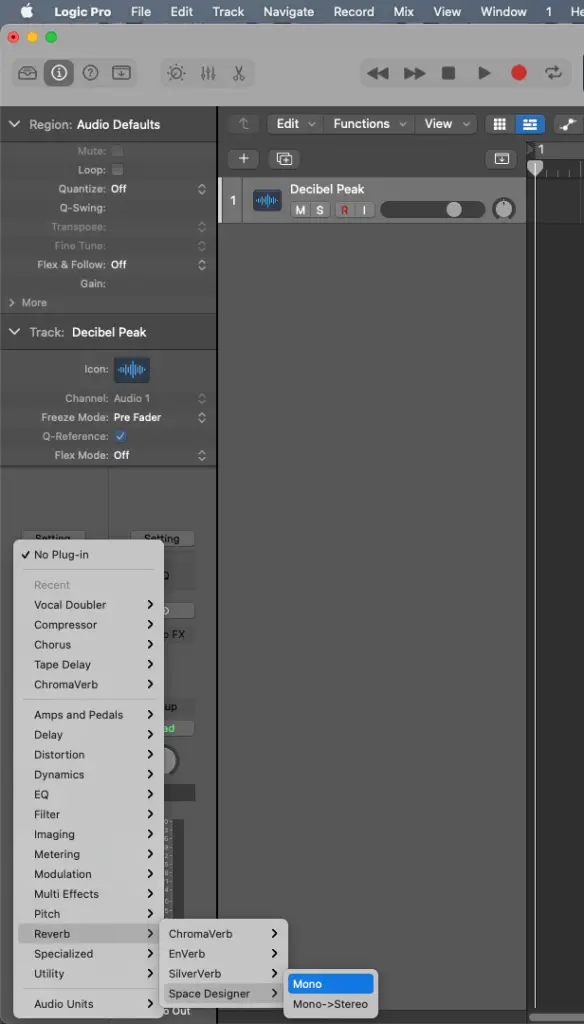
Step 2
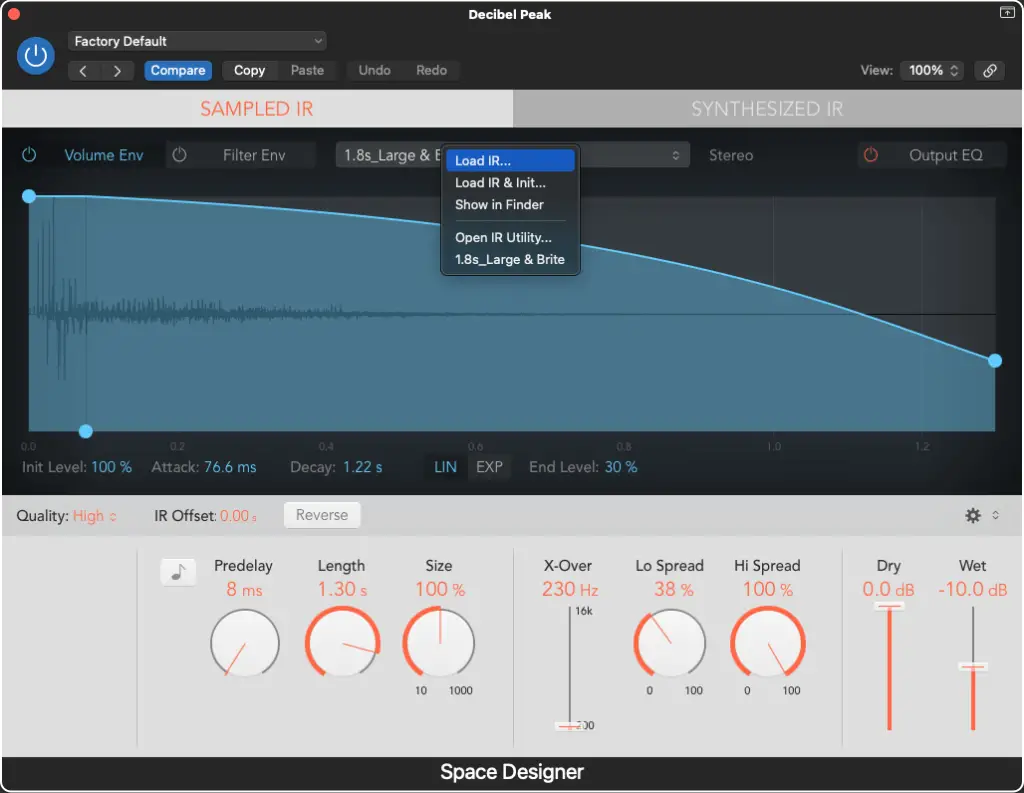
Step 3
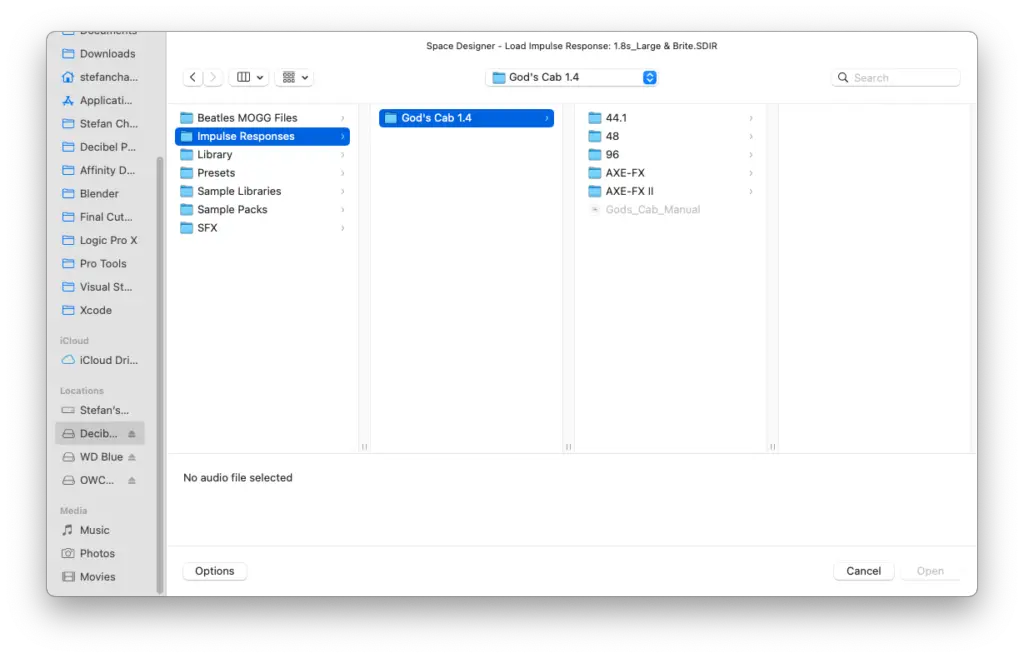
Step 4
How To Create Your Own Guitar Cab Impulse Responses
It’s not that difficult to create an impulse response, but it’s definitely complicated in theory!
To simplify it, here’s what you’re going to need…
- DAW
- Audio Interface
- Power Amp (ideally, not a guitar amp)
- Speaker Cabinet
- Microphone
It’s important to point out at the choice of speaker cabinet, microphone and microphone placement IS what determines the sound of your impulse response.
You COULD use a guitar amp instead of a power amp, but the sound will be slightly coloured by the guitar amp (i.e. not 100% pure).
If you’ve got all that though, here are the steps…
Step 1
Create 2 audio tracks in your DAW (“white noise” and “IR”).
Step 2
Generate or import white noise onto “white noise”.
Step 3
Cut the white noise to EXACTLY 1 sample (you’ll have to zoom in quite a bit).
Step 4
Route “white noise” to an output on your audio interface.
Step 5
Route the output on your audio interface to your power amp/guitar amp.
Step 6
Route the output on your power amp/guitar amp to your speaker cab.
Step 7
Route your microphone to the input on “IR”.
Step 8
Place the microphone as you would if you were tracking electric guitar.
Step 9
Record on the “IR” track.
Step 10
Export EXACTLY 1 sample of “IR” (where the “blip” lines up on both tracks).
Step 11
Import the impulse response into an IR loader and test!
Where To Download FREE Impulse Responses
Here are some great places to get FREE impulse responses…
- Forward Audio – Free Impulse Responses
- Redwirez – FREE Marshall 1960 IRs
- Wilkinson Audio – God’s Cab (my favourite)
- Celestion Plus – Cenzo Townshend IR Mix
- Line 6 – Allure Pack IRs
- Soundwoofer – Impulse Response Library
Summary: Beginner’s Guide to Impulse Responses for Electric Guitar
Impulse reponses are more than just emulations, they’re also powerful mixing tools.
Seriously, there are things you simply cannot do with EQ alone. Impulse responses can save your mix if ever you find that a particular track is coming in too dark or too bright.
Remember, you can use them on pretty much ANY instrument (not just electric guitar).
Of course, the impulse responses we covered today are designed for electric guitar.
I just wanted to take this opportunity to open your mind (and ears) up to the possibilities that impulse responses can bring to your music production workflow.
It all starts with an IR loader which can easily be downloaded for FREE.
I highly recommend building yourself a small library of impulse reponses using the resources I covered and working your way up from there.
So, I hope you enjoyed learning about impulse reponses for electric guitar. Let me know if you have any questions or requests for future articles down in the comments!
If you want to learn more about recording electric guitar at home, check out…
Related Articles
- 5 Professional Techniques for Recording Electric Guitar at Home
- How To EQ Electric Guitar in Logic Pro X (w/ Presets)
- How To Record Electric Guitar Without Noise
- How To Record Bass With a Guitar
Sources
https://en.wikipedia.org/wiki/Impulse_response
https://blog.andertons.co.uk/learn/what-is-a-guitar-amp-impulse-response
